
Setting up and using Microsoft Teams
There are two ways to use MS Teams with pickAtime
Method 1: Enable MS Teams Integration (Auto-Generated Unique Links)
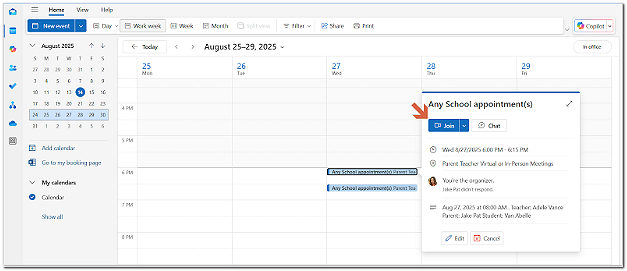
Each appointment receives a a unique MS Teams link link that is automatically generated and sent to both parent and teacher. Please ensure that Microsoft Teams is enabled for your organization's users; otherwise, virtual meetings won't be created.
- Have your teachers sync their Outlook Calendar using the instructions here.
- Enable MS Teams
- Go to Settings / UI Setup / Advanced Settings.
UnderUnder Online Meeting Provider,selectselect MS Teams.- Use Virtual Appointment Types
- MS Teams links are only generated for appointments of
type Virtual ortype Virtual or Virtual/In-Person. - Email Configuration
- Go
toto Settings / Notification Setup. CheckCheck the Send confirmation email option.- Enable “Insert Printable Schedule as Body” to include the $(ROOM) macro (MS Teams link).
- Optionally, you may need to change the virtual event column header to say MS Teams.
- Customize Calendar Notifications
- To edit the details of the notification that
thethe parent/participantthethe Settings / NotificationSetupSetup page.SelectSelect Calendar Event Notification, and then you can edit the Title (this is the header), the Description (the message in the calendar), and the Location*. - To edit the details of the notification that
thethe teacher/providerreceivesreceives in their calendar, go tothethe Settings / NotificationSetupSetup page. Selectthethe Resource Notification Email, and then you can edit the Subject and the Confirmation Email Body.
Notes
You need to have a Microsoft Business Account and an MS Teams License for Teachers
- Teachers must have a Microsoft Business account and an active MS Teams license within their organization.
- To verify and activate the MS Teams license:
- Sign in
toto https://admin.microsoft.com/. - On the homepage, go to
the Usersthe Users section and select the teacher’s account. ClickClick Moreactionsactions andchoosechoose Manage product licenses.- In
thethe Licenses andAppsApps window, ensurethethe MSTeamsTeams app is checkedunderunder Apps. IfIf MSTeamsTeams is unchecked, activate it andclickclick Save Changes.
- Sign in
Additional Notes
- Parents must log in to MS Teams to join meetings.
- For updating time zones,
contactcontact support@pickatime.com - Until a real MS Teams link is generated, a placeholder 'pickAtime' link appears.
Online Meetings Page Guide
This page helps Admins monitor the status of of MS Teams link generation and teacher calendar syncs. It’s essential to ensure that every virtual appointment is properly linked when using the MS Teams Integration.
Sections on the Online Meeting Page
1. Online Meeting Sync
- Shows appointments with still generating MS Teams links.
- Note: Link generation may take up
toto 40 minutes. - The links
willwill disappear from this section once the link is created and detected.


2. Online Meeting Issues
- This section lists teachers/resources that do not have meeting URLs.
- The system will
giveprovide the relevant meeting information.
3. Calendar Link Setup Status

This section will show you if the teacher has synced their account or not and offers you the option to log in as the teacher directly from this page.
Export Setup
- Checked when:
- The teacher has synced the MS Calendar account on the Calendar Sync page in the Admin UI.
- Selected a default calendar.
ClickedClicked Save and Sync.
- Missing
checkcheck = Teacherhashas notcompletedcompleted calendar sync.
Import Setup
- Checked if the teacher opted
toto block off times in pickAtime from MS Calendar. - Not recommended for teachers.
Important Admin Tips
TeachersTeachers must have a Resourceassignedassigned to their contact recordsandand time slots with the appointment type virtualcreatedcreated to appear on this page.- After enabling the Online Meeting Provider: MS Teams, always check the Online Meeting Links page (left-handed dashboard).
- Use it
toto identify any missingURLs andURLs and verify teacher sync status.
- Use it
- If links don’t generate after 40 minutes, confirm:
- The teacher has completed sync (Export Setup is checked).
- The appointment was created
as Virtual oras Virtual or Virtual/In-Person.
Still No Link?
It might be due to:
- The time zone was recently changed
- There’s an error in the system
Contact: support@pickatime.com
{{@244#bkmrk-method-2%3A-manual-set}}
{{@244#bkmrk-best-for%3A-teachers-w}}
{{@244#bkmrk-google-zoom-teams-go}}
{{@244#bkmrk-step-1%3A-initial-even}}
{{@244#bkmrk-you-must-first-enabl}}
{{@244#bkmrk-enable-appointment-t}}
{{@244#bkmrk-step-2%3A-adding-the-l}}
{{@244#bkmrk-choose-one-of-the-fo}}
{{@244#bkmrk-option-a%3A-manual-ent}}
{{@244#bkmrk-final-step%3A-ensure-l}}
{{@244#bkmrk-to-ensure-participan}}
{{@244#bkmrk-go-to%C2%A0events-managem-1}}
{{@244#bkmrk--5}}
{{@244#bkmrk-this-is-a-%22smart-mac}}
{{@244#bkmrk-important}}
{{@244#bkmrk-do-not%C2%A0enable-the-ms}}