
Setting up and using Microsoft Teams
There are two ways to use MS Teams with pickAtime
Option 1: Enable MS Teams Integration (Auto-Generated Unique Links)
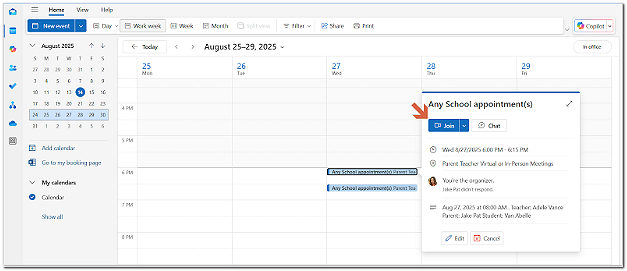
Each appointment receives a unique MS Teams link that is automatically generated and sent to both parent and teacher. Please ensure that Microsoft Teams is enabled for your organization's users; otherwise, virtual meetings won't be created.
- Have your teachers sync their Outlook Calendar using the instructions here.
- Enable MS Teams
- Go to Settings / UI Setup / Advanced Settings.
- Under Online Meeting Provider, select MS Teams.
- Use Virtual Appointment Types
- MS Teams links are only generated for appointments of type Virtual or Virtual/In-Person.
- Email Configuration
- Go to Settings / Notification Setup.
- Check the Send confirmation email option.
- Enable “Insert Printable Schedule as Body” to include the $(ROOM) macro (MS Teams link).
- Optionally, you may need to change the virtual event column header to say MS Teams.
- Customize Calendar Notifications
- To edit the details of the notification that the parent/participant receives in their calendar, go to the Settings / Notification Setup page. Select Calendar Event Notification, and then you can edit the Title (this is the header), the Description (the message in the calendar), and the Location*.
- To edit the details of the notification that the teacher/provider receives in their calendar, go to the Settings / Notification Setup page. Select the Resource Notification Email, and then you can edit the Subject and the Confirmation Email Body.
Notes
You need to have a Microsoft Business Account and an MS Teams License for Teachers
- Teachers must have a Microsoft Business account and an active MS Teams license within their organization.
- To verify and activate the MS Teams license:
- Sign in to https://admin.microsoft.com/.
- On the homepage, go to the Users section and select the teacher’s account.
- Click More actions and choose Manage product licenses.
- In the Licenses and Apps window, ensure the MS Teams app is checked under Apps.
- If MS Teams is unchecked, activate it and click Save Changes.
Additional Notes
- Parents must log in to MS Teams to join meetings.
- For updating time zones, contact support@pickatime.com to request a 'Force Update Appointments'.
- Until a real MS Teams link is generated, a placeholder 'pickAtime' link appears.
Online Meetings Page Guide
This page helps Admins monitor the status of MS Teams link generation and teacher calendar syncs. It’s essential to ensure that every virtual appointment is properly linked when using the MS Teams Integration.
Sections on the Online Meeting Page
1. Online Meeting Sync
- Shows appointments with still generating MS Teams links.
- Note: Link generation may take up to 40 minutes.
- The links will disappear from this section once the link is created and detected.
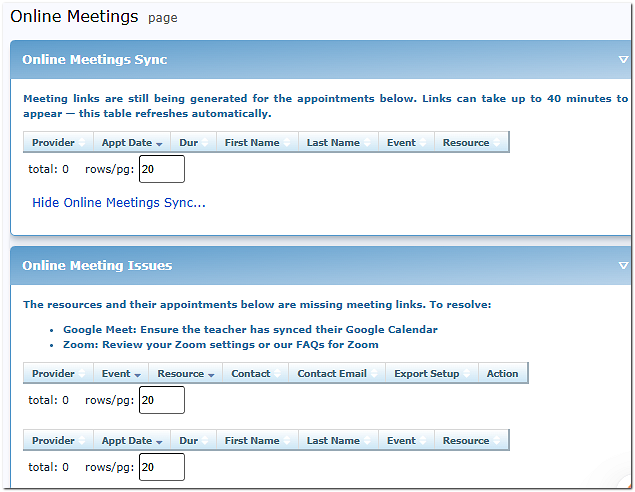
2. Online Meeting Issues
- This section lists teachers/resources that do not have meeting URLs.
- The system will give the relevant meeting information.
3. Calendar Link Setup Status
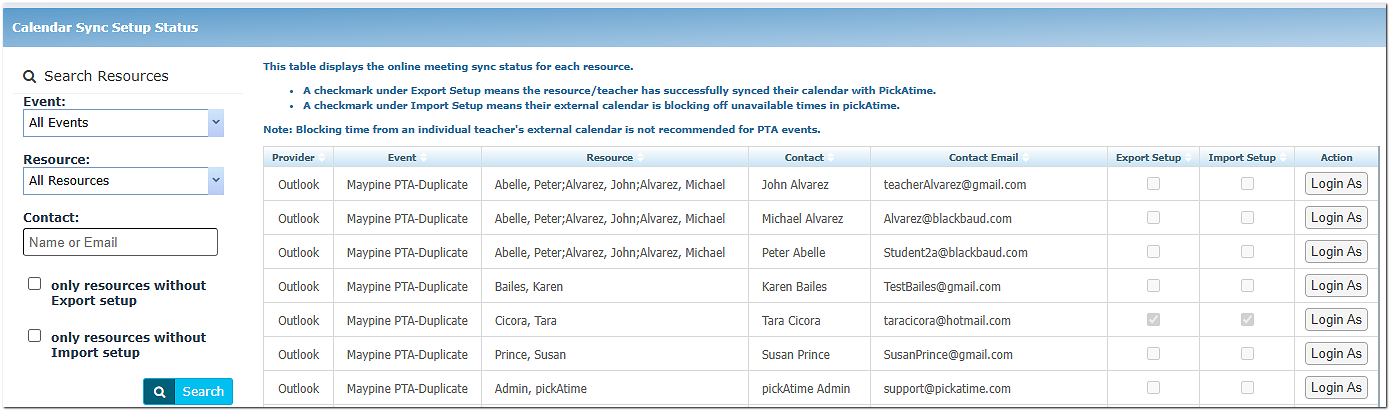
This section will show you if the teacher has synced their account or not and offers you the option to log in as the teacher directly from this page.
Export Setup
- Checked when:
- The teacher has synced the MS Calendar account on the Calendar Sync page in the Admin UI.
- Selected a default calendar.
- Clicked Save and Sync.
- Missing check = Teacher has not completed calendar sync.
Import Setup
- Checked if the teacher opted to block off times in pickAtime from MS Calendar.
- Not recommended for teachers.
Important Admin Tips
- Teachers must have a Resource assigned to their contact records and time slots with the appointment type virtual created to appear on this page.
- After enabling the Online Meeting Provider: MS Teams, always check the Online Meeting Links page (left-handed dashboard).
- Use it to identify any missing URLs and verify teacher sync status.
- If links don’t generate after 40 minutes, confirm:
- The teacher has completed sync (Export Setup is checked).
- The appointment was created as Virtual or Virtual/In-Person.
Still No Link?
It might be due to:
- The time zone was recently changed
- There’s an error in the system
Contact: support@pickatime.com
Google Meet Guide: Integration vs. Manual Setup
pickAtime offers two ways to manage Google Meet sessions. Choose the method that best fits your school's workflow:
- Google Meet Integration: Links are generated automatically and are unique for every single appointment.
- Manual Setup: A single, permanent link is assigned to each teacher for all their appointments.
Method 1: Google Meet Integration (Automatic)
Best for: High security and unique links for every meeting.
1. Prerequisites
Ensure Google Calendar Integration is already set up at the Account level. This is required to activate the Google Meet engine.
2. Enable for Your Event
- Go to Events Management / Settings/Online Scheduler Settings.
- Open Advanced Settings / Online Meeting Provider.
- Select Google.
3. How it Works
Once enabled, any appointment booked as a Virtual type will automatically generate a unique Google Meet link. This link is included in the confirmation email sent to parents.
Note: When using the integration, the "Virtual Room" column will not appear in the Appointments tab, as links are handled automatically by the system.
Online Meetings Page Guide
This page helps Admins monitor the status of Google Meet link generation and teacher calendar syncs. This page will help you to ensure every virtual appointment is properly linked.
Sections on the Online Meeting Page
1. Online Meeting Sync
- Shows appointments with still generating Google Meet links.
- Note: Link generation may take up to 40 minutes.
- The links will disappear from this section once the link is created and detected.


2. Online Meeting Issues
- This lists teachers/resources that do not have meeting URLs.
- The system will give the relevant meeting information while also offering action steps
3. Calendar Link Setup Status

This section will show you whether the teacher has synced their account and offers you the option to log in as the teacher directly from this page.
Export Setup
- Checked when:
- The teacher has synced the Google Calendar account on the Calendar Sync page in the Admin UI.
- Selected a default calendar.
- Clicked Save and Sync.
- Missing check = Teacher has not completed calendar sync.
Import Setup
- Checked if the teacher opted to block off times in pickAtime from Google Calendar.
- Not recommended for teachers.
Important Admin Tips
- Teachers must have a Resource assigned to their contact records and time slots with the appointment type virtual created to appear on this page.
- After enabling the Online Meeting Provider: Google, always check the Online Meeting Links page (left-handed dashboard).
- Use it to identify any missing URLs and verify teacher sync status.
- If links don’t generate after 40 minutes, confirm:
- The teacher has completed sync (Export Setup is checked).
- The appointment was created as Virtual or Virtual/In-Person.
Still No Link?
It might be due to:
- The time zone was recently changed
- There’s an error in the system
Contact: support@pickatime.com
Method 2: Manual Setup (Permanent Links)
Best for: Teachers who prefer to use one "personal" room link for all their sessions. This option can be used with any virtual provider, including:
- Zoom
- Teams
- GotoMeeting
- and more!
Step 1: Initial Event Configuration
You must first enable virtual appointment types. This is required for both entry methods below.
- Enable Appointment Types: Go to Events Management / Settings / Admin View Settings. In the Slot Generator section, check Show the "Appointment type".
- Configure Time Slots: Go to the Events Management / Appointments tab. Create or update slots and set the type to Virtual or In-person or Virtual.
Step 2: Adding the Links
Choose one of the following ways to add the teacher's URLs:
- Option A: Manual Entry (Directly in Event) Navigate to the teacher list in the Appointments tab. Double-click the cell in the Virtual Room column to paste the link.
- Option B: Bulk Import (Via Data Files)
- Update Teachers: Add URLs to the Virtual Room column in your Teachers file and import it (this updates the contact record).
- Sync to Event: Import your Class file. This is essential to push the links from the teacher records into the specific event.
Final Step: Ensure Links are Sent to Parents
To ensure participants receive their meeting links, you must verify your email macros.
- Go to Events Management / Settings / Notification Setup.
- In the Confirmation and Reminder emails, ensure that " Replace the Email Body with the Printable Schedule of Appointments is checked.
- Navigate to Settings / CUI Messages / Printable Schedule.
- Ensure the $(Room) macro is present
- This is a "Smart Macro" - it automatically pulls the correct data (Room or Virtual) based on the booked appointment type, regardless of whether you are using the Integration, the Manual Virtual Room, or a physical room number.
Important
- DO NOT enable your virtual Integration when using this option. Doing so will override your manual Room links with auto-generated ones.