Quick Start Guide: Summer School & Camp Scheduling
This Quick Start Guide walks you through setting up summer scheduling events in pickAtime, including Summer School, Camps, Enrichment Programs, Athletic Programs, and other roster-based events.
Overview
In this guide, you will learn how to:
- Create your pickAtime account
- Navigate the Admin UI
- Create and configure an event
- Customize your scheduler settings
- Preview and publish your online scheduler
Terms
- Account - an account will hold your events. You may have only one event on your account, or you may have multiple events. You may also have multiple accounts with us. Each account has a unique scheduling URL that you can provide to your customers.
- Event - an event that you create on your account. An event can span multiple dates. An event can represent one location or one type of appointment
- Admin UI - the Administrative User Interface, this is the tool where you will set up and manage your event
- CUI - the Customer User Interface or Online Scheduler. This is the unique link that your customer will log in to in order to book their appointments.
Getting Started
Create Your Account
To get started:
- Visit pickAtime
- Select Sign Up Now
- Complete the registration form
- Log in using your email address and password
Once logged in, you will enter the Admin UI.
Navigating the Admin UI
Account-Level Navigation
These sections manage settings across your entire account:
- Events — Create and manage events
- Appointments List — View scheduled appointments and registrations
- Contacts — View participant contact information
- Global Setup — Configure account-wide settings
Event-Level Navigation
After selecting an event, you will have access to event-specific settings:
- Roster Editor — Manage registrations and participant rosters
- Settings — Customize scheduler behavior, appointment fields, emails, and display options
Step-by-Step Setup
Step 1: Create Your Event
- In the Admin UI, select Events
- Click Add Event
- Enter an event name
Examples:- Summer School
- STEM Camp
- Basketball Camp
- Academic Enrichment
- Configure the following:
- Type: Roster
- Template Event: Roster Template
- Time Zone: Select your local time zone
- Optionally:
- Add date labels
- Add location information
- Create separate events for different campuses, sessions, or grade levels
- If you need to collect participant information, configure your Appointment Fields.
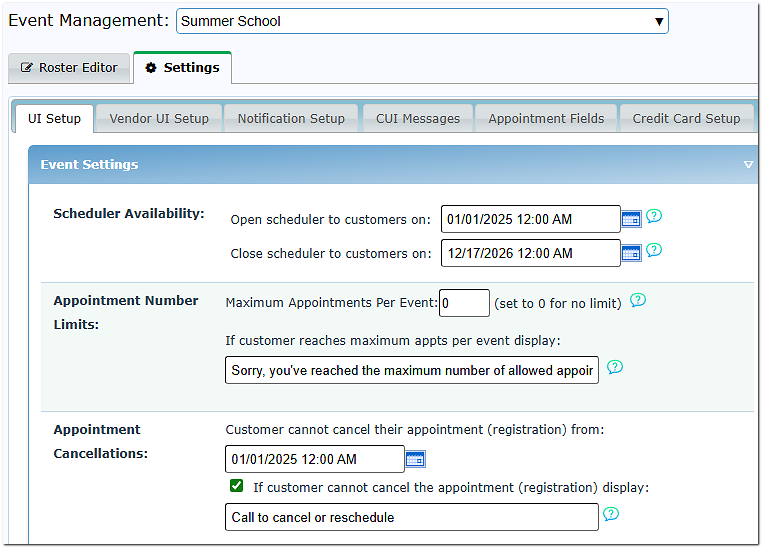
Step 2: Configure Event Settings
- Select your event
- Open the Settings tab
- Select UI Setup
Configure the following:
- Start Date for registration availability
- End Date for registration availability
- Appointment or roster display options
- Capacity limits and scheduling preferences
Additional settings can be reviewed by selecting the help icon next to each option.
Step 3: Preview Your Scheduler
Option 1: Direct Sidebar Access
Click the Online Scheduler button on the Admin UI sidebar. This will open the scheduler in a new tab.
Option 2: Using the Account/Event URL
-
Testing: Click the link or copy and paste it into a different browser window to experience the site as a customer.
-
Customization: You can personalize this link by navigating to the Global Setup / Business page, checking the Set custom URL box, and entering your preferred name (e.g.,
pickatime.com/YourSchoolName).
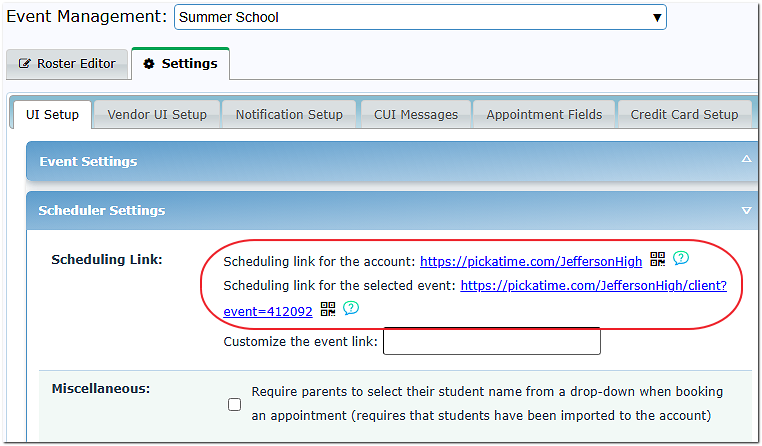
Your participants will use this link to register for programs and appointments.
Frequently Asked Questions
Q: Can I manually add a student or camper to a session?
A: Yes. Go to the Roster Editor, click the Add Participant icon (represented by a person with a green $+$ sign), and enter their information.
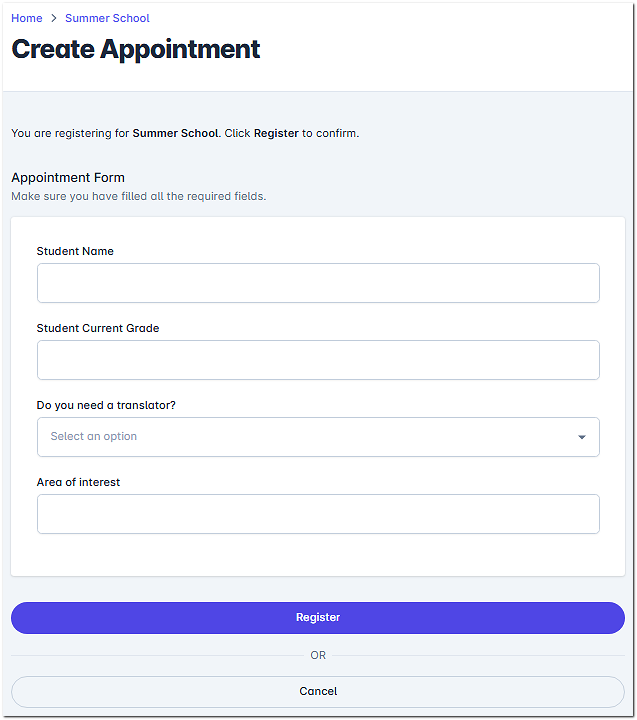
Q: How do I change or add the question fields parents fill out during registration?
A: Go to Settings / Appointment Fields. Then:
- Add the Field: Type the name of the information you want (e.g., "Phone Number") into the Add New box and click add.
- Activate the Field: The new field will appear in the Available Fields section. Click the < button to move it into the Included Fields column.
- To create a drop-down list or multiple-choice options (e.g., T-Shirt Size: S, M, L), change the Type column dropdown to Choice. Enter your options in the question editor box below and click Add New for each response. Use the <> arrows to change their order.
Q: How do I add our school or district logo to the scheduler?
A: Go to Global Setup / Business, Account Level Settings, Account Logo. Then:
- Click on the upload button.
- You will then see a pop-up File Manager window, where you can choose a File on your PC and click the Upload button.
- Crop your image (if needed). Once you have finished cropping, click 'OK.'
- Your logo is now displayed on your account.
Q: Can I customize the automated emails sent to parents?
Q: How do I collect registration fees or tuition?
A: Go to Settings /Credit Card Setup. pickAtime securely integrates with MySchoolBucks, Authorize.net, PayPal, and First Data. For more details, visit our dedicated Payment Options documentation.
Q: A camp session is full, but I want to squeeze in a few more participants. How do I do that?
A: You can change capacity limits on the fly. Go to the Roster Editor page for that event and increase the Max Roster Size to your new desired limit.
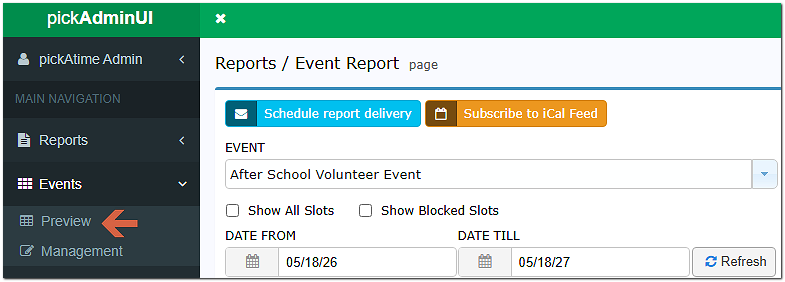
Q: How do I run reports to see who has signed up?
A: When you first log into pickAtime, you will land in the Reporting area. You can view real-time rosters and download various custom appointment reports.
Need More Help?
-
Phone Numbers & Custom Info: Review our guide on Collecting Information from your Participants to add custom fields like emergency contact phone numbers.
-
Detailed Instructions: Click the User Manual link on your main navigation panel and jump to the Roster Scheduling section.
-
Support Team: Email us directly at support@pickatime.com for personalized assistance.