
STEP TWO: Import Data Files
Data FilesOverview
ThereThe arePTA scheduler requires 4 required data files: Student, Teacher, Class, and Enrollment. Two additional files — Parent and Parent-Student Relationship — are optional and only needed for theSingle ParentSign-On Teachersetups.
All Scheduler:files amust Studentbe file,tab-delimited atext Teacherfiles file,(.txt afrom ClassesExcel, file,or and.tsv anfrom EnrollmentGoogle file.Sheets), Optionallywith youcolumn canheaders create a Parent File and a Parent Student Relationship File. Generally,in the Parentfirst Filerow, andmatching the Parentexact Studentfield Relationshipnames Filebelow are(no only used when you are setting up a Single-Sign On Option. spaces).
Student File
This file lists all the students.The student file must contain the following fields:
StudentID
SecurityValue
First
4321
04/12/2012
Amanda
Jones
4322
08/04/2012
Timothy
Smith
This table must be provided in a tab‐delimited text file (MS Excel ‐> *.txt (Tab delimited); Google Sheets ‐ > *.tsv (Tab delimited).
The first row should contain the column titles. The column titles must be labeled exactly as listed above. Notice that none of the column titles has spaces in them.
Do not recycle StudentID'Student's without first removing existing students. For example, if StudentID 101 last year was assigned to Betsy Smith, and this year StudentID 101 is assigned to William Johnson, the parent of Betsy Smith will log in this year and see student William Johnson listed as her child.
If you will be recycling student IDs, prior to uploading your new student file, remove all stored contacts. You can do this on the Global Setup / Contacts Setup page under 'remove all contacts.'
Key
StudentID is the key field on this file and must be unique.
Other Columns
A column called Action can be created in order to delete an existing entry. If you need to delete previously uploaded data, you could resubmit the data file with this column title and the word delete entered in each row. This column defaults to "update" if the column is not present. The Action column is only needed if you will be deleting data.
Teacher File
This file lists all the teachers. The teacher file must contain the following fields:
TeacherID
First
Last
Email
Room
234
Angela
Frank
a@school.com
106
225
Bobby
Smith
b@school.com
Library
This table must be provided in a tab‐delimited text file (MS Excel ‐> *.txt (Tab delimited); Google Sheets ‐ > *.tsv (Tab delimited).
The first row should contain the column titles. The column titles must be labeled exactly as listed above. Notice that none of the column titles has spaces in them.
Key
TeacherID is the key field on this file and must be unique.
Email must also be unique.
IMPORTANT NOTE: If you would like to create team conferences, please see the section on Creating Teams.
Other Optional Columns
Password creates an initial password for your teachers. If you do not import a password when the teacher logs in, they will be prompted to create a password. The password must be at least 6 characters in length.
Once the teachers have taken ownership of their account and created a password, the import will not change the password. However, on the Global Setup / Contacts Setup page, you can reset the password for all your teachers. This is the reset administrative password button.
Virtual Room is used to import an online meeting link for the teacher if you are having Virtual Conferences or allowing a choice of In‐Person or Virtual conferences. It is only used when you are creating your own meeting links for your teachers. If you are using the pickAtime integration for online meetings, the link will be generated automatically.
AccessLevel allows you to set the Admin level for your teachers. An AccessLevel of 3 will provide your teachers with Resource Administrator access, and they will then be able to block their own schedule. The default access level for a teacher is Appointment Viewer.
GroupName allows you to classify a teacher with a GroupNamevalue (e.g., Middlebirthdate) Schoolparents Teacher, Science Teacher). This is useful if you wantenter to createconfirm differentthey're slots for different groups of teachers. For example, if all your Middle School Teachers needed 15-minute slots and all your High School Teachers needed 20-minute slots, you might set a group name for your teachers and then create slots forselecting the entirecorrect group. The Group Name can also be used on the parent scheduling page to display teachers under the Group Name.
A column named Action can be created to delete an existing entry. If you need to delete previously uploaded data, you could resubmit the data file with this column title and the word delete entered in each row. This column defaults to "update" if the column is not present. The Action column is only needed if you will be deleting data.
Class File
This file defines the classes. The class file must contain the following fields
GroupName is an optional field and allows you to categorize your teachers with a Group Name. For example, you might want to categorize some teachers as Upper School teachers and some as Lower School teachers. This will allow you to create different time slots for different groups of teachers easily.
ClassID
TeacherID
ClassName
Math - Sec200
234
Math
Math - Sec201
235
Math
This table must be provided in a tab‐delimited text file (MS Excel ‐> *.txt (Tab delimited); Google Sheets ‐ > *.tsv (Tab delimited).
The first row should contain the column titles. The column titles must be labeled exactly as listed above. Notice that none of the column titles has spaces in them.
Key
ClassID is the key field on this file and must be unique for each teacher. Each ClassID should only exist in one row in this file.
Keep in mind that the ClassID has to be unique for each teacher. If your database has one "English 9" class with multiple sessions each taught by a different teacher, then you will need a different ClassID for each teacher. You can concatenate your database's class identifier with the teacher ID to produce something like "Eng9‐869," indicating that this is the English 9 class taught by teacher 869. If you do this, then make sure that the enrollment file has "Eng9‐869" in it, not "English 9" or "Eng9".
Other Columns
These columns can optionally be used.
A column called Action can be created in order to delete an existing entry. If you need to delete previously uploaded data, you could resubmit the data file with this column title and the word delete entered in each row. This column defaults to "update" if the column is not present. The Action column is only needed if you will be deleting data.
PTAN is the number of allowed appointments for each student's parent for that class. For example, some schools allow the parent to have 2 appointments with a home room teacher or an advisor. If the column is not present, 1 is assumed.
Max is the largest number of students that could sign up for the class. This must be larger than the number of students that are in the class. If this column is not present, a very large number is the default.
Enrollment File
This file specifies the classes each student is enrolled in. The enrollment file must contain the following fields
StudentID identifies the student; this must match the StudentID listed in the student file
ClassID identifies the class; this must match the ClassID listed in the class file
This table must be provided in a tab‐delimited text file (MS Excel ‐> *.txt (Tab delimited); Google Sheets ‐ > *.tsv (Tab delimited).
The first row should contain the column titles. The column titles must be labeled exactly as listed above.
Notice that none of the column titles has spaces in them.
Your file can be formatted in one of two different ways.
Option # 1
With this option, only one class is listed in the ClassID column. If a student has multiple classes you will have multiple rows for each student.
StudentID
ClassID
123
English-SecB
123
Science
Option # 2
StudentID
ClassID
ClassID
123
English-SecB
Science
456
Math
Gym
There is only one row per student. Each class is in a separate column labeled ClassID
Other Columns
A column named Action can be created to delete an existing entry. If you need to delete previously uploaded data, you could resubmit the data file with this column title and the word delete entered in each row. This column defaults to "update" if the column is not present. The Action column is only needed if you will be deleting data.
Creating Teams
You can either create teams via the import files or after you have imported your files.
Creating Teams via the Import Process - There are two different ways to accomplish this. The way you select depends on how you will be importing your data, and whether the teachers within a team will also have individual conferences.
Use the first method if you will be importing team data rather than individual teacher data, and your teams will not have any teachers needing to conference on their own. Use the second method if you will be importing individual teacher data, and you would like to combine some of these teachers into teams.
Method 1
Using this option, you will create a new teacher with a team name such as Team Smith‐Jones. This team teacher would need to create a class that has all students for teacher Smith and teacher Jones within the class. When the parent logs in, they would see the teacher “Team Smith‐Jones” listed. When using a team such as team Smith‐Jones, you need to make sure that teacher Smith and teacher Jones are not also available for conferences at the same time as teacher Smith‐Jones.
When you import data for teacher Team Smith‐Jones, you will need to import a TeacherID. This can simply be a made up teacherID, but it can not be a teacherID that has been imported for another teacher. You can choose to import the email address of one of the two teachers, or leave the email field blank. However, you can not import an email address that has already been imported for another teacher. The email address AND the teacherID must be unique for each teacher. See example below:
Once you have created and imported the data for a team teacher, you can provide the two individual teachers access to the schedule for the team. You would do this by going into the Contacts section of Admin UI. In the upper left hand side, search for the first teacher name (ex. Smith). When you find teacher Smith and have this teacher’s information in the right hand side, in the Resource Access section, give teacher Smith access to teacher Team Smith‐ Jones. Then you would do the same for teacher Jones. If data for teacher Smith or teacher Jones had not been imported individually, you can use the Contacts section of the site to add the two teachers and give them each access to the team.
Method 2
You can create teams by combining two or more teachers. When you import your class file, in the TeacherID column, concatenate your teacher IDs. Below you will see a Teacher File example and a Class File example.
Teacher File
TeacherID
First
Last
Email
T123
Anne
Smith
asmith@school.com
T124
Harold
Rice
hrice@school.com
Class FileExample:
TeacherID
ClassID
T123;T124
Math101⚠️ Don't recycle Student IDs without removing the old student first. If StudentID 101 belonged to Betsy Smith last year and is reassigned to William Johnson this year, Betsy's parent will see William listed as their child. If recycling IDs, remove all stored contacts first via Global Setup / Contacts Setup / Remove All Contacts.
Optional column: Action — set to delete to remove a previously imported row. Defaults to update if omitted.
Teacher File
T123
Biology
T124
English
InExample:
Want team-taught conferences? See Creating Teams, below.
Optional columns:
3 = Resource Administrator (can block their own schedule). Default is Appointment Viewer.
GroupName
Categorizes teachers (e.g., "Middle School," "Science") — useful for creating different slot durations per group, or displaying teachers grouped on the scheduler
Action
Set to delete to remove a previously imported row
Class File
Example:
⚠️ ClassID must be unique per teacher. If your school has
twoone "English 9" course taught by multiple teachers, give each section its own ClassID — e.g.,Eng9-869for the section taught by teacher 869. Make sure your Enrollment file uses this same exact ClassID.
Optional columns:
delete to remove a previously imported row
PTAN
Number of appointments allowed per parent for this class (default: 1)
Max
Maximum students allowed to enroll (default: a very high number)
Enrollment File
Format Option 1 — One class per row (multiple rows per student if enrolled in multiple classes):
Format Option 2 — One row per student, with each class in its own ClassID column:
Optional column: Action — set to delete to remove a previously imported enrollment row.
Creating Teams
You can set up team-taught classes either during import or after import, depending on your situation.
Option A: Via Import
Method 1 — Import the team as a single "teacher" Use this if you're importing team data directly (not individual teacher data), and the team members won't also have individual conferences.
Team Smith-Jones), with its own unique TeacherID.
This team's class should include all students from both teachers' rosters.
You can optionally use one teacher's email, or leave it blank — but it can't duplicate an email already used by another teacher.
Make sure the individual teachers (Smith, Jones) aren't also separately bookable at the same times as the team.
To grant the individual teachers visibility into the team's schedule: Go to Contacts, locate each teacher, and under Resource Access, grant them access to the team resource.
Method 2 — Combine individual teachers into a team via the Class file Use this if you're importing individual teacher data and want to combine some into a team. In the Class file's TeacherID column, concatenate teacher IDs with a semicolon.
Example:
Teacher File:
Class File:
Here, Anne Smith and Harold Rice.Rice These two teachers team team-teach a class called Math 101.Math101. A parent with a student in Math101 will book an appointmentbooks with the team,team; a parent with a student in oneBiology ofor theEnglish two individual classes will bookbooks with the individual teacher. WhenThe asystem parentprevents ofdouble-booking a— student in Biology booksbooking with teacher Anne Smith,Smith that(individually) automatically blocks the corresponding slot for the team of Anne Smith and Harold Smith/Rice will be blocked off.team.
TheThiscreationsameoftechniqueteamworksteachersforand team classes can also be used when you wouldcases liketopairingallowasomegeneralparentseducationto bookteacher withteachers jointly, and some parents to book with teachers separately. One example might be where you have some students inaclass where you would like thespecial education teachertoforalsoselectattendstudentsconferences. On your class file, you could— create anewcombined classlabeled(e.g., "English/SpecialEducationEd") andassignenroll only theteacherIDrelevanttostudents in it, while others remain in thetwostandardteachers, the English teacher and the Special Education teacher. Then on the enrollment file, you would assign some students to the English/Special Education class and some to the English"English" class.
Creating
Option afterB: theAfter Import Process
You can also combine teachers into teams after you have imported your four data files. To create a team, you will do the following:
- Go
intoto Class Editor. - Select Add Teacher/Team.
TheSelect Persondialog box will display
You would then want to eitherEither manually create a class for thatthe team orteam, import a classclass/enrollment and corresponding enrollmentfile for thatthem, team.or Or,move if you already have theexisting classes youfrom wouldan likeindividual for the team listed under another teacher, you can simply move the classesteacher to the team.
When a parent booksBooking with theteam,team blocks the correspondingtime slots for all individual members of the team will become unavailable. Similarly, when a parent books with an individual teacher, the corresponding timeslot fortheeachteamindividualwillmember,becomeandunavailable.vice versa — this prevents double-booking automatically.
IfTo you would likeadd a room number for youra team,team: you will needGo to addAppointments, thisand onenter the Appointmentsroom page.number Toto the right of yourthe teamteam's name, enter a room number.name.
Parent File (optionalOptional file only required for— Single SignSign-On On)
This file lists all the parents. The parent file must contain the following fields:
ParentID
Firstidentifier
Last
Email
123
John
Smith
js@parent.com
456
Susie
Smith
ss@parent.com
ThisExample:
Both ParentID and Email should be
provideduniquein— duplicate rows will simply update the same contact rather than create atab‐delimitednewtextfile(MS Excel ‐> *.txt (Tab delimited); Google Sheets ‐ > *.tsv (Tab delimited).one.
IfTo you do not want yourprevent parents tofrom havemanually theattaching/detaching optionstudents: of attaching their studentGo to their account, then turn this option off. This is set on the Global Setup / Business Setup page./ Under Miscellaneous, and uncheck the box "allowAllow parents to attach and detach students.students."
The
ParentID and the Email address should be unique. If you have multiple rows with the same ParentID, only one contact will be created, as each row will update what was previously imported. If you have multiple rows with the same Email, only one contact will be created, as each row will update what was previously imported.
Parent
Parent-Student Relationship File (optionalOptional and only required for— Single SignSign-On On)
This file connects the parents to the students. The parent‐student relationship file must contain the following fields:
StudentIDParentID
ParentID
37890
4451
37891
4478
This table must be provided in a tab‐delimited text file (MS Excel ‐> *.txt (Tab delimited); Google Sheets ‐ > *.tsv (Tab delimited). Example:
Mistakes to Avoid
- Don't export
anaentirefull year of class datawhenif youjustonlywantneed half aschoolyear. - If
youparentsusewon't recognize aschoolnumericmanagementStudentdatabaseID:identifier for theStudentID,and your parents are not familiar with this number, then useUse aconcatenation of the student's first name andfirst+last name concatenation instead (ex,e.g.,"BenFranklin"BenjaminFranklin)when you prompt your parents to identify their student.. Youdo notdon't need to create thisconcatenatedfieldfield;manuallysimply— checkthe box"Use First + Last Name asStudentID"StudentID"inundertheParent Loginsection of theGlobal Setup / Business Setuppage./Then,ParentonLogin, then customize thelabel for this field that your parents will see on the Customer User Interface, enterprompt textdescribingunderthis field to your parents. For example, you can enter the following text for your prompt: "First Name + Last Name, e.g. " "BenjaminFranklin"You would enter this text in theCUI Messages / Student / StudentIDlabel (see CUI Messages page). BeWatchcarefulforwithleading zeros. Opening a numeric ID column in Excel may strip leading zeroson numeric IDs. For example, if you use Excel to open a text file that has studentIDs that are all numeric and have leading zeros, the zeros will be stripped off when you save the file.automatically.- If
your studentStudent IDshavechanged fromthelastprevious year, you will need to make sure that youyear, remove theprevious year'sold stored studentdata.dataSeefirstthe(seesection on removing contacts on thePrevious Users of pickAtimepage.). - If
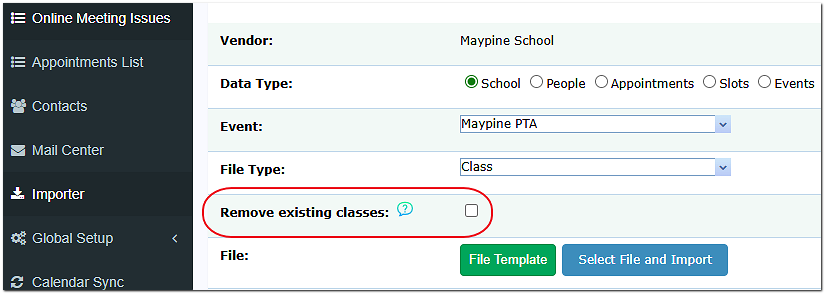
your studentStudent IDs aresimplyreassigned annually (not tied to anumberpermanentyourecord),havealsoassignedremoveto each student, and that number may change each year, make sure you have removed the previous year'sold storedstudentdatadata. See the section on removing contacts on thePrevious Users of pickAtimepage.first. IfCleaningyouuphaveoldolderdata:classes and enrollments, youYou can now deletetheanevent’event's existingclassesclasses/enrollment (andenrollmentstheir associated teacher resources) directly from theImportImporter pagebefore—uploadingnonewneeddata.toThis option will also deleteleave theclasses’ associated teacher resources, making it easier to remove bad data without leaving the Importerpage.ToSelectlocateClassthisunderfeatureFileonType,the Imports page,then clicktheRemoveClassExistingfile option within the File Type drop-down menu.Classes.
Makecolumn sure you use our naming convention when you are importing Emails.naming:
Email. Email_Address Teachers_Email_Address will import Import Process
Once you have created your 4 import files, you are ready to import these files to your pickAtime account. All 4 files must be tab‐delimited text files. Locate the Importer under Main Navigation on the left side.
After loggingLog intopickAtime,pickAtime and click Importer.SelectSet Data TypeoftoSchool.School.- Select your event from the Event
pull‐pull-down. - Set File Type to Students.
If you havewith no errors on your import,errors, repeat steps 4 ‐ 4–6 for yourTeachers, teacher file, your classes file,Classes, and yourEnrollment enrollment(in file,that order), changing the File Type drop‐downeach totime.
the
correct type for your file.
ForDataall 4 data files, the data typeType should be set to School.
Ifforyou have anyerror messages on the import, readthat section in the manual.
Keep in mind that each row in theall fourtablesfiles.
Import logic: Each row has a unique identifier,key which(StudentID, ensuresTeacherID, thator ifClassID). you importRe-importing the same data morewon't thancreate onceduplicates no— harm will be done. Thethe system does not create new data entries each time the data is imported. It first checks tofor seean ifexisting match and either updates it has the data row you are importing (by matching the key field), then it either updates the existing data or it creates a new record.
IfThis youalso leave out some data,means you can simplysafely import thea file containing only missing data.rows to fill in gaps.
⚠️
IMPORTANTAlwaysNOTE:Please be sure thatconfirm the number of rows imported matchesthe number of rows onyourdatafilefile.— silent partial imports can be easy to miss.
Import order matters:
IfFixyouallreceiveTeacheranyfile errorswhen importing your teacher file, correct thesebefore importingyourtheclassClassand enrollment files.file.IfFixyouallreceiveClassanyfile errorswhen importing your class file, correct thesebefore importingyour enrollment file.
.
Error Messages on Import
General Error Messages
"Incorrect file type was supplied.The" Your file must be atab-delimited. tab‐delimited text file.Make sure that you have createdRe-save/re-export and aretry importing a tab‐delimited text file.again.
Error
messages when importing
Student File
Errors
Check
StudentID, not Student Lunch Number'.Number)
"The ID field is empty for
Check
Error message when importing the
Teacher file
File Errors
This
ABC + a However, in the Admin UI, you already have a contact with a teacherID of ABC and a different email address than betsy@noemail.com, AND a contact with the email address of betsy@noemail.com and a different teacherID than ABC.
For example, on your import file, you have this:
TeacherID Email
But in the Admin UI, you have two different contacts.
TeacherID Email
You need to correct your data inbut the Admin UI andalready thenhas re‐importtwo yourseparate teacherexisting file.contacts In— one matching the AdminTeacherID, UI, search for the contact with that email address that was flagged. If the contact you locate has a different teacherID than on your teacher file, and is an old contact, then delete that contact and re‐import your teacher file.
During the teacher file import, we look for aone matching teacherID record or a matching email address record. If we find a match on either, we update the rest of the information. For example, if we find a matching teacherID, we update the email address and name of the teacher. If we find a matching email address, we update the teacherID— and the namesystem ofcan't tell which to update. Fix: In Contacts, find the teacher.conflicting However,record(s), ifdelete wethe findoutdated two different contact records, one with a matching teacherIDone, and onere-import.
"The ID field is empty for
Check
in that row
"The password field should be 6 characters or more forCheck the
Class dataFile withinErrors
"Could not find teacher with teacherID XXXX"
This
"Class 'Math' already exists with a different teacher than '123'"
This means that your class file has a row with ClassID: Math and TeacherID: 123. But, Class Math has already been assigned to a different teacher than teacherID 123. The
For example, if you have— two rows suchare as:
TeacherIDthe same ClassID 123 Math 456 Math
We will flag the second row as an error. The ClassID must be unique for eachdifferent teacher,teachers. otherwise when we import the enrollment file, we do not know which students in class Math have teacher 123 and which students in class Math have teacher 456. You will need to make the ClassID uniqueFix by either appending a section number to the ClassID or a section/teacher identifier to(e.g., the Class ID. Your enrollment file will also need to be updated to reflect this.
Also note that in the example above, ClassID Math has been added to teacherID 123. Prior to fixing your import filesMath-123), and importingupdate again, you will want to remove ClassID Math. You can remove an individual class by going to the ClassEditor, selecting the 'Show only Classes', locating and then clicking the red X next to the name.
You can delete all of the event's resources, classes, and enrollments from the Import page as well, making it easier to remove the bad/old data without navigating away from the Importer page. To do this, on the Imports page, click the Class file option within the File Type drop-down menu, then click 'Remove existing Classes'.
Error messages when importing theyour Enrollment file
to match. (See "Removing a bad class" below to clean up the incorrect entry first.)
Enrollment File Errors
This
The enrollment file must be imported after the student, teacher, and class files have been imported. When you— import thestudents enrollmentfirst
Example: an error message of Student 12345 not found means that a student with the StudentID of 12345 was NOT imported on your student file.
"Class XX not
This
Example: an error message of Class Math‐101 not found indicates that Class Math‐101 was NOT imported into your Class file.
(Safe to ignore if it's a non-conference class, like Study Hall.)
"No class ID found for studentThis
"Student XX not in class
This message comes up
"Class XX has reached maximum enrollment. Student XX has been skipped."
This
Error message when importing
Parent File
Errors"The file does not have a column labeled "First"'First' or "'First Name"
CheckColumn the labels you have created for each column in your file. Theyheaders must match ourthe specificationsspec exactly.
Error
message when importing Parent
Parent-Student relationshipRelationship file
File Errors
"Could not find Parent with ID 'XX' or Student with ID 'YY' as this parent/ student was not imported
This error message indicatesDouble-check that eitherboth the ParentID as listed on your parent‐student relationship file was not found or theand StudentID asexist listedin ontheir yourrespective parent‐student relationship file was not found. Refer back to your Student file or your Parent file to make sure the parentfiles and the student were imported.successfully imported first.
How to Correct Bad Data
STUDENT FILE
My💡studentsRemovingnamesawerebad class — quick reference (used throughout this section):Individually: Go to Class Editor, check "Show Only Classes," locate the class, and click the red X next to it. In bulk prior to an updated Class file import: On the Importer page, select Class under File Type, then click Remove Existing Classes — this also removes the associated teacher resources, without needing to leave the Importer.
Student File
Simply
My
Take
Action column I forgot the SecurityValue field
Simply add the fieldset to your file and re‐import.
My file was missing some students
Import your student file again with the newly included students. Then also import your enrollment file to add in the enrollment for these students.
TEACHER FILE
For teacher file import issues, how you resolve these depends on whether you have already imported your class file. Once the class file has been imported your teachers are turned into a "resource" on the Appointments page and can not simply be updated with a new teacher file import. See the two different sections below.
WHEN YOU HAVE NOT IMPORTED YOUR CLASS FILE
My teacher names were reversed
Simply correct your file and re‐import.
My teacher file was not correct, and I have not yet imported my class file
Take your incorrect teacher file, add a new column labeled Action, and fill this with the Delete. Then re‐ import this file. This will remove all your incorrectly imported teachers.
My teacher IDs are incorrect, and I have not yet imported my class file
Take your teacher file (with the incorrect teacher ID's) add in a column labeled Action, and fill this column with the word Delete. Then import this filedelete, to remove the incorrect teachers.records
Teacher File
Your fix depends on whether you've already imported your Class file — once imported, teachers become "resources" tied to Appointments and Class Editor, and can no longer be simply overwritten by re-importing the Teacher file.
WHEN YOU HAVE ALREADY IMPORTED YOUR CLASS FILE
My teachers are not correct, and I have imported my class file
When your class file is imported, your teachers get placed on the Appointments page and on the Class Editor page.
If you have someNOT yet imported your Class file:
Action column set to delete
Teacher IDs incorrect
Same as above — re-import with Action: delete to remove, then import the corrected file
If you HAVE already imported your Class file:
My teachers areyou don't need
Go
CLASS FILE
I imported the wrong classes? I imported too many classes?
Go into the Class Editorfile, and delete all your classes or the classes you do not want.
You can remove an individual class by goingprior to thea ClassEditor, selecting the 'Show only Classes', locating and then clicking the red X next to the name, or you can select all of them and then delete.
You can also delete all of the event's resources, classes, and enrollments from the Import page, making it easier to remove the bad/old data without navigating away from the Importer page. To do this, on the Imports page, click thenew Class file optionimport, withincheck the Filebox Type drop-down menu, then click 'Remove"remove existing Classes'.
Class File
This
directly. My(Just classes are assigned to the wrong teachers.
Go into the Class Editor and remove allcorrecting your classes. Then import your class file again.
You can remove an individual class by going to the ClassEditor, selecting the 'Show only Classes', locating and then clicking the red X next to the name, or you can select all of them and then delete.
You can also delete all of the event's resources, classes, and enrollments from the Import page, making it easier towon't remove the bad/oldoriginal dataincorrect withoutassignment navigating— awayyou frommust themove Importerit page.manually.)
One class I imported was assigned to the wrong teacher.
The simplest solution is to go into the Class Editor and move the class from the incorrect teacher to the correct teacher. If you simply change your class file, you will be adding the correct class to the correct teacher, but the incorrect class ‐ teacher assignment will not get removed.
I missed some classes.
Simply add to your class file and re-import again, (or import a file with just the missing classes.
ENROLLMENT
I
Enrollment enrollment
IFile
Delete
HOW— TOno REMOVEneed IMPORTEDto DATA
redo the full file
How to Remove Imported Data
To remove everything:everything (start completely fresh):
1.
2. Then delete theRemove stored contactscontacts: on the account. These are the parent and teacher contacts, as they are on the account, not just the event. This is done by going into the Global Setup / Contacts page,→ Show Advanced Options → Remove All Customers, selecting theEvent ShowAdministrator advanced options... and clicking on the Remove all customers button. Selectas the level to deletedelete. of Event Administrator. Note that this will(This also removeremoves parents.
3. To remove the student contacts, select the Remove studentsstored notstudents: enrolledClick Remove Students Not Enrolled in a classClass. button. (This may take a few minutes.)
You
will
wronghaveIf
anonlyemptyyourevent,class andyouenrollmentcandatastartisover.
If your students and (students/teachers are correct,fine), and it isyou only theneed Class and Enrollment data that is not, you can simply do itemstep 1 and not item 2..
To remove class data,data butonly, towhile keep the slots you have created forkeeping your teachers:teacher roster and slots:
- Go
intototheClassViewerEditor and delete alltheclassesclasses.—Thisthiswill keepkeeps your teacher roster on the Appointmentspageandon theClass Editorpage.pages. You will then need to importImport a newclassClass file and a newenrollmentEnrollment file.
To remove student,students, teacher,teachers, class,classes, and enrollment data,— but not yourkeep parents:
1.
2. Take your incorrectold or recently imported studentStudent and teacherTeacher files, add aan newAction column set to them labeled Action. Fill this column with the word DELETEdelete, and re‐re-import bothboth.
files.
Frequently Asked Questions on School Data
We mistakenlyaccidentally imported the previouslast semester's data, but we have too many parent appointments to start over. Can we just import new files?
YouYes can import— new dataimports files. However, this will simply add to the existing data.data Forrather example,than ifreplacing yourit. classNew and classes/enrollment file now contain different classes, any new classes will be imported,added, but classes that wereanything previously imported willstays notunless beexplicitly deleted.deleted To delete classes, you will need to do so in the(via Class Editor,Editor or createan Action: delete import). Existing parent appointments are never affected by a new data file listing your classes to delete and using the Action column filled with the word delete.import.
Note that a new import will not remove any parent appointments.
We re‐re-imported ourcorrected class and class/enrollment files as we needed to deleteremove some classes.classes, We don't seebut the changesold inones theare Classstill Editor.showing.
AImports newonly import will simply add to or update existing— data.they If you have classes to delete, you will need tonever delete themautomatically. fromTo theremove classes, use Class Editor pagedirectly, or byinclude usingan theAction: column in your import file for the ActiondeleteClass File import. To delete via an import,rows you wouldwant addremoved. aThe columnsame labeled Action and filled with the word Delete in the row for a class that you would likeapplies to delete.
To remove select enrollments, take your incorrect enrollment file, and add a column to it labeled Action. Fill this column with the word delete and then reimport the file. This will remove any matchingspecific enrollment records.
We realized that we were missing some class and class/enrollment data. Can we import a new class and enrollment file? Will thisimporting the missing data delete any parentbooked appointments that have been booked?appointments?
YouNo. canImporting importadditional newclass/enrollment data files.only Thisadds willwhat's addmissing any— new class and enrollment data. Itit will not delete or disturb parent appointments that have already been booked.
ViewViewing Your Imported Data
Once you have imported your data, you should go to the Class Editor page to confirm that your data is correct.
- From
the Admin UI on theEvents Preview,page,select your eventfrom the listand clickonGothetobutton.Event. - Select
theClass Editortab.toThis tab will displaysee yourlistteacheroflist.teachers.SelectIfayouteacher to see their classes; select ateacher'sclassname from the left-hand side, then you willto seetheenrolledliststudents.
See
theModifying Teacher or Room Datasection of the manualtoadd oradd/removeteachers.teachers,Clicking on a class will bring up the list of students in that class.If you would like to view the data in class order, check the box on the far right-hand side "show only classes." See theMoving a Classsectiontomovereassign aclassclass, andsee theModifying Enrollment Datasectiontoadd oradd/remove students fromclasses.a class.
Missing Classes
If
If you have made manualManual changes inwere the Admin UImade (i.e.g., changingreassigned teachers, movingmoved kidsstudents): from one class to another), then you will want to importImport a classClass file with ONLYonly the missing class(es), and an enrollmentEnrollment file with ONLYonly the missing enrollment.
TheseNeitheroptionsapproachwill not disturb anydisturbs appointmentsthat havealreadybeen made.booked.
Missing Enrollment
If you have not made anyno manual changes towere the enrollment within the Admin UI, you canmade, simply import an updated enrollmentEnrollment file.
Any— subsequent imports ofnever your class and enrollment files will not changeoverwrite previously imported class and class/enrollment data.data; Itthey willonly simply ADD INadd new data that is on the class or enrollment file.rows.