Additional Integrations
- ClassLink Integration
- Clever Integration
- Microsoft Entra ID (Formerly Azure AD)
- Veracross - Setting Up the Integration
ClassLink Integration
The pickAtime and ClassLink integration consists of two essential components: Direct Data Import and Single Sign-On (SSO). Follow the steps below to connect your accounts.
1. Enable Direct Data Import
Use this to automatically import teachers, students, class rosters, parents, and parent-student relationship data for your parent-teacher conferences.
- Add the pickAtime application within your ClassLink management console. For a step-by-step guide, visit the Add Applications and Determine Data Sharing Permissions page within the ClassLink Help Center.
- Once the app is added, pickAtime will receive an automated notification. Our team will configure the import on our end.
- Confirmation: You will receive an email from us once the data import is active and ready for use.
- Before your initial import, navigate to the Rosters > Demographics section in ClassLink. Ensure that the security value (student DOB) permission is activated for the pickAtime app. This is required to allow parents to link to their students. Please review the following page to learn more about enabling this permission for the pickAtime app.
- Once permissions are updated, run the data import.
2. Configure Single Sign-On (SSO)
This allows your users to log in to pickAtime securely using their ClassLink credentials.
- Log In: Sign into the pickAtime Admin UI.
- Navigate: Go to Global Setup / Business.
- Locate SSO Settings: Scroll down to Integration Options and find the Single Sign On section.
- Select Provider: Choose ClassLink SAML from the SSO Provider drop-down menu.
- Enter Credentials: Paste your IdP Metadata URL into the respective field.
Note: If you need help finding these URLs, refer to the SAML Console page within the ClassLink Help Center for a step-by-step guide on locating your IdP credentials.
NOTE: Preventing Duplicate Contacts for Existing pickAtime Accounts
If your school has used pickAtime without integration, imported data files manually, and now wants to enable a ClassLink integration, duplicate contact records may occur due to differing contact IDs (teacherID, studentID, parentID).
Recommendation: Clear old data before the new import.
Steps to remove old data:
- Create a new event using a past event as a template to preserve settings, notifications, and appointment fields.
- (Optional) Export reports from past events on the Reports page.
- Delete all past events except the new one.
- Go to Global Setup / Contacts / Advanced Options, then click Delete All Contacts. In the pop-up, select Level to delete: Admin Level - Event Administrator (this removes contacts with lower access level and contacts with customer access level - parents and students).
- Run the new integration import.
This ensures clean data syncing without duplicates. Contact support@pickatime.com if needed.
FAQ: We recently switched to ClassLink. Parents can sign in, but when they try to link their child, they receive the error: "We are unable to find your student records with the values you have supplied." And when we view the contact record for that student, the security value field is blank. How do we fix this?
A: This error occurs because student Security Values (Dates of Birth) were not included in the initial data import. When a parent enters a birth date to verify their student, the system finds an empty field in pickAtime and denies the match.
The security values (student DOB) are located in the Rosters > Demographics section in ClassLink. Most likely, this step may have been skipped when the pickAtime app was initially added. Please review the following page to ensure you have enabled this permission for the pickAtime app.
Once permissions are updated, run the data import again. This will populate the missing birth dates in pickAtime and allow parents to successfully link their students.
Clever Integration
How the Integration Works
The integration with Clever will bring in students, teachers, classes, and enrollment, and no SSO. You will do a one-time import to bring in the initial data. Optionally, the data could be synced nightly at 1 AM. Once the data has been imported, it will be available on your account in the Admin tool, and you will then be able to create the slots for your parents and open them up for booking.
For any of our integrations, we do charge a 3rd-party integration fee of $230 annually per school attached.
-
- To start the process, we would send you an invite from Clever.
- Once accepted, we will set up your account for the Clever data sync, and you will create an event on your account. Then, when you import your files, you will see that the importer is set up for Clever. You will select the Terms to import, which will kick off the sync.
Locating Data within a Term in Clever
Clever places the data into different Terms. These Terms may or may not match what your school has in its SIS. We encourage you to review the data before importing.
To review your information, go to the Data Browser, and under Terms and Sections, you can review the data that is within each section.
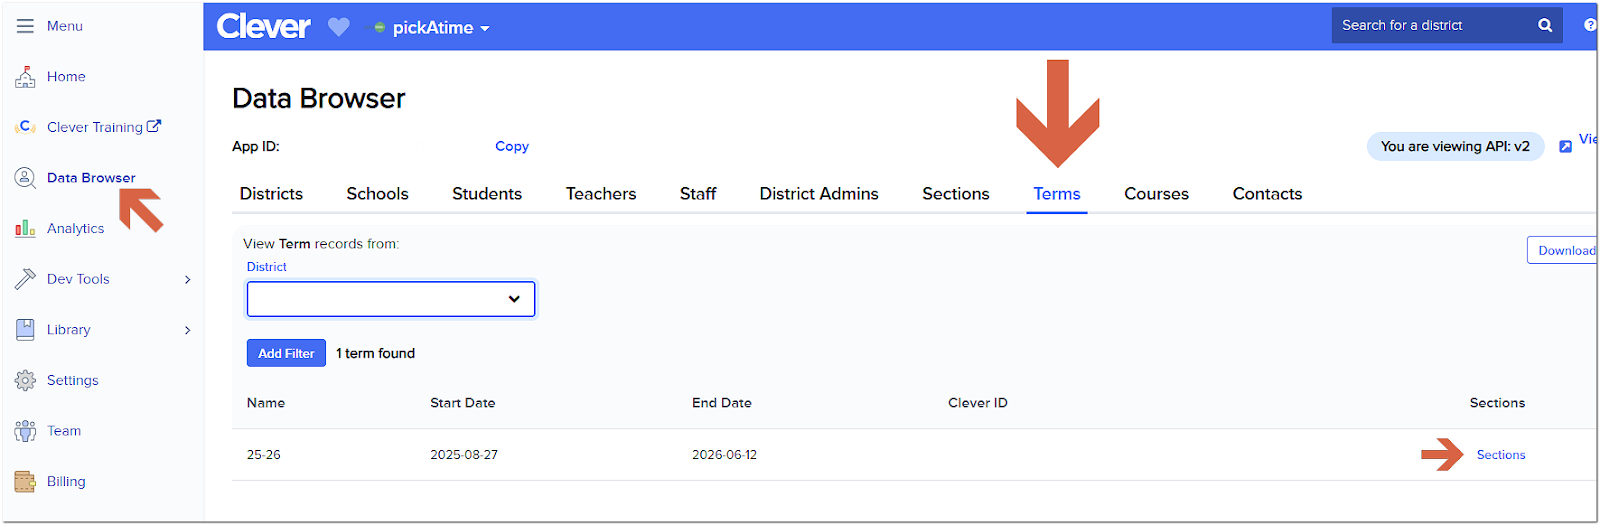
pickAtime offers the Clever v3.0 API data importer with the option to switch between the v2.0 and v3.0 versions per a request to pickAtime Support.
Data Transfer
The integration will give your students and teachers different IDs from your SIS.
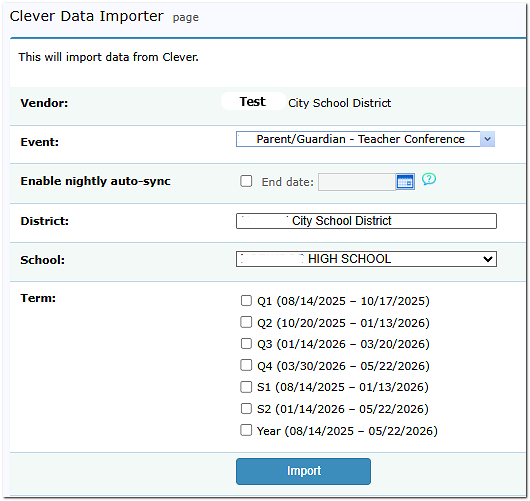
To do the data transfer, go to the Importer under Main Navigation. Select the event, your school, and the term. Once you have done the initial import into your event, the integration will do a nightly sync for individual events.
There is the option to import parent and relationship data, if available within your school's Clever account.
Removing Classes from Your Event
In the Admin UI tool, open the event, and go to the Class Editor tab. Tick the box labeled 'show only classes' on the far side. This will present a list of all the classes you have imported. Select the classes to be removed and then click on the Delete Class option. This will remove all of those classes.
To remove a single class, click the red x to the left of the class name within the Class Editor.
However, these classes will reappear when the nightly data import occurs. To maintain the nightly sync and not have the classes appear within the event, select the Hide option within the Class Editor under the ‘Type’ column for the class.
The nightly sync can be disabled by clicking the "Stop Sync For the Selected Event" or "Stop Sync For All Events" buttons. When you do this, you will see a confirmation prompt, and in the dialog for "Stop Sync For All Events", a list of events with sync enabled will be displayed.
NOTE: Preventing Duplicate Contacts for Existing pickAtime Accounts
If your school has used pickAtime without integration, imported data files manually, and now wants to enable a Clever integration, duplicate contact records may occur due to differing contact IDs (teacherID, studentID, parentID).
Recommendation: Clear old data before the new import.
Steps to remove old data:
-
- Create a new event using a past event as a template to preserve settings, notifications, and appointment fields.
- (Optional) Export reports from past events on the Reports page.
- Delete all past events except the new one.
- Go to Global Setup / Contacts / Advanced Options, then click Delete All Contacts. In the pop-up, select Level to delete: Admin Level - Event Administrator (this removes contacts with lower access level and contacts with customer access level - parents and students).
- Run the new integration import.
This ensures clean data syncing without duplicates. Contact support@pickatime.com if needed.
Microsoft Entra ID (Formerly Azure AD)
pickAtime offers SSO integration with Microsoft Entra ID. This option will allow your participants to access pickAtime from the Entra ID Portal without the need to create an account. This guide walks you through configuring Microsoft Entra ID (Azure AD) SSO for PickATime.
Setting up Entra ID
Required for Setup
- You must be an admin
- This setup is for single-tenant only
- Please review the Multifactor authentication and Conditional Access policies if applicable for your situation.
Setup Steps
A. Go back to the PickATime app and go to Global Setup/Business/Integration Options, and within the Single Sign On drop-down menu, select Azure Ad. You will then see the redirect URL.
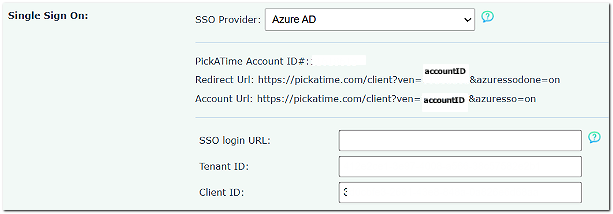
B. Copy and paste the URI in the Redirect URI field within Entra ID. The format will resemble:
https://pickatime.com/client?ven=11600000&azuresso=on
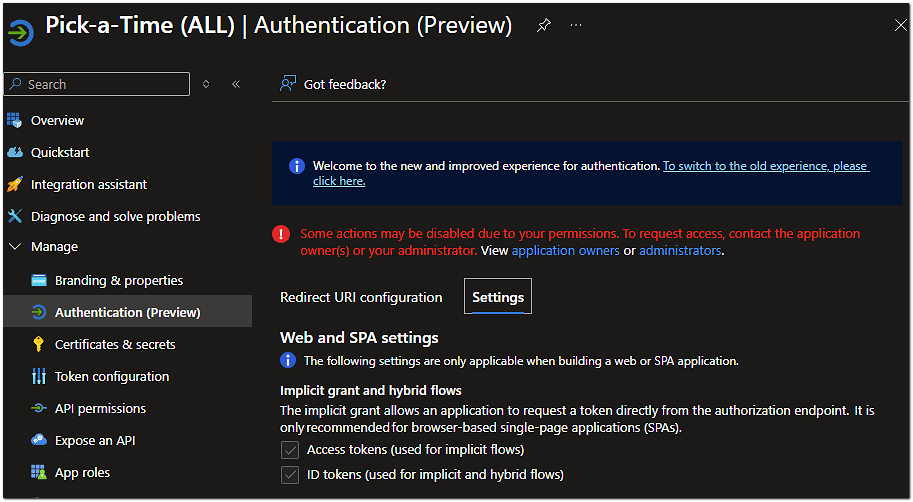
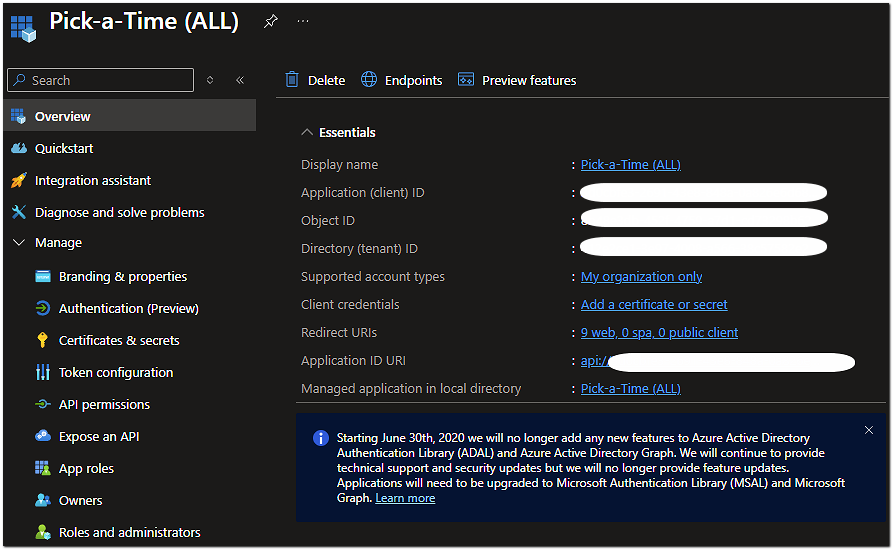
7. The app 'PickAtime' will appear in the sidebar.
8. Click Authentication.
9. Then, under the “Settings” tab, navigate to Web and SPA settings, check the boxes 'Access tokens' and 'ID tokens', and click 'Save' at the top.
When all the above are completed, you would use the URL in the following format: https://pickatime.com/client?ven=11600000&azuresso=on

How to add/invite users into Entra ID Active Directory
- Select Entra ID Active Directory
- In the sidebar, select Users
- The 'All Users (Preview)' page would appear.
- Click 'New User' at the top, then set the radio button 'Invite user', then enter the email address and click the ' Invite button.
Note: On the 'All Users (Preview)' page, you can select your user contact on the profile tab. Then make sure that the selected user has an email address in the Contact Info section, Email field.
Single Sign On with Entra ID
Step 1 – In pickAtime
In the Admin UI tool, go to the Global Setup/Business/Single Sign On, SSO Provider = Azure AD
Copy and paste the Client ID and Tenant ID

Step 2 - In Entra ID
Go to App Registrations → select your existing pickAtime app
- Check the pickAtime Account ID with the Environment
- Check Settings (check Access to Tokens)
Navigate to Authentication
- In Redirect URIs, click Add URI
- Paste the new Redirect URL
- Click Save
Testing the URL
Once you have set up the integration, test the SSO by having a user access pickAtime via the portal.
Veracross - Setting Up the Integration
This guide explains how to connect Veracross with pickAtime. Please note that the setup process is completed inside the Veracross Axiom backend.
Before You Begin
You must have one of the following Veracross roles or permissions:
-
System Administrator
-
IT Administrator
-
API Administrator
-
Integration Manager
If you do not see the integration settings described below, contact your school’s Veracross administrator or IT department.
Step 1: Confirm API Permissions
Before creating the integration, your Veracross account must have the OAuth_App_Admin security role assigned.
Important: Even standard System Administrator accounts cannot create API integrations unless this permission is specifically enabled.
Without this role:
-
Integration setup buttons may be hidden
-
Fields may appear read-only
-
OAuth applications may not be accessible
If needed, ask your Veracross administrator to assign this permission.
Step 2: Log Into Veracross Axiom
-
Log into your school’s Veracross Axiom dashboard using your administrator credentials.
-
Open the Identity & Access Management section.
-
Under the Configuration area, select OAuth Applications
This page manages third-party integrations.
Step 3: Create a New OAuth Application
-
Select Add Record or Add OAuth Application
-
Fill out the basic application information.
Recommended settings:
Name
Enter a recognizable name such as:
-
pickAtime Integration
-
pickAtime Scheduling Sync
Internal Notes
Add a short description for your staff. For example: “Integration used for conference scheduling and roster imports.”
Contact Email
Enter the support or technical contact email address.
Step 4: Configure API Permissions (Scopes)
Once the application is created:
-
Open the Scopes tab on the left-hand side.
-
Enable the permissions required for your integration.
Required Scopes for Imports
Enable the following permissions:
-
staff_faculty:list
-
staff_faculty:read
-
parents:list
-
parents:read
-
students:list
-
students:read
-
relationships:list
-
relationships:read
-
academics.config.grading_periods:list
-
academics.config.grading_periods:read
-
academics.classes:list
-
academics.classes:read
-
academics.enrollments:list
-
academics.enrollments:read
Required Scope for Single Sign-On (SSO)
If using Single Sign-On, also enable:
-
sso
After selecting the required permissions, click Save or Update. Your Veracross integration application is now created.
Step 5: Copy Client ID and Client Secret
Return to the General tab of the OAuth application.
You will see two important credentials:
Client ID - A unique identifier for the integration.
Client Secret - A secure password-like key used to connect systems.
Copy both values.
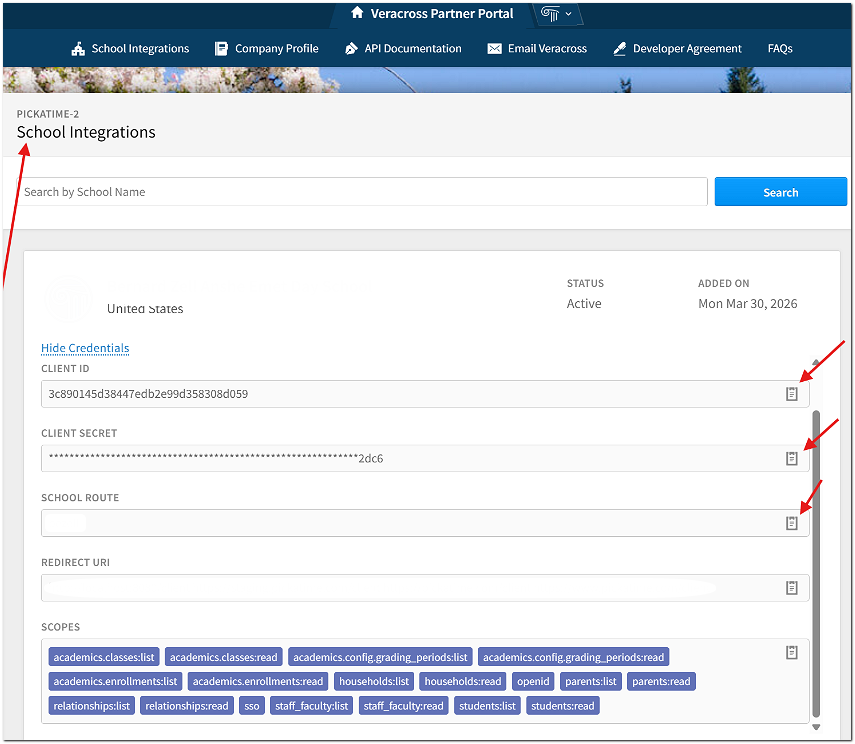
Important: The Client Secret may only be fully visible once immediately after creation. If you leave or refresh the page, it may become hidden for security reasons.
Step 6: Add Credentials to pickAtime
-
Log in to your pickAtime administrator account.
-
Navigate to Global Setup / Business/Integration Options/Veracross Integration.
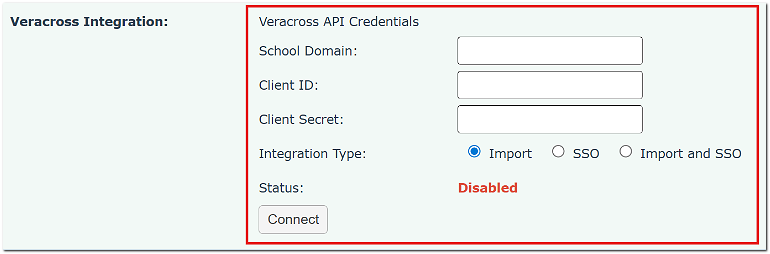
Enter:
-
School Domain
-
Client ID
-
Client Secret
-
Integration Type
Then click Connect
Step 7: Add Redirect URLs for SSO (If Using)
If your school is using Veracross Single Sign-On (SSO), add the following redirect URLs to the allowed redirect list inside Veracross:
If these URLs are missing, users may receive an authentication or redirect error when attempting to log into pickAtime through Veracross.
Step 8: Run Your First Sync
Once connected, create an event and run the importer inside pickAtime.
Recommended Best Practices
Before opening scheduling to families:
-
Run a test import
-
Verify that the information has been added to pickAtime correctly
-
Test the scheduler as a parent
Need Help?
If you need assistance:
-
Contact your Veracross administrator
-
Reach out to your school’s IT department
-
Contact pickAtime Support