Contact / Appointment Fields with questions
Collecting Information from Customers (Contact & Appointment Fields)
InpickAtime pickAtime,lets you can collect specificcustom datainformation from your participants at two different stages:points:
Both support various answer types — including text, date, radio buttons, drop-down lists, and checkboxes.
1. Choosing the Right Field Type
Before setting up your fields, determine when you need the information:
Contact Fields
Appointment Fields
When it’s collected
During initial Accountaccount Sign-up.
Every time a slot is booked.
Frequency
Collected onceOnce per user.
Collectedper for every appointment.
Best Usedused For
Phone numbers,number, address, or language preference.preference Contact— specificinfo information.tied
Student name, meeting topic, teacher-specific questions for— info tied to the teacher, or meeting topics. Appointment specific information.
Location
Global Setup /→ Contacts Setup → Contact Fields
Settings /→ Appointment Fields
2. How to SetSetting Up Fieldsa Field
Both Contactfield andtypes Appointment fields are configured usinguse the same simplebasic process:
NavigateGo to either Global Setup/→ Contacts Setup or Settings/→ AppointmentFields.Fields, depending on which type you're creating.- Add the
Field:field: Type the field nameof the information you want(e.g., "Phone Number") into the Add New box and clickadd.Add. - Activate the
Field:field:The new fieldIt will appearinunder Available Fields — select it, then click theAvailable Fields section. Click the<button to move it intotheIncluded Fieldscolumn.. - Admin
Visibility:visibility: Checkthe box under"Required for Admins" if you want staffmemberstosee andsee/fill outthesethispromptsfield when testing the system.
💡
Pro-Tip:ProDotip:notDon't create custom fields for"FirstName,"Name,"LastName,"Name, or"Email."EmailThe system collects— these are already collected automatically duringregistration;registration.addingAdding themhereagain willforcepromptthe userusers to enter the sameinfoinformation twice.
3. Configuring a Question with Multiple Choice Answers
If you want a field to use radio buttons, a drop-down list, or checkboxes, you'll configure it as a "Choice" type field:
<>) to reorder the options as needed.
4. Conditional Logic: Show/Hide Fields Based on Responses
You can make fields appear or disappear dynamically based on how a participant answers a Choice-type question.
Each Included Field is assigned a number, which is used to reference it in the conditional logic.
To enable this: Check "Hide/Show fields based on the user response" on the question you want to control others with.
To configure it: Next to each answer option, enter the field numbers to hide or show when that option is selected:
3,4,5 or 3-5
To show specific fields instead: Prefix each number with a / — e.g., /5, /6
⚠️ This logic only applies to fields that come after the conditional field in the list — it cannot affect fields earlier in the form.
Example: If a participant selects "Junior" for a given question, you could configure the rule to show only fields 5 and 6 — hiding everything else beyond that point unless explicitly shown.
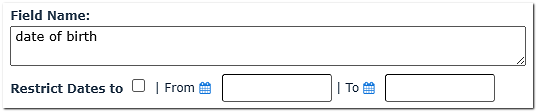
5. Restricting Date Ranges
For Date-type fields (e.g., Date of Birth), you can restrict the range of dates a participant is allowed to enter.
3.Why this matters: Schools have reported participants accidentally entering today's date in a DOB field. The Restrict Dates option helps prevent this kind of erroneous entry.
To use it: On a Date-type field (in either Contact Fields or Appointment Fields setup), enable Restrict Dates and define the valid range — e.g., no dates after the year 2000.
6. Viewing the Collected Data
In the Appointments Grid (Admin View)
:For Appointment Fields,Fields, you can seeview the dataresponses immediately without running a report:
- Go to the Appointments page.
- Click
onany booked slot. LookViewatthe participant's custom field responses in the section below the calendaron the(left-handsideto see the custom information provided by the participant.side).
In Reports
To include these custom fields inas yourreport report:columns:
- Go to the Reporting section.
- Click the blue Contact Fields or Appointment Fields link.
- Check the box in the
upper right-handupper-right corner of the pop-up to select allfieldsfields,(orselectchoose specificones).ones. - Confirm your
selection;selection — thedatafields will now appear asa new columncolumns in your report.
FAQ
We have had a large number of people entering the current date in the DOB field. Is there a way that we can not allow anything later than 2000?
Yes, we have added an update to the Date Field in both the Appointment and Contact Field Setup sections. This update allows you to add 'restrict dates' to control the date range that participants can enter to ensure that there are fewer erroneous entries.