Simple PTA Management Guide
- Administrator Access
- Allow Teachers to Block Slots
- Allow Teachers to Pre-Book Appointments
- Contacts
- Directions for Parents
- Handling Appointment Errors
- Modifying Teacher or Room Data
- Passwords
- Problem Appointments
- Reports
- Scheduling Parent Apppointments in the Admin UI
- Sending Custom Emails Using Appointments List page
- Teacher Access
- Viewing Appointments on the Appointments tab
Administrator Access
From the Contacts tab, you can search for a contact, select their name, and adjust the "Admin Level" pull-down to allow them to log in to the Admin UI and see reports.
To add a new contact, i.e., select the green Add button. For an Administrator, select Admin... and fill in the Contact information for the Admin.
Select the Admin Level pull-down to set the Contact's access level.
- Appointment Viewer - has the ability to log into the Admin UI and view the appointments, but cannot change anything.
- Appointment Maker - has the ability to make appointments from the Admin UI but cannot change the setup or add or remove slots.
- Resource Administrator - has the ability to make and cancel appointments and add and remove slots from the Admin UI for the resources to which they have been granted access in the Resource Access section.
- Event Administrator - is a full-powered administrator on one or more events. Use the lower right-hand table labeled Event Access to set the events the contact should have administrative access to.
- Administrator - has full access to the entire account.
For the administrative categories, Appointment Viewer, Appointment Maker, and Resource Administrator, be sure to specify the resources the contact should have access to. This is set on the Contacts page, in the Vendor Access tab -> Resource Access block.
For the administrative category Event Administrator, make sure to set the event that the contact should have access to. This is set on the Contacts page, in the Vendor Access tab -> Event Access block.
All of these settings allow access to the reports.
This new contact will be prompted to create a password the first time they log in.
To Update multiple Teachers
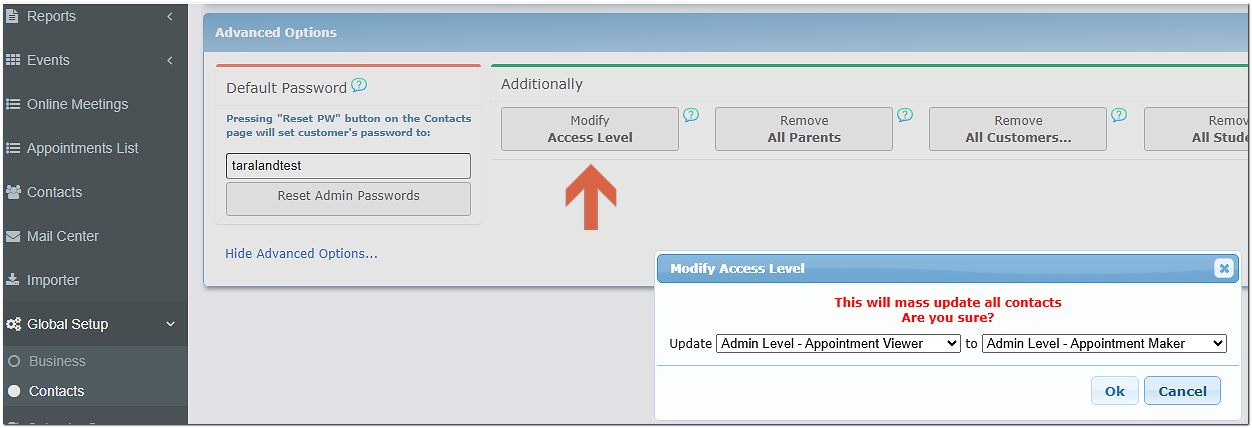
To update groups of Teachers /Admins to higher (or lower) levels, go to Global Setup/Contacts and under Advanced Options / Additionally select the Modify Admin Level button.
Allow Teachers to Block Slots
The default Administrative access for teachers is Appointment Viewer access only. You can, however, provide all your teachers with Appointment Maker access. This would allow your teachers to block slots prior to opening up the scheduler to parents. This would be used if an Admin has created an entire batch of slots for all the teachers and wanted each teacher to be able to block specific slots.
To upgrade the teacher access, you would go to the Global Setup / Contacts page, the Advanced Options section, and click on the Modify Access Level button. Modify your teachers' access from Appointment Viewer to Appointment Maker.
Each teacher will then have access to their own schedule.
A teacher can block their own slots by going into the Admin UI, where they will be immediately in the Reporting section. At the top of the page is a Block Schedule button. This will take the teacher to the Appointments page, where they will see their schedule of available time slots. To block a slot, they should click on the x in the slot cell. The slot will turn red, indicating that it is blocked. To unblock a slot, they can click on the X once again, and the slot will turn blue, indicating that it is available.
Allow Teachers to Pre-Book Appointments
The default Administrative access for teachers is Appointment Viewer access only. You can, however, provide all your teachers with Appointment Maker access. This would then allow your teachers to book appointments on behalf of parents prior to opening up the scheduler to parents.
To modify the teacher access, you would go to the Global Setup / Contacts page, Advanced Options section, and click on the Modify Access Level button. Modify your teachers' access from Appointment Viewer to Appointment Maker.
Each teacher will only have access to their own schedule.
Contacts
In the Admin UI tool, select Contacts on the sidebar. On the Contacts page, you can search for a contact, select the contact, and then view the information about that contact. Your contacts are your list of teachers, administrators, parents, and students (optionally). As soon as a parent logs into the online scheduler, their contact information will be stored in the contacts section.
Note that parent names do not automatically display in the contacts section. You need to search by either first name, last name, or email address to find your parents.
Search Console
- The Search Console section allows you to search by Last name, First name, Email address, and any other fields that you identify as an ID field in the Global Setup / Contacts page.
- You can select a contact record and then click on the Delete button to delete a contact, or click on the Reset PW button to reset the password for a contact.
View the Info
After you search, you can select a contact in the search results. On the right side, you will see the contact's information. There are several small tabs on the right.
- The Contact Info tab will display the contact's Email, First name, Last name, admin level, and customer access rights, as well as any fields you may have included from the Global Setup / Contacts page.
- The Appointments tab, not to be confused with the main Appointments tab on the top line, shows all the selected contact's appointments.
- The Log tab shows what emails have been sent and when appointments were booked or canceled.
- The Vendor Access tab allows you to set up Resource Access and Event Access for your administrators.
IMPORTANT NOTE: If you are adding a new contact with an access level of either Appointment Viewer, Appointment Maker, or Resource Administrator, make sure you check the resource box in the Vendor Access tab, Resource Access section.
On the Vendor Access tab, the Master Access section with the 'allow access to all events and all resources' check box is available for Appointment Viewer and Appointment Maker access levels only. The Resource Administrator and Event Administrator access levels do not support the master access.
Once you have selected a contact, you will also have the option to reset the password for a contact. The Reset PW button will reset the password to the stored default password that is set on your account. To view or change the default password, go to the Global Setup / Contacts page, Advanced Options section.
Add a new Contact
To add a new contact, select the Add button. In the drop-down, you would have 5 options:
- Admin
- Teacher
- Student
- Parent
- Other
Selecting one of these options will display an appropriate form; each form includes different contact fields, oriented to the contact you are going to add. On the form, you will need to fill in the fields where you see the text <not entered>.
The form will not allow you to create a new contact record with the email address that already exists on the vendor account.
Directions for Parents
Follow the link provided by your school to access the Scheduler. Once on the site, follow the steps below:
1. Sign In
- Enter Email: Type your email address and click Next.
- Returning Users: If your email is recognized, enter your password.
- New Users: If your email is not registered, follow the prompts to Sign Up.
2. Select Teachers
By default, all of your student's teachers will appear.
- To select a teacher: Check the box next to their name. Or to select them all by clicking the three dots and then selecting the option 'Select All'.
- To proceed: Click Filter Slots once you have finalized your list.


3. Booking Appointments
The scheduling grid displays available times as squares with a plus sign (+).
- Click on your preferred Time Square.
- Enter in the Student Name or any other prompts selected by your school
- Click Create Appointment.
- A confirmation message will briefly appear at the top of the screen to confirm your booking.
- Repeat these steps for each teacher you wish to visit.
Managing Your Schedule
View or Print
To see your full itinerary, click the Printable Schedule on the left-hand sidebar.
Changes & Cancellations
If you are using a Computer (Desktop):
-
Click My Appointments on the left-hand sidebar.
-
Locate the appointment you wish to change.
-
Hover your mouse over the appointment to reveal the Details, Edit, and Cancel options on the right.
If you are using a Mobile Phone:
Important Notes:
- If you have questions or need technical assistance, please call the school office.
Handling Appointment Errors
If an appointment appears with a red border, it indicates a system error or a scheduling conflict (such as a double-booking). Follow these steps to resolve it:
1. Identify the Issue
Click on the red-bordered appointment. Look at the bottom-left area of the screen (below the calendar) to read the specific error message.
2. Choose a Resolution
Once you understand the conflict, you have two options:
- To Remove the Appointment: If the slot was booked in error, click Cancel Appointment.
- To Keep the Appointment: If you wish to bypass the warning and allow the booking anyway, click Confirm Appointment. This will "force" the appointment and clear the red highlighting.
Other Appointment Options
On the Appointments page, you can click on an existing appointment. Select the Appointments drop-down to see the following options:
Confirm Appointment - this will be enabled if you have clicked on a red problem appointment and will allow you to confirm the problem appointment.
Cancel Appointment - will allow you to cancel the appointment and optionally send a cancellation email.
Edit Appointment - will allow you to edit the appointment details for an appointment. For example, if you were prompting your parents for additional appointment-specific information, you would be able to edit that information here.
Change Time - will allow you to move the appointment to a new time.
Send Reminder - will send a reminder email to the parent.
Customer Info - will bring up the Contact Information dialog box for the parent.
Modifying Teacher or Room Data
Teachers
Once the teacher has been imported into the system the teacher’s names will appear in the contacts and also in the resource listing on the Appointments page.
Change the spelling of a teacher's name
- From the Admin UI, open the event.
- On the right-hand side in the list of teachers select the teacher that you want to change, select the Teachers drop-down and then the Assign Contact option. A dialog box called Select person will pop up that is very similar to the Contacts page.
- On the Select person dialog box click on the 'Show Full Dialog' button.
- Search for the teacher on the left-hand side, when his/her information displays on the right-hand side, correct the name and then click "Select".
Rooms
To display the Room column on the event scheduler, follow these steps:
To update a room number, follow these steps:
-
Select the Appointments tab.
-
Locate the room listed next to the teacher's name.
-
Double-click the room number to edit it directly.
Passwords
Resetting Passwords for Individual Contacts
Note: The default password is found and managed on the Global Setup / Contacts page, Advanced Options section.
Resetting Passwords for All Teachers
To perform a bulk password reset for your teaching staff:
Problem Appointments
The Appointments List serves as a master record for all bookings. It is also your primary tool for identifying and resolving scheduling conflicts that require administrative attention.
Problem Appointments (Displayed in Red)
Appointments appear in red when they violate pre-established scheduling rules (e.g., rules set within the Settings / UI Setup tab).
-
Identifying the Issue: Select the appointment to view the specific error reason, which will appear beneath the calendar on the left-hand side.
-
Resolving the Conflict: To override the rule and keep the booking, select the Appointments dropdown and click Confirm Appointment.
Red appointments are not visible to parents. An administrator must manually confirm them for the appointment to become "active," appear in the parent's schedule, and trigger automated reminders.
In-Progress Bookings (Displayed in Orange)
When a parent is actively booking, the status Customer is creating this appointment will appear on the Appointments tab, and the slot will turn orange.
-
Manual Restrictions: These slots cannot be manually deleted or selected for email notifications while in this state.
-
Conflict Prevention: This status prevents administrators from accidentally booking over a slot a parent is currently navigating.
-
System Cleanup: If a user remains inactive for an extended period without completing the booking, the system will automatically release the slot. Once the parent clicks Create Appointment, the orange status is removed, and the booking is finalized.
Deleted Slots vs. Deleted Appointments
It is important to note that deleting a time slot does not delete the appointments associated with it. Instead:
-
The appointments are flagged as "Problem" bookings.
-
They will appear in the Appointments List tab for administrative review.
-
You must resolve these flagged items to ensure they are either confirmed or properly canceled.
Reports
Upon logging into your pickAtime account, you will default to the Event Reporting page within the Admin tool. Reports are divided into two categories: Event-Specific and Account-Specific.
Event Reports
First, use the Event dropdown to select your specific event. Note: You only need to adjust the "From" and "To" date fields if you are running reports for an event that has already concluded.
Teachers' Schedule
This shows the appointment schedule for each teacher. Under Additional report fields, the links "Student's contact's field", "Parent's contact's fields", and "Appointment fields" are available on this report. There will also be a pull-down where you can select the report for a specific teacher name.
You can also check the box "Show All Slots" to review the list of all slots for your teachers.
On the Teachers' schedule, you have the option to email the report to all your teachers or to an individual teacher. In the Teacher pull-down, you can select All or the name of an individual teacher and then select the Email Report button.
Teachers' appts
This report displays the number of appointments that have been scheduled for each teacher.
Parents’ Schedule
This will produce a sorted list of the appointments for each parent. Under Additional report fields, the links "Student's contact's field" and "Appointment fields" are available to add additional student and/or appointment information to this report. There will also be a pull-down where you can select the report for a specific parent name.
On the Parents' schedule, you have the option to email the report to all your parents or to an individual parent. In the Parent pull-down, you can select All or the name of an individual parent and then select the Email Report button.
*This report can be sent to the parents
Students’ Schedule
This will produce a sorted list of the appointments for each student. Under Additional report fields, the links "Parent's contact's field" and "Appointment fields" are available to add additional parent and/or appointment information to this report. There will also be a pull-down where you can select the report for a specific student name.
*This report can be sent to the students
Number of parents and students
This will display the number of parents and students who have appointments in the system. This will be sorted by date if your event spans several days.
Appointment Histogram
This report shows the number of appointments by date and time.
Appointment Count by parent
This will provide a list of all the parents who have booked appointments and the number of appointments they have made. Under Additional report fields, the link “Parent’s contact’s fields” is available to add information (such as email address) to this report.
Appointment Count by student
This will provide a list of all the students where the parent has made an appointment. Under Additional report fields, the link "Student's contact's fields" is available to add student information to this report.
All Teacher/Team Appointments
This report is similar to the Teachers' Schedule report. However, if you have created any teams of teachers, each teacher will have a master schedule showing all appointments booked with them individually and all appointments booked with them as a team.
Appointments by Date/Time
This report will list each appointment by date and time.
Display only empty (not blocked) slots
This report displays a list of empty slots for each teacher.
Managing Reports
For every report generated, you have the following options:
-
Format: Print, Export to XML, or Export to a Tab-delimited file (Excel compatible).
-
Email: Send the report directly to yourself or others.
-
Save Settings: If you customise a report (e.g., by adding "Additional report fields"), click Save Report Settings. The system will remember these preferences the next time you run the report.
-
Automated Delivery: Administrators can click Schedule Report Delivery to set a date range, time of day, and frequency for automated email delivery.
Save Report Settings
There is also an option on any report to save the settings for that report. For example, if you add additional fields to your report, such as the email address of the participant, you can now add these fields and then select the Save Report Settings button, and your new selection will be saved. The next time you return to this report, you will see the additional fields displayed.
Account Reports
To access these, toggle the view to Account Reports mode. These cover data across your entire vendor account.
You will have the option of the following reports:
Settings
The Settings report will list the URL that was automatically created for your online scheduler.
Account - Invoices and Payments
This report will display the balance on your account. It will also list your invoices and payments. You can click on an invoice # to see the invoice. On any invoice page, you will have the option to pay by credit card.
Problem Appointments
If there are any "problem appointments" on your account, this report will provide you with a list of these appointments. A "problem appointment" is an appointment that has been placed "on hold". For example, if you delete a slot that had an appointment on it, the appointment is not automatically deleted. The appointment is tagged as a "problem appointment", and you must decide what you will do with this appointment.
Appointments from all events
This report will display a list of all appointments from all your events.
Appointments for all Roster events
This report will display a list of all appointments from all Roster events.
Contacts without appointments
This report will display a list of all the contacts that have logged into your account and have not booked an appointment. The "Contact's fields" link is available on this report to add contact information (ex. email address) to your report.
List of Admins
This report will display a list of your admins. It will show you the email address that was imported, as well as the Access Level provided to each admin. When teachers are imported, they are automatically given Appointment Viewer access, and this report will also show you the resources (teacher names) that each teacher has access to. To see when your admin(s) last logged in, click the green “Additional Fields” button and then select “Last Logged In.”
% Full
If you have multiple events, this will show you the percentage of booked slots out of the total available slots.
Cancelled Appointments
This report lists all cancelled appointments, the date and time the appointment was cancelled, and the email address of the Contact Person who cancelled the appointment.
Appointment Counts for all Events
This will provide you with the total appointment counts for all your events.
Resource Mapping
This report shows all the Resources on your events and the contacts (if any) associated with each Resource. For Parent Teacher Conference scheduling, this will allow you to check the connection between assigned contacts (teachers) and Teams.
Parents without Students
This report displays a list of parents who are not associated with any students.
Students without Parents
This report displays a list of students who are not associated with any parents.
Parent-Student Relationship
This report displays a table showing the association between parents and students.
Scheduled Report Delivery
This report displays the details of your Scheduled Report Delivery settings. This shows the reports you have scheduled for delivery, what the time period is for those reports, who the report is going to, the interval frequency of the report, and when the report was last sent. You can also cancel the Scheduled Report Delivery from here by selecting the delete option next to the report.
Appointments Summary by Contacts
This report allows admins to see appointments booked by contact(s) on all events across the Vendor account.
Scheduling Parent Apppointments in the Admin UI
Administrators can manually book appointments for parents through the Appointments tab. Follow these steps to ensure the booking is correctly attributed.
1. Navigate to the Schedule
-
Access the Tab: Click the Appointments tab at the top of the Admin UI.
-
Set the Date: Use the calendar on the left-hand side to select the specific day of the event.
-
Select the Teacher: Choose the teacher's name from the list on the right to load their specific schedule.
2. Select a Time Slot
-
Locate the desired time on the teacher's schedule.
-
Click the Green Plus Sign (+) in the time slot. The Select Person pop-up will show up.
3. Identify or Create the Parent Contact
You must link the appointment to a parent contact. You can either find an existing user or create a one-time entry:
Option A: Search for an Existing Parent
-
Type the parent's name (or the first few letters) into the search bar.
-
Select the correct name from the results list on the left.
-
Review the contact details on the right to ensure accuracy, then click OK.
Option B: Create a New Contact
-
If the parent is not found, enter their First Name, Last Name, and Email Address in the fields on the left.
-
Click the Add > Parent... button to add them to your database.
-
Click OK to proceed.
4. Finalize the Appointment
The Create Appointment window will appear once a parent is selected.
-
Enter Student Name: Type the student's name in the designated field. This is crucial for the teacher to know which student the meeting concerns.
-
Save: Click OK to finalize the booking. The slot will now appear as occupied on the schedule.
Sending Custom Emails Using Appointments List page
The Appointments List page provides a powerful, spreadsheet-style view of your bookings. Unlike the standard Appointments tab, this page is designed for bulk actions, advanced filtering, and communication.
Filtering and Searching
You can generate a targeted list of participants by filtering by:
-
Single Date: View all bookings for one specific day.
-
Date Range: View bookings across a week or the duration of your event.
-
Event: View every appointment associated with a specific event.
Once filtered, the page will display a comprehensive list of parents and their corresponding appointment details.
Management Actions
From this view, you can perform the following administrative tasks:
-
Confirm: Validate "Problem" appointments (red slots) to make them active.
-
Delete: Remove appointments or slots in bulk.
-
Recreate: Restore slots that may have been previously removed.
-
Email: Send direct communications to your filtered list.
Sending Emails to Participants
To communicate with parents directly from this list:
-
Click the Send Email button at the top of the page.
-
Choose your recipients:
-
Send to All: Emails everyone currently visible in your filtered list.
-
Send to Selected: Emails only the participants you have manually checked in the list.
-
-
A Send Email window will appear, allowing you to choose the email type:
-
Reminder Email: Sends a standard appointment reminder.
-
Custom Email: Allows you to draft a unique message for this specific group.
-
Pro Tip: While you can customize the text in the window, your default templates are managed on the Settings / Notification Setup page.
Teacher Access
Teachers can access their appointment schedules by logging in through the school’s unique scheduling link.
Staff with Dual Roles (Teacher & Parent)
If a teacher is also a parent at the school, the system will default to the Parent Scheduling page upon login.
-
To view your professional schedule, click the Admin UI link located on the left-hand navigation menu. This will transition you to the reporting section.
How to View Your Conference Schedule
-
Login: Access the site using your school email address.
-
Select Event: On the Event Reporting page, ensure the correct conference is selected in the Event dropdown menu.
-
Run Report: Select Teachers’ Schedule from the Report dropdown.
-
View Openings: To see your entire availability (including unscheduled times), check the Show All Slots box.
Key Features for Teachers
-
Privacy: Teachers are restricted to viewing only their own schedules. Full Administrators retain the ability to view all schedules across the school.
-
Email Delivery: Click the Email Report button to have a copy of your current schedule sent directly to your inbox.
-
Troubleshooting: If you see the message “You do not have access to any resource,” please contact your system administrator. This indicates your email address has not yet been linked to your teacher profile.
Viewing Appointments on the Appointments tab
You can adjust the layout of the Appointments tab to make your schedule easier to read and navigate. These changes help you focus on specific time slots or view more teachers on a single screen.
Adjusting Row Height and Column Width
-
Increase Row Height: To make time slots appear taller, hover your mouse over any horizontal line separating the time markers. When the cursor changes, click and drag vertically to expand or shrink the row size.
-
Adjust Column Width: To make a teacher’s column wider or narrower, hover over the vertical line between two resource columns. Click and drag horizontally to adjust the width.
Managing Time Visibility and Scrolling
For more advanced layout changes, navigate to the Settings / Vendor UI Setup tab:
-
Grid Line Frequency: You can change how often time markers and gray lines appear by adjusting the "Time Mark Display on the Appointments page" settings.
-
Scroll Bar Range: Under "Hours visible on the Appointments page," you can set the minimum and maximum hours shown.
-
Tip: These settings are event-specific but apply to all days within that event. If your Monday sessions are 8:00 AM – 5:00 PM and your Tuesday sessions are 9:00 AM – 6:00 PM, set your range from 8:00 AM to 6:00 PM to ensure all slots are accessible via the scroll bar.
-