If you have multiple dates for your Parent‐Teacher Conferences, you do not need to create multiple events. Any event can have any number of dates on it.
##### Duplicate PTA Option The Duplicate PTA feature will allow you to create a COPY of a previous event. This is generally only used when you want a new event with the exact same data as a previous event - for example, if you are doing a second set of conferences in the year with no changes to the enrollment data. The Duplicate PTA option is enabled on a request-only basis. If you would like to use this option, email support@pickatime.com. # STEP TWO: Import Data Files ### **Data Files** There are 4 required data files for the Parent Teacher Appointments Scheduler: a Student file, a Teacher file, a Classes file, and an Enrollment file. Optionally you can create a Parent File and a Parent Student Relationship File. Generally, the Parent File and the Parent Student Relationship File are only used when you are setting up a Single-Sign On Option. #### **Student File** This file lists all the students. The student file must contain the following fields: - **StudentID **identifies the student - **First **contains the first name of the student - **Last **contains the last name of the student - **SecurityValue** is the value that a parent will enter to identify their child when they first sign up. For example, the SecurityValue could be the student’s birthday, and you would then prompt your parents to enter in a birthday in a predetermined format (e.g. dd/mm/yyyy). The SecurityValue prevents a parent from entering an incorrect StudentID and accidentally selecting the wrong child.| **StudentID** | **SecurityValue** | **First** | **Last** |
| 4321 | 04/12/2012 | Amanda | Jones |
| 4322 | 08/04/2012 | Timothy | Smith |
Do not recycle StudentID's without first removing existing students. For example, if StudentID 101 last year was assigned to Betsy Smith, and this year StudentID 101 is assigned to William Johnson, the parent of Betsy Smith will log in this year and see student William Johnson listed as her child.
If you will be recycling student IDs, prior to uploading your new student file, remove all stored contacts. You can do this on the Global Setup / Contacts Setup page under 'remove all contacts.'
#### **Key** **StudentID **is the key field on this file and must be unique. #### **Other Columns** A column called **Action** can be created in order to delete an existing entry. If you need to delete previously uploaded data, you could resubmit the data file with this column title and the word delete entered in each row. This column defaults to "update" if the column is not present. *The Action column is only needed if you will be deleting data.* #### **Teacher File** This file lists all the teachers. The teacher file must contain the following fields: - **TeacherID **identifies the teacher - **First **contains the first name of the teacher - **Last **contains the last name of the teacher - The **email** contains the teacher's email address. Only one email address should be entered here. - The **room** is where the teacher will be at the parent‐teacher conferences. This does not have to be the same room that the class is held in. This field can be helpful for reporting purposes. If you use this field, you can then produce a report by room number.| **TeacherID** | **First** | **Last** | **Email** | **Room** |
| 234 | Angela | Frank | a@school.com | 106 |
| 225 | Bobby | Smith | b@school.com | Library |
Once the teachers have taken ownership of their account and created a password, the import will not change the password. However, on the Global Setup / Contacts Setup page, you can reset the password for all your teachers. This is the reset administrative password button.
**Virtual Room** is used to import an online meeting link for the teacher if you are having Virtual Conferences or allowing a choice of In‐Person or Virtual conferences. It is only used when you are creating your own meeting links for your teachers. If you are using the pickAtime integration for online meetings, the link will be generated automatically. **AccessLevel** allows you to set the Admin level for your teachers. An AccessLevel of 3 will provide your teachers with Resource Administrator access, and they will then be able to block their own schedule. The default access level for a teacher is Appointment Viewer. **GroupName** allows you to classify a teacher with a GroupName (e.g., Middle School Teacher, Science Teacher). This is useful if you want to create different slots for different groups of teachers. For example, if all your Middle School Teachers needed 15-minute slots and all your High School Teachers needed 20-minute slots, you might set a group name for your teachers and then create slots for the entire group. The Group Name can also be used on the parent scheduling page to display teachers under the Group Name. A column named **Action** can be created to delete an existing entry. If you need to delete previously uploaded data, you could resubmit the data file with this column title and the word delete entered in each row. This column defaults to "update" if the column is not present. *The Action column is only needed if you will be deleting data.* #### **Class File** This file defines the classes. The class file must contain the following fields - **ClassID **identifies the class. - **TeacherID **identifies the teacher; this field must match the TeacherID listed in the teacher file - **ClassName** is an optional field and provides a name for the class. This name can be displayed on the CUI legend. For example, if you have multiple sections of Math, each with a different ClassID, you might want to import a field for the Name with the value "Math." **GroupName** is an optional field and allows you to categorize your teachers with a Group Name. For example, you might want to categorize some teachers as Upper School teachers and some as Lower School teachers. This will allow you to create different time slots for different groups of teachers easily.| **ClassID** | **TeacherID** | **ClassName** |
| Math - Sec200 | 234 | Math |
| Math - Sec201 | 235 | Math |
This table must be provided in a tab‐delimited text file (MS Excel ‐> \*.txt (Tab delimited); Google Sheets ‐ > \*.tsv (Tab delimited).
The first row should contain the column titles. The column titles must be labeled exactly as listed above. Notice that none of the column titles has spaces in them. #### **Key** **ClassID** is the key field on this file and must be unique for each teacher. Each **ClassID** should only exist in one row in this file. Keep in mind that the **ClassID **has to be unique for each teacher. If your database has one "English 9" class with multiple sessions each taught by a different teacher, then you will need a different **ClassID **for each teacher. You can concatenate your database's class identifier with the teacher ID to produce something like "Eng9‐869," indicating that this is the English 9 class taught by teacher 869. If you do this, then make sure that the enrollment file has "Eng9‐869" in it, not "English 9" or "Eng9". #### **Other Columns** These columns can optionally be used. A column called **Action **can be created in order to delete an existing entry. If you need to delete previously uploaded data, you could resubmit the data file with this column title and the word delete entered in each row. This column defaults to "update" if the column is not present. The **Action** column is only needed if you will be deleting data. **PTAN** is the number of allowed appointments for each student's parent for that class. For example, some schools allow the parent to have 2 appointments with a home room teacher or an advisor. If the column is not present, 1 is assumed. **Max** is the largest number of students that could sign up for the class. This must be larger than the number of students that are in the class. If this column is not present, a very large number is the default. #### **Enrollment File** This file specifies the classes each student is enrolled in. The enrollment file must contain the following fields **StudentID **identifies the student; this must match the **StudentID **listed in the student file **ClassID **identifies the class; this must match the **ClassID **listed in the class file This table must be provided in a *tab‐delimited text **file* (MS Excel ‐> \*.txt (Tab delimited); Google Sheets ‐ > \*.tsv (Tab delimited). The first row should contain the column titles. The column titles must be labeled exactly as listed above. Notice that none of the column titles has spaces in them. Your file can be formatted in one of two different ways. ##### **Option # 1** With this option, only one class is listed in the **ClassID** column. If a student has multiple classes you will have multiple rows for each student.| **StudentID** | **ClassID** |
| 123 | English-SecB |
| 123 | Science |
| **StudentID** | **ClassID** | **ClassID** |
| 123 | English-SecB | Science |
| 456 | Math | Gym |
| **TeacherID** | **First** | **Last** | **Email** |
| T123 | Anne | Smith | asmith@school.com |
| T124 | Harold | Rice | hrice@school.com |
| **TeacherID** | **ClassID** |
| T123;T124 | Math101 |
| T123 | Biology |
| T124 | English |
| **ParentID** | **First ** | **Last** | **Email** |
| 123 | John | Smith | js@parent.com |
| 456 | Susie | Smith | ss@parent.com |
| **StudentID** | **ParentID** |
| 37890 | 4451 |
| 37891 | 4478 |
This table must be provided in a *tab‐delimited text **file* (MS Excel ‐> \*.txt (Tab delimited); Google Sheets ‐ > \*.tsv (Tab delimited).
#### Mistakes to Avoid - Don't export an entire year of class data when you just want half a school year. - If you use a school management database identifier for the StudentID, and your parents are not familiar with this number, then use a concatenation of the student's first name and last name (ex, "BenFranklin") when you prompt your parents to identify their student. You do not need to create this concatenated field; simply check the box "Use First + Last Name as StudentID" in the Parent Login section of the Global Setup / Business Setup page. Then, on the label for this field that your parents will see on the Customer User Interface, enter text describing this field to your parents. For example, you can enter the following text for your prompt: "First Name + Last Name, e.g. " "BenjaminFranklin" You would enter this text in the CUI Messages / Student / StudentID label (see CUI Messages page). - Be careful with leading zeros on numeric IDs. For example, if you use Excel to open a text file that has studentIDs that are all numeric and have leading zeros, the zeros will be stripped off when you save the file. - If your student IDs have changed from the previous year, you will need to make sure that you remove the previous year's stored student data. See the section on removing contacts on the [Previous Users of pickAtime page.](https://docs.google.com/document/d/11V8DzJiFqX4otutBNBTbS5UqCSYEFw45DkOT5b-Uv08/edit?tab=t.0#heading=h.zbtvv3qkt7vf) - If your student IDs are simply a number you have assigned to each student, and that number may change each year, make sure you have removed the previous year's stored student data. See the section on removing contacts on the [Previous Users of pickAtime](https://docs.google.com/document/d/11V8DzJiFqX4otutBNBTbS5UqCSYEFw45DkOT5b-Uv08/edit?tab=t.0#heading=h.zbtvv3qkt7vf) page. - If you have older classes and enrollments, you can now delete the event’s existing classes and enrollments directly from the Import page before uploading new data. This option will also delete the classes’ associated teacher resources, making it easier to remove bad data without leaving the Importer page. To locate this feature on the Imports page, click the Class file option within the File Type drop-down menu. Make sure you use our naming convention when you are importing Emails. The column should be labeled Email. For example, if you import a column labeled Email\_Address, Teachers\_Email\_Address, or anything labeled other than Email this column will be added but will not be considered the Email to be used for the Teacher or Participant to use as their login Email. ### **Import Process** Once you have created your 4 import files, you are ready to import these files to your pickAtime account. All 4 files must be tab‐delimited text files. Locate the Importer under Main Navigation on the left side. 1. After logging into pickAtime, click Importer. 2. Select Data Type of School. 3. Select your event from the Event pull‐down. 4. Set the File Type to students 5. Click Browse and locate your student file on your computer 6. Click on Import If you have no errors on your import, repeat steps 4 ‐ 6 for your teacher file, your classes file, and your enrollment file, changing the File Type drop‐down to the correct type for your file. For all 4 data files, the data type should be set to School. If you have any error messages on the import, read that section in the manual. Keep in mind that each row in the four tables has a unique identifier, which ensures that if you import the same data more than once no harm will be done. The system does not create new data entries each time the data is imported. It first checks to see if it has the data row you are importing (by matching the key field), then it either updates the existing data or it creates a new record. If you leave out some data, you can simply import the missing data.**IMPORTANT NOTE**: Please be sure that the number of rows imported matches the number of rows on your data file.
- If you receive any errors when importing your teacher file, correct these before importing your class and enrollment files. - If you receive any errors when importing your class file, correct these before importing your enrollment file. - You can delete existing resources, classes, and enrollments from the Import page, making it easier to remove bad/old data without navigating away from the Importer page. To do this, on the Imports page, click the Class file option within the File Type drop-down menu. [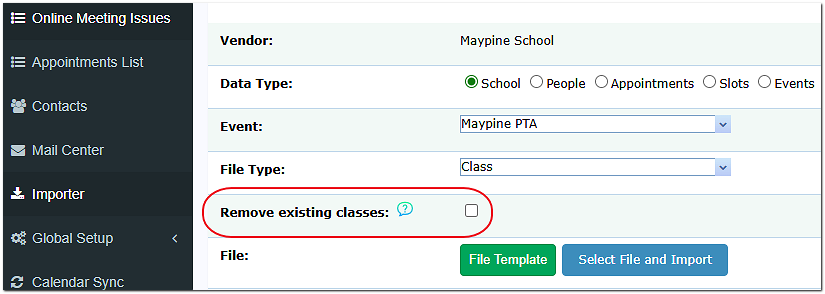](https://help.pickatime.com/uploads/images/gallery/2026-05/zGHimage.png) ### **Error Messages on Import** ##### **General Error Messages** *Incorrect file type was supplied.* *The file must be a tab‐delimited text file.* Make sure that you have created and are importing a tab‐delimited text file. ##### **Error messages when importing Student File** *The file does not have a column labeled "First" or "First Name" and The file does not have a column labeled "StudentID"* Check the labels you have created for each column in your file. They must match exactly our specifications. For example the studentID column needs to be labeled 'StudentID' not something else such as 'Student Lunch Number'. *The ID field is empty for XX* Check the file to confirm that the column has data (first name, last name, studentid, date of birth) within it. ##### **Error message when importing the Teacher file** *Found contact with teacherid of ABC and a different contact with the email of betsy@noemail.com* This message indicates that you have a row in your teacher file with teacherID ABC and email address betsy@noemail.com. However, in the Admin UI, you already have a contact with a teacherID of ABC and a different email address than betsy@noemail.com, AND a contact with the email address of betsy@noemail.com and a different teacherID than ABC. For example, on your import file, you have this: **TeacherID Email** - ABC betsy@noemail.com But in the Admin UI, you have two different contacts. **TeacherID Email** - ABC annie@noemail.com - DEF betsy@noemail.com You need to correct your data in the Admin UI and then re‐import your teacher file. In the Admin UI, search for the contact with that email address that was flagged. If the contact you locate has a different teacherID than on your teacher file, and is an old contact, then delete that contact and re‐import your teacher file. During the teacher file import, we look for a matching teacherID record or a matching email address record. If we find a match on either, we update the rest of the information. For example, if we find a matching teacherID, we update the email address and name of the teacher. If we find a matching email address, we update the teacherID and the name of the teacher. However, if we find two different contact records, one with a matching teacherID and one with a matching email address, we do not know which one should be updated, and we flag this error. *The ID field is empty for XX* Check the file to confirm that the column has data (first name, last name, email) within it. *The password field should be 6 characters or more for XX.* Check the file to confirm that the password column has the correct password data within it. ##### **Error messages when importing the class file** *Could not find teacher with teacherID XX* This error message comes up when importing a Class file with a teacherID which is not on the Teacher File. The Classes file will match each class to a teacher. If the teacher was not previously imported into the teacher file, then no match will be found, and the class will not be imported. Take a look at your Teacher file and make sure the TeacherID listed in the error message exists on the Teacher file. *Class 'Math' already exists with a different teacher than '123'* This means that your class file has a row with ClassID: Math and TeacherID: 123. But, Class Math has already been assigned to a different teacher than teacherID 123. The ClassID must be unique for each teacher. For example, if you have two rows such as: TeacherID ClassID 123 Math 456 Math We will flag the second row as an error. The ClassID must be unique for each teacher, otherwise when we import the enrollment file, we do not know which students in class Math have teacher 123 and which students in class Math have teacher 456. You will need to make the ClassID unique by either appending a section number to the ClassID or a teacher identifier to the Class ID. Your enrollment file will also need to be updated to reflect this. Also note that in the example above, ClassID Math has been added to teacherID 123. Prior to fixing your import files and importing again, you will want to remove ClassID Math. You can remove an individual class by going to the ClassEditor, selecting the 'Show only Classes', locating and then clicking the red X next to the name. You can delete all of the event's resources, classes, and enrollments from the Import page as well, making it easier to remove the bad/old data without navigating away from the Importer page. To do this, on the Imports page, click the Class file option within the File Type drop-down menu, then click 'Remove existing Classes'. ##### **Error messages when importing the Enrollment file** *Student ID not found* This error message comes up when importing an enrollment file that contains a StudentID that does not exist on the Student File. The enrollment file must be imported after the student, teacher, and class files have been imported. When you import the enrollment file, the student ID needs to find a match to a student in the student file. The error message: Student ID not found means that the Student ID in the enrollment file did not have a corresponding Student ID in the student file. Example: an error message of Student 12345 not found means that a student with the StudentID of 12345 was NOT imported on your student file. *Class XX not found* This error message indicates that your enrollment file contains a ClassID that was not on the Class File. Take a look at your Class file and make sure that the ClassID listed in the error message exists on the Class file. Note that if you are receiving this error message on classes that you do not care about, and where the teachers will not be conferencing (for example, a Study Hall) then you can ignore these messages ‐ they do not need to be corrected. Example: an error message of Class Math‐101 not found indicates that Class Math‐101 was NOT imported into your Class file. *No class ID found for student XX* This message indicates that you have a row with a StudentID that does not contain any ClassIDs. *Student XX not in class YY* This message comes up when you are deleting enrollment, and indicates the student XX was not found in class YY. *Class XX has reached maximum enrollment. Student XX has been skipped.* This indicates that you have set a maximum allowed enrollment for the class and you are importing more rows than the allowed amount. Go into the Class Editor page, click on the teacher and then the class. Check the # you see in the Maximum column and see if this is set correctly. ##### **Error message when importing Parent File** *The file does not have a column labeled "First" or "First Name"* Check the labels you have created for each column in your file. They must match our specifications exactly. ##### **Error message when importing Parent Student relationship file** *Could not find Parent with ID 'XX' or Student with ID 'YY' as this parent/ student was not imported* This error message indicates that either the ParentID as listed on your parent‐student relationship file was not found or the StudentID as listed on your parent‐student relationship file was not found. Refer back to your Student file or your Parent file to make sure the parent and the student were imported. ### **How to Correct Bad Data** ##### **STUDENT FILE** *My students names were reversed* Simply correct your file and re‐import. *My student ID’s were incorrect* Take your incorrect file, add a new column labeled Action, and fill this with the word Delete. Then re‐import this file. This will remove all your incorrectly imported students. *I forgot the SecurityValue field* Simply add the field to your file and re‐import. *My file was missing some students* Import your student file again with the newly included students. Then also import your enrollment file to add in the enrollment for these students. ##### **TEACHER FILE** For teacher file import issues, how you resolve these depends on whether you have already imported your class file. Once the class file has been imported your teachers are turned into a "resource" on the Appointments page and can not simply be updated with a new teacher file import. See the two different sections below. **WHEN YOU HAVE NOT IMPORTED YOUR CLASS FILE ** *My teacher names were reversed* Simply correct your file and re‐import. *My teacher file was not correct, and I have not yet imported my class file* Take your incorrect teacher file, add a new column labeled Action, and fill this with the Delete. Then re‐ import this file. This will remove all your incorrectly imported teachers. *My teacher IDs are incorrect, and I have not yet imported my class file* Take your teacher file (with the incorrect teacher ID's) add in a column labeled Action, and fill this column with the word Delete. Then import this file to remove the incorrect teachers. **WHEN YOU HAVE ALREADY IMPORTED YOUR CLASS FILE** *My teachers are not correct, and I have imported my class file* When your class file is imported, your teachers get placed on the Appointments page and on the Class Editor page. If you have some teachers that you do not want, then you can go to the Class Editor page and remove teachers who are not participating in the conferences. *My teachers are assigned to the wrong classes? (see also below on the Class File import)* Go into the Class Editor and remove all your classes. Then import your class file again. ##### **CLASS FILE** *I imported the wrong classes? I imported too many classes?* Go into the Class Editor and delete all your classes or the classes you do not want. You can remove an individual class by going to the ClassEditor, selecting the 'Show only Classes', locating and then clicking the red X next to the name, or you can select all of them and then delete. You can also delete all of the event's resources, classes, and enrollments from the Import page, making it easier to remove the bad/old data without navigating away from the Importer page. To do this, on the Imports page, click the Class file option within the File Type drop-down menu, then click 'Remove existing Classes'. *On my class import, I received this message, “Class A already exists but with a different teacher than Teacher B.”* This means that on your class file you have Class A listed in two different rows and belonging to two different teachers. The ClassID must be unique for each teacher. Take a look at the Class file and determine which is the correct teacher for Class A. If your 2nd reference is incorrect, then correct that row and re‐import. If your first row was incorrect, then go into the Class Editor, click on the incorrect teacher for the class, and then click on the class. You can either delete the class or move the class to the correct teacher. *My classes are assigned to the wrong teachers.* Go into the Class Editor and remove all your classes. Then import your class file again. You can remove an individual class by going to the ClassEditor, selecting the 'Show only Classes', locating and then clicking the red X next to the name, or you can select all of them and then delete. You can also delete all of the event's resources, classes, and enrollments from the Import page, making it easier to remove the bad/old data without navigating away from the Importer page. To do this, on the Imports page, click the Class file option within the File Type drop-down menu, then click 'Remove existing Classes'. *One class I imported was assigned to the wrong teacher.* The simplest solution is to go into the Class Editor and move the class from the incorrect teacher to the correct teacher. If you simply change your class file, you will be adding the correct class to the correct teacher, but the incorrect class ‐ teacher assignment will not get removed. *I missed some classes. * Simply add to your class file and import again, or import a file with the missing classes. ##### **ENROLLMENT FILE** *I imported the wrong enrollment* *I imported last year’s enrollment data* Delete all your classes by going to the Class Editor. Then import your class file and a corrected enrollment file. My enrollment file did not include all enrollment Simply import your enrollment file, with the newly included enrollment data ##### **HOW TO REMOVE IMPORTED DATA** To remove everything: 1. On the Events List page, create a new event and select the Add button using your last event as a template. Then delete the old event. This will delete your class and enrollment data. 2. Then delete the stored contacts on the account. These are the parent and teacher contacts, as they are on the account, not just the event. This is done by going into the Global Setup / Contacts page, selecting the Show advanced options... and clicking on the Remove all customers button. Select the level to delete of Event Administrator. Note that this will also remove parents. 3. To remove the student contacts, select the Remove students not enrolled in a class button. This may take a few minutes. You will have an empty event, and you can start over. If your students and teachers are correct, and it is only the Class and Enrollment data that is not, you can simply do item 1 and not item 2. To remove class data, but to keep the slots you have created for your teachers: 1. Go into the Class Viewer and delete all the classes. This will keep your teacher roster on the Appointments page and on the Class Editor page. 2. You will then need to import a new class file and a new enrollment file. To remove student, teacher, class, and enrollment data, but not your parents: 1. On the Events List page, create a new event (select the Add button) using your last event as a template. Then delete the old event. This will delete your class and enrollment data. 2. Take your incorrect or recently imported student and teacher files, add a new column to them labeled Action. Fill this column with the word DELETE and re‐import both files. #### Frequently Asked Questions on School Data *We mistakenly imported the previous semester's data, but we have too many parent appointments to start over. Can we import new files?* You can import new data files. However, this will simply add to the existing data. For example, if your class and enrollment file now contain different classes, any new classes will be imported, but classes that were previously imported will not be deleted. To delete classes, you will need to do so in the Class Editor, or create a new data file listing your classes to delete and using the Action column filled with the word delete. Note that a new import will not remove any parent appointments. *We re‐imported our class and enrollment files as we needed to delete some classes. We don't see the changes in the Class Editor.* A new import will simply add to or update existing data. If you have classes to delete, you will need to delete them from the Class Editor page or by using the Action column in the Class File import. To delete via an import, you would add a column labeled Action and filled with the word Delete in the row for a class that you would like to delete. To remove select enrollments, take your incorrect enrollment file, and add a column to it labeled Action. Fill this column with the word delete and then reimport the file. This will remove any matching enrollment records. *We realized that we were missing some class and enrollment data. Can we import a new class and enrollment file? Will this delete any parent appointments that have been booked?* You can import new data files. This will add any new class and enrollment data. It will not delete or disturb parent appointments that have already been booked. ### View Your Data Once you have imported your data, you should go to the Class Editor page to confirm that your data is correct. 1. From the Admin UI on the Events Preview page, select your event from the list and click on the button. 2. Select the Class Editor tab. This tab will display your list of teachers. If you select a teacher's name from the left-hand side, then you will see the list of classes for the teacher. See the [Modifying Teacher or Room Data](https://docs.google.com/document/d/11V8DzJiFqX4otutBNBTbS5UqCSYEFw45DkOT5b-Uv08/edit?tab=t.0#heading=h.jwr4oc9wx2) section of the manual to add or remove teachers. Clicking on a class will bring up the list of students in that class. - If you would like to view the data in class order, check the box on the far right-hand side "show only classes." See the [Moving a Class](https://docs.google.com/document/d/11V8DzJiFqX4otutBNBTbS5UqCSYEFw45DkOT5b-Uv08/edit?tab=t.0#heading=h.4xlleigsgb75) section to move a class and see the [Modifying Enrollment Data](https://docs.google.com/document/d/11V8DzJiFqX4otutBNBTbS5UqCSYEFw45DkOT5b-Uv08/edit?tab=t.0#heading=h.uvmp40hp8z6q) section to add or remove students from classes. **Missing Classes** If you have not made any manual changes to the classes and enrollment within the Admin UI, you can simply import updated class and enrollment files. A new import will not replace what was previously imported, but it will add in any new class and enrollment data. If you have made manual changes in the Admin UI (i.e. changing teachers, moving kids from one class to another), then you will want to import a class file with ONLY the missing class(es) and an enrollment file with ONLY the missing enrollment. These options will not disturb any appointments that have already been made. **Missing Enrollment** If you have not made any manual changes to the enrollment within the Admin UI, you can simply import an updated enrollment file. Any subsequent imports of your class and enrollment files will not change previously imported class and enrollment data. It will simply ADD IN new data that is on the class or enrollment file. # STEP THREE: Create Time Slots ### **Creating Slots** To get started, go to **Events > Preview**, select your event, then click the Appointments tab. From the left-hand calendar, select the date you want to work with. Then open the Slots drop-down and choose Create Slots. #### **Step 1: Choose which teachers to create slots for** In the slot generator, choose whether to create slots for selected teachers or all teachers/resources. To select multiple teachers, hold Ctrl while clicking names in the right-hand panel. #### **Step 2: Set your time and duration**| **Field** | **Description** |
| From | Start time of the first slot |
| To | End time of the last slot |
| Duration | Length of each appointment (in minutes) |
| Travel Break | Optional gap between appointments |
Example: 10-minute slots with a 5-minute travel break create slots at 8:00–8:10, 8:15–8:25, 8:30–8:40, and so on.
Note: If you need a break that doesn't align with your slot duration (e.g., 20-minute slots but a 40-minute lunch break), create slots in two batches — one before the break and one after.
#### **Step 3: Choose appointment type**| **Type** | **Description** | **Indicator** |
| In-Person | Parents receive room/location info | P |
| Virtual | Parents receive a meeting link | V |
| In-Person or Virtual | Parents choose their preferred format | PV |
| **Option** | **What it does** |
| Visible for Customer | Available for online booking |
| Hidden from Customer | Hidden from parents; visible in Admin UI only |
| Shown with "Call" Status | Visible to parents, but they're prompted to call the school to book |
| Make Unavailable | Visible in Admin UI but not bookable online (use for lunch breaks, meetings, etc.) |
Tip: If you created identical slots for all teachers at once, individual slots won't display until you click a specific teacher's name in the right-hand panel.
### **Updating Existing Slots** Use Update Slots to change the characteristics of existing slots without deleting and recreating them. To access it, go to the Appointments tab, select a date and teacher, then choose **Slots > Update Slots** from the drop-down. **You can update:** - Appointment type (e.g., switch from in-person to virtual) - Maximum appointments per slot - Slot visibility (hidden, unavailable, etc.)Important: Update Slots does not change start times, end times, or appointment duration. To change those, you must delete and recreate the slots.
The "Keep existing slot type on slots being updated" checkbox is useful when teachers have already blocked parts of their schedules — it lets you change appointment type without affecting slot type.
### **Blocking Slots** Blocking is the preferred way to temporarily remove availability without permanently deleting a slot. To block a slot, go to the Appointments page and click the X in the corner of the slot. It will turn red and display "Blocked." You can enter a custom message (e.g., "Lunch Break" or "Staff Meeting"). To unblock it, click the X again to restore it to available.Blocked slots appear on reports when the Show All Slots option is enabled.
### **Deleting Slots** Use Delete Time Slots when you need to permanently remove slots. To access it, go to the Appointments tab, select a date and teacher, then choose Slots > Delete Time Slots. If appointments already exist on those slots, a second dialog will appear with these options: - Move appointments to the red Appointments List (a holding area where you can manually rebook or cancel them) - Cancel appointments without sending a notification - Cancel appointments and send a cancellation emailTip: Review whether parents need a cancellation notification before confirming any deletion.
### **Moving Slots** Use Move Slots to transfer an entire day's slots — and any existing appointments — to a new date. This is useful for school closures, rescheduled conference days, or teacher availability changes. To access it, go to the Appointments tab, select a date and teacher, then choose Slots > Move Slots. In the dialog, select the destination date, choose whether to move slots for all teachers or selected teachers, and confirm. Existing appointments transfer to the new date with all parent information intact. Appointment times remain the same.Important: Calendar notification emails are not sent automatically. Advise parents to update any calendar entries they've saved.
You can send a custom notification email to affected parents explaining the change. ### **Copying Slots** Use Copy Slots to duplicate a day's slot structure to another date or teacher — without copying existing appointments. This is helpful when multiple days share the same schedule, or when you want to quickly replicate one teacher's setup for another. To access it, go to the Appointments tab, select a date and teacher, then choose Slots > Copy Slots. Select the destination date and/or teacher(s) and confirm. Slot visibility, appointment type, and availability settings are all preserved. If you also need appointments to transfer, use Move Slots instead. ### **Changing Slot Duration or Times** You cannot modify slot start times, end times, or duration in place. To change any of these, you must: 1. Delete the slots you want to change (or all slots for that day) 2. Recreate them with the correct settings **Example**: If you have 10-minute slots from 8:00 AM–2:00 PM but want 9:00 AM–1:00 PM instead, delete the 8:00–9:00 AM and 1:00–2:00 PM slots (or delete all and start fresh), then create the new schedule. ### **Quick Reference: Which Tool to Use?**| **Situation** | **Use** |
| Temporarily remove availability | Block Slots |
| Permanently remove slots | Delete Time Slots |
| Change appointment type or visibility | Update Slots |
| Reschedule an entire day | Move Slots |
| Duplicate a schedule to another day or teacher | Copy Slots |
| Change slot duration or times | Delete + Recreate |
| **Color** | **Meaning** |
| Blue | Available |
| Red | Blocked |
| Grey | Teacher is booked elsewhere (team meeting or personal appointment) |
| Yellow | Time has passed |