PTA Management Guide
- Adding a new student
- Administrator Access
- Allow Teachers to Block Slots
- Allow Teachers to Pre-Book Appointments
- Contacts
- Creating Teams
- Directions for Parents
- Divorced Parents
- Making Parent Appointments
- Modifying Enrollment Data
- Modifying Teacher or Room Data
- Moving a Class
- Parent Student Relationships
- Problem Appointments
- Reports
- Sending Custom Emails
- Teacher Access
- Viewing Appointments in the Admin
- PTA Videos
Adding a new student
Step 1: Add the Student
- Go to the Contacts section of the Admin UI.
- Search for the student by name.
- If the student isn't found, click Add / Student....
- Fill in the Student First Name, Student Last Name, StudentID and SecurityValue.
- Click Add.
Step 2: Connect the Student to a Parent
If the parent already exists in Contacts:
- Search for the student by name.
- Select the student, then select the small Parent-Students Map tab.
- Click the green Add button under Parent List.
- In the Select Person dialog, search for the parent by name, select them, and click Add.
The student and parent are now connected.
If the parent is not found:
- Go back to Contacts and click Add → Parent.
- Fill in the parent's Email, First Name, and Last Name, then click Add.
- Search for the parent by name, select them, then select the small Parent-Students Map tab.
- Click the green Add button under Student List.
- In the Select Person dialog, search for the student, select them, and click Add.
The parent and student are now connected.
Step 3: Enroll the Student in Classes
- Go to Class Editor.
- Select the teacher, then the class.
- In the entry box above the student roster, type the student's name using your account's name format (Last, First or First Last).
Not sure which format your account uses? Check how other students are listed in the same class roster.
- Press Enter when the system finds a match.
- Repeat for each class the student should be enrolled in.
Administrator Access
Updating an Existing Contact's Access
- Go to the Contacts tab and search for the contact.
- Select their name.
- Adjust the Admin Level pull-down to set their access.
This allows the contact to log into the Admin UI and view reports, with permissions determined by the level selected (see table below).
Adding a New Administrator
- Click the green Add button.
- Select Admin....
- Fill in the contact's information.
- Set their Admin Level using the pull-down.
The new contact will be prompted to create a password the first time they log in.
Admin Access Levels
| Level | Permissions |
|---|---|
| Appointment Viewer | Can log in and view appointments only — no changes allowed |
| Appointment Maker | Can make appointments from the Admin UI, but cannot change setup or add/remove slots |
| Resource Administrator | Can make/cancel appointments and add/remove slots — limited to the specific resources granted in Resource Access |
| Event Administrator | Full administrative access to one or more specific events — set under Event Access |
| Administrator | Full access to the entire account |
All levels include access to reports.
Granting Specific Access
Some levels require you to specify what the contact can access:
- Appointment Viewer, Appointment Maker, Resource Administrator: Set their accessible resources under Vendor Access / Resource Access.
- Event Administrator: Set their accessible event(s) under Vendor Access / Event Access.
Updating Multiple Teachers/Admins at Once
To bulk-update access levels for a group of contacts:
- Go to Global Setup / Contacts.
- Under Advanced Options, click Modify Admin Level.
Allow Teachers to Block Slots
Why upgrade teacher access?
By default, teachers have Appointment Viewer access only — they can view their schedule but not make changes.
Upgrading teachers to Appointment Maker access allows them to block their own slots before the scheduler opens to parents. This is useful when an admin has bulk-created slots for all teachers, and each teacher needs to block off specific times (e.g., for breaks or unavailability).
How to upgrade teacher access
- Go to Global Setup / Contacts.
- Click Show Advanced Options.
- Click Modify Access Level.
- Change the access level from Appointment Viewer to Appointment Maker for your teachers.
Each teacher will now have access to manage their own schedule.
How teachers block/unblock slots
- Log into the Admin UI — teachers will land directly on the Reports section.
- Click Block Schedule at the top of the page to go to the Appointments page, showing their available time slots.
- To block a slot, click the X in that slot's cell — it will turn red.
- To unblock a slot, click the X again — it will turn back to blue, indicating it's available.
Allow Teachers to Pre-Book Appointments
Why upgrade teacher access?
By default, teachers have Appointment Viewer access only — they can view their schedule but not make changes.
Upgrading teachers to Appointment Maker access allows them to book appointments on behalf of parents, before the scheduler opens to parents.
How to upgrade teacher access
- Go to Global Setup / Contacts.
- Click Show Advanced Options.
- Click Modify Access Level.
- Change the access level from Appointment Viewer to Appointment Maker for your teachers.
Each teacher will now have access to manage their own schedule.
Contacts
The Contacts tab is where your full list of teachers, administrators, students, and parents is stored. Parent contact records are created automatically the first time they log into the online scheduler.
Note: Student and parent names don't display automatically — you'll need to search by first or last name to find them.
To get started: From the Admin UI, select Contacts on the left-hand side dashboard.
Viewing Contact Info
Search for and select a contact to populate their details on the right-hand side. Several tabs are available:
| Tab | What it shows |
|---|---|
| Contact Info | Email, first/last name, admin level, customer access rights, and any custom fields configured under Global Setup / Contacts |
| Appointments (small tab, distinct from the main Appointments tab) | All appointments for this contact. For students, this shows enrolled classes. |
| Log | Email history and a log of when appointments were booked or canceled |
| Vendor Access | Resource Access and Event Access settings for administrators |
| Parents-Students Map | View, create, or edit which students are linked to a parent (see Parent-Student Relationships) |
Search options: The Search Control list allows you to search by Last Name, First Name, Email, or any custom ID fields configured under Contacts.
Other actions available from a selected contact:
- Delete — removes the contact
- Reset PW — resets the contact's password to your account's default password (configurable under Global Setup / Contacts)
Setting Up Vendor Access
Important: When adding a new contact with Appointment Viewer, Appointment Maker, or Resource Administrator access, be sure to check the appropriate box under Vendor Access / Resource Access — otherwise they won't have access to any resources.
Master Access: The "Allow access to all events and all resources" option under Master Access is only available for Appointment Viewer and Appointment Maker levels. It is not available for Resource Administrator or Event Administrator levels, which require resources/events to be granted individually.
Adding a New Contact
- Click Add.
- Select a contact type from the drop-down:
- Admin
- Teacher
- Student
- Parent
- Other
- Fill in the fields marked
<not entered>on the form — fields vary depending on the contact type selected.
The form will not allow you to create a new contact record with the email address that already exists on the vendor account.
Creating Teams
You can combine teachers into teams from the Class Editor page.
Create a New Team
- Select Add Teacher/Team → Add Team. The Select Person dialog will open.
- Search for and select the first teacher, then click Add to Team (top-left corner of the dialog).
- Repeat for the second teacher.
- Once all team members appear in the top-left list, click OK.
Double-booking protection: Booking a slot with the team automatically blocks the corresponding slot for each individual team member — and vice versa, booking with an individual teacher blocks the corresponding team slot.
Add Teachers to an Existing Team
If a teacher is already listed in Class Editor and you'd like to add them to a team:
- Select the teacher on the left-hand side.
- Select Add Contact/Team → Assign Team. The Select Person dialog will open, with the first teacher you selected already on the team.
- Search for and select the teacher to add, then click Add to Team.
- Repeat for any additional teachers.
- Once all team members appear in the top-left list, click OK.
FAQ: What happens with our teacher teams if we do another integration-oriented import?
A: The data transfer will only pull over the head teacher, and you will need to create a team. If you do another data sync/ import, the class and enrollment will remain with the team, but you will see an error. It can be ignored.
FAQ: What happens with our teacher teams if we do a manual import?
A: If you do another data sync/ import, the class and enrollment will remain with the team, but you will see an error. It can be ignored. If "Remove all resources and their classes" is checked, that option will first delete all teachers and teams along with their classes (only when nothing has been scheduled yet). The classes are then recreated under the teachers in the file, so the team would be removed.
FAQ: What happens if I block one team member’s schedule?
When you block a time on an individual team member’s schedule, the block is also applied to the team’s schedule. However, the other team members’ individual schedules remain unchanged.
-
Blocking the team: Blocking the team also blocks each team member’s individual schedule.
-
Blocking an individual team member: Blocking one team member’s schedule also blocks the team’s schedule, but the other team members’ individual schedules remain open. They can still accept appointments individually, but the team is unavailable.
-
Unblocking a time: Unblocking works the same way in reverse. Unblocking an individual team member’s schedule also unblocks the team’s schedule, even if another team member has a block at that time. Similarly, unblocking the team removes blocks from all linked individual schedules, including blocks added for reasons such as lunch.
Important: Blocking or unblocking a time on one schedule can affect other linked schedules, regardless of who created the block.
Directions for Parents
Follow the link provided by your school to access the Scheduler, then follow the steps below.
Step 1: Sign In
- Enter your email and click Next.
- Returning users: If your email is recognized, enter your password.
- New users: If your email isn't registered, follow the prompts to Sign Up.
- You will then be sent to the scheduler.
If your school is offering a choice between In-Person and Virtual appointments, you will be prompted to give a response before locating your students.
Step 2: Locate Your Student(s)
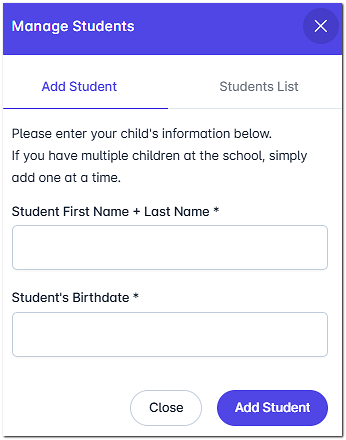
- Enter the required information to find your student(s), then click Next Step.
-
The two prompts are typically a student ID (or the Student's first and last name with no space) and a birthdate. (Unless your school specifies otherwise, enter the birthdate in the following format: MM/DD/YY). Continue this step for as many students as you need to schedule.

-
- Confirm your student(s) appear in the list, check the box next to their name(s), and click Next Step.
Step 3: Select Teachers
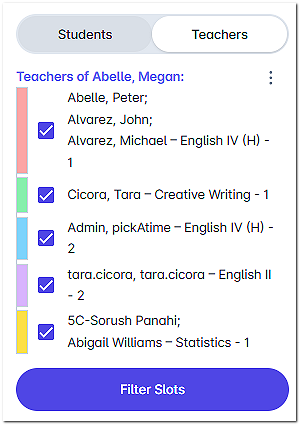
By default, all of your child's teachers are selected.
- To exclude a teacher: Uncheck the box next to their name.
- When ready, click Filter Slots.

Step 4: Book Appointments
The scheduling grid displays available times as squares with a plus sign (+).
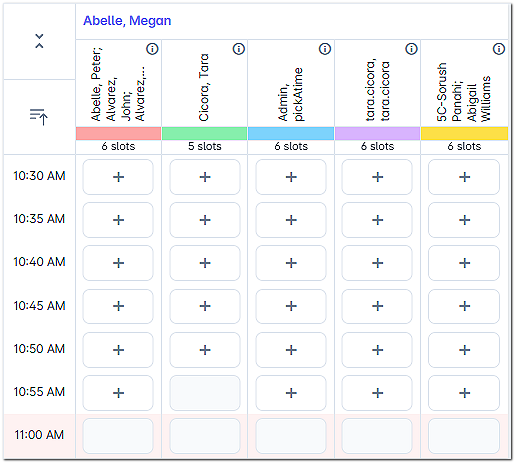
- Click your preferred time square.
- Click Create Appointment.
- A confirmation message will briefly appear at the top of the screen.
- Repeat for each teacher you'd like to visit.
Managing Your Schedule
View or Print Your Schedule
Click Printable Schedule in the left-hand sidebar to see your full itinerary.
Changes & Cancellations
On a computer:
- Click My Appointments in the left-hand sidebar.
- Locate the appointment you'd like to change.
- Hover over the appointment to reveal Details, Edit, and Cancel options.
On a mobile phone:
Important Notes
- To meet with a staff member who doesn't currently teach your child, please contact the school office directly.
- For questions or technical assistance, please call the school office.
Divorced Parents
Default behavior: PTA scheduling enforces a one appointment per teacher per class rule per student. This means two parents can split up conference duty — one can book appointments with half the teachers, and the other can book with the remaining half — while the system still ensures no teacher gets double-booked for the same child and class.
If divorced parents would prefer separate appointments: Sometimes both parents need their own, separate appointment with the same teacher for the same class — which the standard one-appointment rule doesn't allow.
The Solution: Clone Student
To allow two separate appointments with the same teacher, you'll create a second record for the student so the system treats them as two distinct children.
- In the Admin UI, go to Contacts and search for the student.
- Select the student, then click Clone Student.
This creates a duplicate student record, with an asterisk (*) appended to the original Student ID.
Linking the Cloned Record to the Second Parent
- If both parents have already logged in: You'll be prompted to associate the cloned record with one of the existing parents.
- If the second parent hasn't logged in yet: Have them log in and enter the Student ID followed by an asterisk (e.g.,
1234*) to find and claim the cloned record.
Since pickAtime now treats the two records as separate children, each parent can book independently with the same teacher without conflict.
Note: Some schools maintain a standing list of families who use Clone Student every year, while others handle it case-by-case as requests come in.
Making Parent Appointments
Booking through the CUI (parent-facing scheduler) respects all standard restrictions and limits. To override those restrictions — for example, giving a parent extra time with a teacher — you'll need to book the appointment manually through the Admin UI.
For the PTA product, every appointment must have both a student and a parent associated with it.
Making Parent Appointments in the Admin UI
- Select the Appointments tab.
- Select the correct date on the calendar (left-hand side).
- Select the correct teacher, then click the time slot where you'd like to schedule the appointment.
- Click the green plus sign. This opens the Select Person dialog.
- Select the student:
- If the student is on the teacher's roster, select their name from the list on the right and click OK.
- If the student is not on the teacher's roster, uncheck "Students of [Teacher Name]", search for the student by name, select them, and click OK.
- This opens the Create Appointment dialog.
Now, link the parent:
- If the parent is already associated with the student: Their name will display automatically. Select the correct class (if more than one), then click OK.
- If the parent is not yet associated with the student: Click the green + button to open the Select Person dialog. Search for the parent by name in the upper-left search boxes. If found, select their name and click OK, then select the correct class and click OK.
- If the parent is not found at all: On the left-hand side, enter the parent's First Name, Last Name, and Email (if available), then click Add Contact → OK. Select the correct class and click OK.
Once complete, the appointment box will display both the parent's and student's names.
If the appointment has a red border: Click on it to view the error message shown below the calendar. From here, either click Cancel Appointment to remove it, or click Confirm Appointment to force the booking and clear the red highlighting.
Other Appointment Options
Click on any existing appointment on the Appointments page, then open the Appointments drop-down to access:
| Option | What it does |
|---|---|
| Confirm Appointment | Confirms a flagged (red) problem appointment |
| Cancel Appointment | Cancels the appointment, with the option to send a cancellation email |
| Edit Appointment | Edits appointment-specific details (e.g., custom fields collected from parents) |
| Change Time | Moves the appointment to a new time |
| Send Reminder | Sends a reminder email to the parent |
| Customer Info | Opens the Contact Information dialog for the parent |
To book as a Parent on through the CUI (parent-facing scheduler)
Go to the Contacts section and locate the parent. Click on their name and then click the 'Log in as' button.
If a parent is not in our system you can manually add them, by filling out the Contact form.
Passwords are not needed to masquerade as a parent.
You will then be sent to the CUI where you can book as a parent.
Step 1: Locate Your Student(s)
- Enter the required information to find your student(s), then click Proceed.
- Confirm your student(s) appear in the list, check the box next to their name(s), and click Next Step.
Step 2: Select Teachers
By default, all of your child's teachers are selected.
- To exclude a teacher: Uncheck the box next to their name.
- When ready: Click Filter Slots.
Step 3: Book Appointments
The scheduling grid displays available times as squares with a plus sign (+).
- Click your preferred time square.
- Click Create Appointment.
- A confirmation message will briefly appear at the top of the screen.
- Repeat for each teacher you'd like to visit.
After you book appointments on behalf of a parent, the parent can still log in and change or cancel the appointment.
When booking on behalf of a parent, other admins will be able to see which admin booked for that parent within the parent's log in Contacts.
Modifying Enrollment Data
Modifying Enrollment Data
- From the Admin UI, select the Class Editor tab.
- Select a teacher, then select the class. The class roster will display on the right-hand side.
To remove a student: Select the student and click the red X to the left of their name.
This only removes the student from this class — it does not remove them from your account.
To enroll an existing student:
- Start typing the student's name in the white box at the top of the roster.
- If the student is already in your account, the system will suggest a match.
- Press Enter to confirm and add them to the roster.
To enroll a new student (not yet in your account):
- Go to the Class Editor page and select the teacher, then the class.
- Click the Enroll Student icon (above the roster, far right).
- In the Select Person dialog, click Add Student, then fill in the student's details — First Name, Last Name, Security Value, and Student ID — in the fields marked
<not entered> - Press Add
- Click OK. The student will now appear in the roster.
Modifying Teacher or Room Data
Teachers
Once teacher and class data are imported, teacher names appear in Contacts and in the resource listing on the Appointments page.
Correct the Spelling of a Teacher's Name
- Go to the Appointments page.
- Select the teacher, then select the Teachers drop-down → Assign Contact. A Select Person dialog will open.
- Click Show Full Dialog.
- Search for the teacher on the left. When their information appears on the right, correct the name, then click Ok.
Add a New Teacher
- Select the Class Editor tab.
- Click Add Teacher/Team → Add Teacher. An Add Teacher dialog box will open.
- Choose one of the following:
- New teacher: Select the green Add Teacher button, fill in the fields marked
<not entered>, then click Add and then Ok. - Existing contact: Search for the teacher, select them, then click OK.
- New teacher: Select the green Add Teacher button, fill in the fields marked
The teacher will be added to the roster.
Be sure to add classes to the teacher, either manually in the Class Editor page or through a data file import.
Replace a Teacher (e.g., Long-Term Substitute)
If one teacher is being fully replaced by another — so all their classes transfer to the new teacher — you can reassign them directly:
- Go to the Class Editor tab.
- Select the teacher to replace, then select Assign Contact/Team → Assign Contact. A dialog will open.
- Search for and select the new teacher, then click Select.
All classes previously assigned to the original teacher will now belong to the new teacher.
Rooms
Displaying Room Numbers
To show the room column on the parent-facing scheduler: Go to Settings / Scheduler Display, and check Display Class Name.
Editing a Room Number
For a single teacher:
- Select the Appointments tab.
- The room number is listed next to the teacher's name and can be edited directly.
For all teachers at once (bulk update via import):
- Import an updated Teacher file with the new room numbers.
- Import the Class file.
This updates room numbers for all individual teachers in the event.
Importing a Class file overwrites manual edits. If you've made manual changes to a class, update your Class file to match before importing — otherwise those changes will be lost.
Note: This method does not update room numbers for Teams of Teachers — those must be edited manually.
Moving a Class
- From the Admin UI, select the Class Editor tab.
- Select the teacher from the list on the left.
- Select the class to be moved. It will turn blue, and the Move Class button will become active.
- Click Move Class.
- Select the teacher the class should be moved to.
Parent Student Relationships
Parent-Student Relationships
The Parents-Students Map tab (right side of the Contacts page) lets you view, create, and modify which students are linked to each parent.
Viewing Relationships
- Go to Contacts and search for a contact on the left.
- Select the contact, then select the Parents-Students Map tab.
What you'll see depends on the contact type:
- Student selected (has a Student ID) → shows Parent List
- Parent selected (has a Parent ID) → shows Student List
To remove a relationship: Click the red X to the left of a name in either list.
Adding a New Student
- Go to Contacts and search for the student by name.
- If not found, click Add / Student....
- Fill in First Name, Last Name, Student ID, and Security Value, then click Add.
Connecting a Student to a Parent
If the parent already exists in Contacts:
- Search for and select the student, then select the Parents-Students Map tab.
- Click the green Add button under Parent List.
- In the Select Person dialog, find and select the parent, then click Add.
If the parent doesn't exist yet:
- Go to Contacts and click Add → Parent.
- Fill in the parent's First Name, Last Name, and Email, then click Add.
- Search for and select the newly created parent, then select the Parents-Students Map tab.
- Click the green Add button under Student List.
- In the Select Person dialog, find and select the student, then click Add.
Adding to an Existing Relationship
To add a parent to a student's record:
- Select the student in Contacts, then go to the Parents-Students Map tab.
- Click Add under Parent List, select the parent, and click Add.
To add a student to a parent's record:
- Select the parent in Contacts, then go to the Parents-Students Map tab.
- Click Add under Student List, select the student, and click Add.
Problem Appointments
The Appointments List page shows a master list of all appointments, including any that need attention.
Red Appointments — Rule Violations
What they are: Previously booked appointments that violate a rule configured under Settings → Online Scheduler Settings.
How they're created:
- An admin manually books an appointment that breaks a configured rule (e.g., booking limits, one-appointment-per-teacher rules).
To resolve:
- Click the red appointment to see the reason for the conflict, shown below the calendar.
- Open the Appointments drop-down and select Confirm Appointment to force the booking and clear the flag.
⚠️ Important: Red appointments are invisible to parents — they do not appear as booked on the parent's schedule, and reminder emails will not be sent until the appointment is confirmed. Always check the Appointments List for unresolved red appointments.
Orange Appointments — In Progress
What they are: Appointments currently being booked by a parent, mid-process.
Behavior:
- Cannot be manually deleted or selected for email notifications.
- Automatically managed by the system — if the parent is inactive for too long without completing the booking, the appointment is automatically canceled.
- The orange status disappears once the parent clicks Create Appointment to finish booking.
This status is useful for admins booking appointments manually: it prevents you from accidentally selecting a time slot a parent is currently in the process of booking.
Deleted Slots with Existing Appointments
When you delete a slot that has appointments booked on it, those appointments are not deleted — they're flagged instead, and will appear in the Appointments List for review.
Reports
When you log into pickAtime, you'll land on the Event Reports page by default. Reports fall into two categories: Event-Specific and Account-Specific.
Event-Specific Reports
Select your event from the Event pull-down. If your event's dates have already passed, enter a From/To date range to pull historical data — otherwise, this is optional.
| Report | What it shows |
|---|---|
| Teachers' Schedule | Appointment schedule per teacher. Supports filtering by teacher, plus "Show All Slots" to see every slot (booked or not). Can be emailed to all teachers or one individual. |
| Teachers' Appts | Number of appointments scheduled per teacher |
| Teachers' Slots | Number of available vs. total slots per teacher |
| Teacher By Rooms | Sorted list of appointments by room — includes room, teacher, time, student, and parent. Supports "print one per page" for a page break per room. |
| Parents' Schedule | Sorted appointment list per parent. Filterable by individual parent; can be emailed to all or one parent. Can be sent directly to parents. |
| Students' Schedule | Sorted appointment list per student. Filterable by individual student. Can be sent directly to students. |
| Number of Parents and Students | Count of parents/students with appointments, sorted by date for multi-day events |
| Appointment Histogram | Number of appointments by date and time |
| Appointment Count by Parent | List of parents and how many appointments each has made |
| Appointment Count by Student | List of students with booked appointments |
| Students Without Any Scheduled Appointments | Students whose parents haven't booked any appointments. Can be sent to parents. |
| Students Without Any Scheduled Appointments by Class | Per-class gaps — e.g., a student enrolled in 7 classes with only 5 booked will show the 2 missing. Can be sent to parents. |
| All Teacher/Team Appointments | Like Teachers' Schedule, but for teachers on a team, shows a combined master schedule of both individual and team appointments |
| Class Rosters | Class roster per teacher/class |
| Appointments by Date/Time | All appointments listed chronologically |
| Display Only Empty (Not Blocked) Slots | List of open, unblocked slots per teacher |
Additional Report Fields: Most reports support adding extra columns via links like "Student's Contact Fields," "Parent's Contact Fields," and "Appointment Fields" — useful for pulling in details like email addresses or Student IDs.
Managing Reports
Every report supports the following options:
| Action | Description |
|---|---|
| Format | Print, export to XML, or export to tab-delimited (Excel-compatible) |
| Email Report | Send the report to yourself or others |
| Save Report Settings | Saves customizations (e.g., added fields) so they persist next time you run the report |
| Schedule Report Delivery | Set a date range, time of day, and frequency for automated email delivery |
Account-Specific Reports
Toggle to Account Reports mode to view data across your entire vendor account (all events).
| Report | What it shows |
|---|---|
| Settings | Your account's auto-generated scheduler URL |
| Account – Invoices and Payments | Account balance, invoice history, and payment history. Click an invoice # to view it and pay by credit card. |
| Problem Appointments | Appointments placed "on hold" — e.g., when a slot with an existing appointment is deleted, the appointment isn't deleted but flagged here for review |
| Appointments from All Events | All appointments across every event on your account |
| Contacts Without Appointments | Contacts who've logged in but never booked an appointment |
| List of Administrators | Admin emails and access levels. For teachers (auto-assigned Appointment Viewer access), this also shows which resources/teachers they can access. Click Additional Fields → Last Logged In to see last login dates. |
| % Full | Percentage of booked vs. available slots, across multiple events |
| Cancelled Appointments | All cancelled appointments, with cancellation date/time and who cancelled |
| Appointment Counts for All Events | Total appointment counts across every event |
| Resource Mapping | Shows all resources and their associated contacts/teachers — useful for verifying Team assignments |
| Parents Without Students | Parents not linked to any student |
| Students Without Parents | Students not linked to any parent |
| Parent-Student Relationship | Table of all parent-student associations |
| Scheduled Report Delivery | Overview of your automated report deliveries — recipients, frequency, last sent date. Delete entries here to cancel a scheduled delivery. |
| Appointments Summary by Contacts | Appointments booked by specific contact(s), across all events on the account |
Sending Custom Emails
The Appointments List page — not the main Appointments page — lets you search for and manage appointments by:
- A single date
- A date range
- An event
This returns a list of parents with appointments matching your search, along with options to email, delete, confirm, or recreate slots and appointments.
Sending Emails from the Appointments List
- Click Send Email at the top of the page.
- Choose Send to All or Send to Selected.
- In the dialog that appears, choose an email type:
- Reminder email
- Custom email
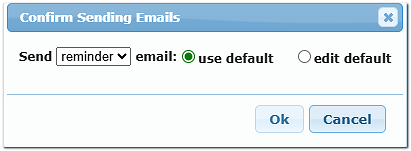
You can send using the existing template as-is, or customize it for this send.
Email templates are managed under Settings/ Notification Setup.
Teacher Access
Teachers can view their conference schedule by logging in at pickatime.com or through the school's scheduling link, using the same login process as a parent.
Teachers who are not also parents at the school will be taken directly to the Reports page, where they can view their scheduled appointments.
Teachers Who Are Also Parents
Teachers who are also parents at the school will first be taken to the standard parent scheduling page.
To view their teaching schedule, they can select the Admin UI link on the left-hand side of the page. This will take them to the Reports page, where they can view their scheduled appointments.
Viewing Appointments in the Admin
You can adjust several display settings to make the Appointments page easier to read.
Adjust row height (make time slots taller): On the Appointments tab, hover over one of the horizontal lines just above a time marker, then click and drag vertically.
Adjust column width: Hover over the space between two resource columns, then click and drag.
Adjust time markers and gridlines: Go to Settings / Admin View Settings and modify "Time Mark Display on the Appointments Page."
Adjust the visible time range (scroll bar limits): On the same Admin View Settings page, under "Hours Visible on the Appointments Page," set the minimum and maximum hours shown.
This range applies account-wide per event — it is not day-specific. If one day has slots from 8–5 and another has slots from 9–6, set the range to 8–6 so the scroll bar covers all possible slot times across every day.
PTA Videos
Getting Started with your PTA event
- Creating a company account
- How to add an event in a Parent Teacher Conference Event
- Duplicating vs Creating a new Parent-Teacher Event
- How it All Works
The Backend
Working with slots in your PTA event
- Creating Slots in your Parent-Teacher Conference
- Adding in Travel Breaks
- Handling Lunch and Dinner Breaks
- Copying vs Moving Slots
Working with classes and teachers at your PTA event
- Understanding the Class Editor
- Creating a Teacher Team
- Understanding the difference between administrative levels
- Understanding the difference between Appointment viewer vs maker
- How Teachers block their own schedule
- How to order teachers alphabetically
- Displaying Class Names in a Parent-Teacher Conference
Working with parents and students at your PTA event
- The Login As Feature
- Cloning Students
- Manually scheduling an appointment in a Parent-Teacher Conference
- Using the Select Student in a Parent-Teacher Conference Event
- How to remove Appointment Times