Zoom
Zoom Admin Managed App
PickAtime offers the option to use Zoom within events. There are two ways to use Zoom.
In the first option, the teacher would use their own account to create a single Zoom URL, which would be placed within the Room column in the Appointments Tab within Event Management.
Method 1: The Zoom Integration
The second option is the integration with Zoom itself. With the Zoom integration, teachers can offer individual Zoom online meetings. The Zoom links are automatically generated for customers and parents. There is no additional charge from pickAtime for this integration.
Please note: When you activate the integration, it will not display the Zoom link information placed in the Virtual/Room column.
To use the Zoom Integration with pickAtime, you will use the Admin Managed application.
1. Go to pickatime.com and log in. Ensure that you have all of your teachers imported, and go to the Admin UI tool, Global Setup / Business page, Integration Options section
2. In the Zoom Integration section, click the Connect and Map Contacts button.
 3. Permit the app (if you are not logged into Zoom, you may be asked to log in) for meetings (first icon listed).
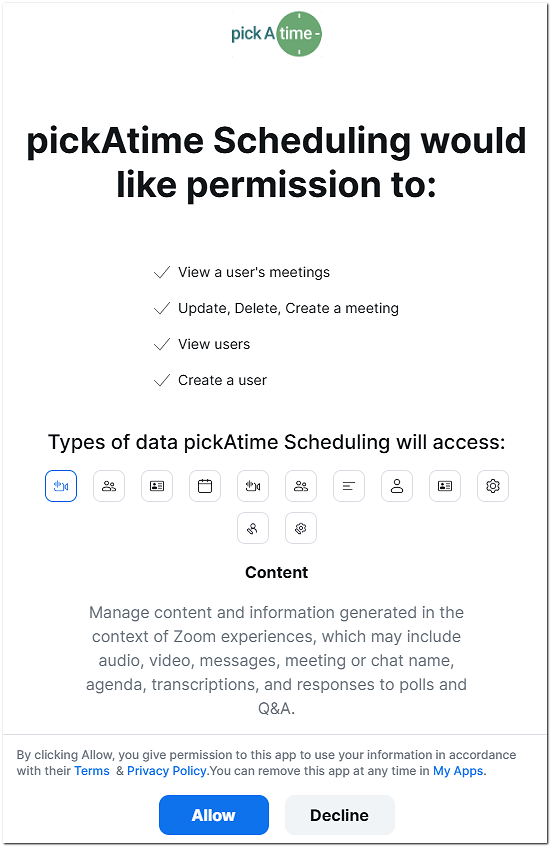 4. The app is now connected.
 5. Once the mapping is complete, a pop-up dialog box will appear giving you the details.
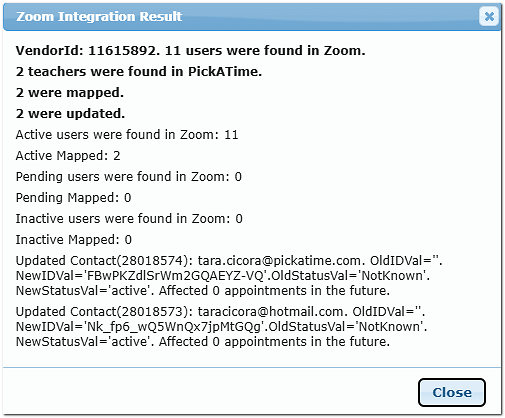 This will activate the integration on an account level. To activate the Zoom integration for an individual event, go to Events Management / Settings / Online Scheduler Settings / Advanced Settings / Online Meeting Provider and then select Zoom.
Online Meetings Page Guide
This page helps Admins monitor the status of Zoom Meet link generation and teacher calendar syncs. This page will help you to ensure every virtual appointment is properly linked.
Sections on the Online Meeting Page
1. Online Meeting Sync
- Shows appointments that are still generating Zoom links.
- Note: Link generation may take up to 40 minutes.
- The links will disappear from this section once the link is created and detected.


2. Online Meeting Issues
- List teachers/resources that do not have meeting URLs.
- The system will give the relevant meeting information while also offering action steps
3. Calendar Link Setup Status

This section will show you if the teacher has mapped their Zoom account or not.
Export Setup
- Checked = The teacher's pickAtime account has been mapped to their Zoom account.
- Missing check = The teacher's pickAtime account has not been mapped to their Zoom account.
Import Setup - Google only
- Checked if the teacher opted to block off times in pickAtime from their Calendar.
- Not recommended for teachers.
Important Admin Tips
- Teachers must have a Resource assigned to their contact records and time slots with the appointment type virtual created to appear on this page.
- Teachers within pickAtime must be mapped to their Zoom account.
- If links don’t generate after 40 minutes, confirm:
- The teacher has completed sync (Export Setup is checked).
- The appointment was created as Virtual or Virtual/In-Person.
Still No Link?
It might be due to:
- The time zone was recently changed
- There’s an error in the system
Contact: support@pickatime.com
Method 2: Manual Setup (Permanent Links)
Best for: Teachers who prefer to use one "personal" room link for all their sessions. This option can be used with any virtual provider, including:
- Zoom
- Teams
- GotoMeeting
- and more!
Step 1: Initial Event Configuration
You must first enable virtual appointment types. This is required for both entry methods below.
- Enable Appointment Types: Go to Settings > Admin View Settings. In the Slot Generator section, check Show the "Appointment type".
- Configure Time Slots: Go to the Appointments tab. Create or update slots and set the type to Virtual or In-person or Virtual.
Step 2: Adding the Links
Choose one of the following ways to add the teacher's URLs:
- Option A: Manual Entry (Directly in Event) Navigate to the teacher list in the Appointments tab. Double-click the cell in the Virtual Room column to paste the link.
- Option B: Bulk Import (Via Data Files)
- Update Teachers: Add URLs to the Virtual Room column in your Teachers file and import it (this updates the contact record).
- Sync to Event: Import your Class file. This is essential to push the links from the teacher records into the specific event.
Final Step: Ensure Links are Sent to Parents
To ensure participants receive their meeting links, you must verify your email macros.
- Go to Events Management / Settings / Notification Setup.
- In the Confirmation and Reminder emails, ensure that " Replace the Email Body with the Printable Schedule of Appointments is checked.
- Navigate to Settings / CUI Messages / Printable Schedule.
- Ensure the $(Room) macro is present
- This is a "Smart Macro" - it automatically pulls the correct data (Room or Virtual) based on the booked appointment type, regardless of whether you are using the Integration, the Manual Virtual Room, or a physical room number.
Important
- DO NOT enable your virtual Integration when using this option. Doing so will override your manual Room links with auto-generated ones.
Zoom FAQs
Q: How much does the Zoom integration cost?
A: Nothing additional on pickAtime’s part, but the integration does require a paid Zoom account.
Q: Can multiple people receive the Zoom links?
A: The links will be in the Printable PDF sent in the Confirmation/Reminder emails, and those only go to the appointment maker. However, those emails can be forwarded to whomever the appointment maker wishes.
Q: How long does it take for the links to be generated?
A: It can take up to 40 minutes for a new link to be generated and added to the reports.
Q: What does this Zoom error mean?
pickATime and Zoom Synchronization Errors
Other Error: Pickatime User: Teacher Name, Teacher email,
Zoom User ID: 00000000
was not found in Zoom or is not active. Check Pending Users section of
your Zoom Account.
A: This means that the sync didn’t find the teacher. Please check both Zoom and pickAtime to ensure that the teacher is in both environments and has the same information.
Q: Can I add my integration retroactively?
A: Yes, you can do the integration after the event closes. Make sure that you alert parents so that they are aware, and the links will be included in the Printable PDF within the reminder email.
Q: Can there be two virtual hosts?
A: No, there can be only one host.
Q: How do I change the host?
A: For the team of teachers, the system will select the first teacher as the host/lead teacher, and the other teacher(s) and parents will then be guests. To change the 'lead' teacher, you would need to add(if they are not already a part of the team) the new lead and remove the other teacher(s) from the team. Then you will allow Zoom to update to that change (40 minutes) and then re-add the other team members.
Q: Why aren’t my links appearing? I added a service and appointment fields, giving the parents their appointment choice.
A: For the links to appear, the slots must be Virtual or Virtual/In-Person. Please update your slots to either the Virtual or the In-Person or Virtual option for your parents. To do this, on the Appointment Tab (Events Management), click on the Slots drop-down menu and click Update Slots. From there, you can update your Appointment Type for your slots.
To update the slots appointment type to virtual:
1. On the Settings/Admin View Settings tab, check the box 'Show the "Appointment type" dropdown'
2. On the Appointments tab, select the date on the calendar, then click Slots>Update Slots, select the slots appointment type virtual, and click Ok.
To remove the Services, click the red Xs to the left of the Services.
To remove the Appointment Fields, click on the field in Appointment Fields and then click the right-hand arrowhead to remove the appointment fields.
Q: The help center references a Virtual Room column on the Appointments tab. I don’t see it.
A: Make sure that your event has either virtual or in-person/virtual appointment slots. If they do, then make sure that you haven’t accidentally activated the integration.
On the Appointment Tab (Events Management), click on the Slots drop-down menu and click Update Slots. From there, you can update your Appointment Type for your slots.
To update the slots appointment type to virtual:
1. On the Settings/Admin View Settings tab, check the box 'Show the "Appointment type" dropdown.'
2. On the Appointments tab, select the date on the calendar, then click Slots>Update Slots, select the slots appointment type virtual, and click Ok.
To check that the integration isn’t activated:
Go to Online Scheduler Settings, Advanced Settings. The drop-down menu should be empty.
Q: I added Virtual links to the Virtual Room column, and I don’t seem them appearing in the reports after someone books, and the links have disappeared.
A: Please look at the Online Scheduler Settings, Advanced Settings. You will see that you have set up the Zoom integration.
If you disable this, the Zoom link you created will appear.
Q: I don’t want to use an integration or import my teachers’ Zoom links. Can I add them manually?
A: Yes, you could add meeting links directly on the Appointments tab in the list of teachers. Then, double-click in the Virtual Room column, and you can edit or paste the meeting link for the teacher.
Q: What happens if a teacher does not currently have an individual Zoom account assigned under their email address /user? Does the system assign a Zoom meeting room, or do we have to make sure that each teacher has a matching Zoom account mapped?
A: They will not have a Zoom link generated until they are mapped. The integration will retroactively add the links once the teacher is mapped, however.
Q: Will teachers log in to pick a time to get the link to their virtual conference, or does it create a meeting with a link on their calendar?
A: Teachers can sign into pickAtime to view their schedule and meeting links by navigating to Reports > Event Reports > Teachers Schedule.
Q: Can I add the virtual link to the Calendar invites?
A: Yes, before opening the event, navigate to Event Management, Settings, Notification Setup, Calendar Event Notification. Click on Insert Macros, and under the Appointment section, add the Room macro to the Description section of the notification.
Q: It looks as if none of our Zoom meetings have a link. We set up our Zoom integration in Summer 2025.
A: You previously used the Server-to-server integration with Zoom. This approach has been deprecated. We recommend setting up a new Admin Managed app integration. This can be completed in a few clicks, and once configured, all meeting links will be generated automatically.
Q: I created my event with in-person slots, but now my virtual links are not appearing. How can I fix this?
A: Virtual Links will only appear if the Virtual or In-Person/Virtual slots are selected. To update the Slots:
On the Appointment Tab (Events Management), click on the Slots drop-down menu and click Update Slots. From there, you can update your Appointment Type for your slots.
To update the slots appointment type to virtual:
1. On the Settings/Admin View Settings tab, check the box 'Show the "Appointment type" dropdown.'
2. On the Appointments tab, select the date on the calendar, then click Slots>Update Slots, select the slots appointment type virtual, and click Ok.
To check that the integration isn’t activated:
Go to Online Scheduler Settings, Advanced Settings. The drop-down menu should be empty.
Q: Once I add my virtual links/ virtual integration to my event, do I need to do anything to my emails to ensure that our parents receive the information?
A: Ensure that you have the Printable Schedule of Appointments activated on your Confirmation and Reminder emails within the Notification Setup page. To confirm that this setting is activated, go to Events Management/Settings/Notification Setup. You can then check the Replace the Email Body with the Printable Schedule of Appointments option within the Confirmation and Reminder emails. The Printable Schedule of Appointments has the needed macro and formatting for your virtual URLs.
Q: I created my event with virtual slots and with a Zoom integration. I can see that all of my teachers are mapped and everything seems ok. Why don't I have links?
A: Review your Zoom account settings to see if they are configured to require numeric-only passwords. The pickAtime-Zoom integration generates alphanumeric passwords. This discrepancy can cause an error each time the system attempts to create a meeting link: "Password provided does not match the password requirement settings set for this account. The password must follow these rules: [Password must contain only numeric characters.]"
- Sign in as an Admin
- Go to the Zoom Web Portal.
- Sign in using an account with Admin or Owner privileges.
- Navigate to Account Settings
- In the navigation menu on the left, click on Account Management.
- Click on Account Settings.
- Ensure you are on the Meeting tab at the top.
- Locate "Passcode Requirement"
- Scroll down to the Security section.
- Look for a sub-section titled Passcode Requirement.
- Note: This is different from the "Sign-in Password" (which is for your login). You are looking for the rules that govern Meeting Passcodes.
- Adjust the Complexity Settings
- Under the Passcode Requirement, you likely have a box checked that says "Only allow numeric passcodes" or similar.
- Uncheck that option.
- To ensure pickAtime's alphanumeric passwords work, make sure the following are not restricted to numbers only.
- Ideally, you want to enable "Have at least 1 letter" or simply ensure that the numeric-only restriction is turned off.
- Save and Verify
- Click Save at the bottom of that section if prompted.
- Important: If the setting is "locked" (indicated by a padlock icon), you must unlock it at the Account level to allow the pickAtime integration to generate the links successfully.
Once you make the changes in Zoom, please let us know, and we will trigger the meeting link generation on our end.