# Google Meet Options
# Google Meet Options
## **Google Meet Guide: Integration vs. Manual Setup**
pickAtime offers two ways to manage Google Meet sessions. Choose the method that best fits your school's workflow:
1. Google Meet Integration: Links are generated automatically and are unique for every single appointment.
2. Manual Setup: A single, permanent link is assigned to each teacher for all their appointments.
---
### **Method 1: Google Meet Integration (Automatic)**
Best for: High security and unique links for every meeting.
#### **1. Prerequisites**
Ensure [Google Calendar Integration](https://pickatime.com/help/GoogleCalendarIntegration.html) is already set up at the Account level. This is required to activate the Google Meet engine.
#### **2. Enable for Your Event**
1. Go to Events Management / Settings/Online Scheduler Settings.
2. Open Advanced Settings / Online Meeting Provider.
3. Select Google.
#### **3. How it Works**
Once enabled, any appointment booked as a Virtual type will automatically generate a unique Google Meet link. This link is included in the confirmation email sent to parents.
Note: When using the integration, the "Virtual Room" column will not appear in the Appointments tab, as links are handled automatically by the system.
### **Online Meetings Page Guide**
This page helps Admins monitor the status of Google Meet link generation and teacher calendar syncs. This page will help you to ensure every virtual appointment is properly linked.
##### **Sections on the Online Meeting Page**
**1. Online Meeting Sync**
- Shows appointments with still generating Google Meet links.
- Note: Link generation may take up to 40 minutes.
- The links will disappear from this section once the link is created and detected.


**2. Online Meeting Issues**
- This lists teachers/resources that do not have meeting URLs.
- The system will give the relevant meeting information while also offering action steps
**3. Calendar Link Setup Status**
[](https://help.pickatime.com/uploads/images/gallery/2026-08/xPRimage.png)
This section will show you whether the teacher has synced their account and offers you the option to log in as the teacher directly from this page.
**Export Setup**
- Checked when:
- The teacher has synced the Google Calendar account on the Calendar Sync page in the Admin UI.
- Selected a default calendar.
- Clicked Save and Sync.
- Missing check = Teacher has **not** completed calendar sync.
**Import Setup**
- Checked if the teacher opted to block off times in pickAtime from Google Calendar.
- Not recommended for teachers.
**Important Admin Tips**
- Teachers must have a Resource assigned to their contact records and time slots with the appointment type virtual created to appear on this page.
- After enabling the Online Meeting Provider: Google, always check the Online Meeting Links page (left-handed dashboard).
- Use it to identify any missing URLs and verify teacher sync status.
- If links don’t generate after 40 minutes, confirm:
- The teacher has completed sync (Export Setup is checked).
- The appointment was created as Virtual or Virtual/In-Person.
**Still No Link?**
It might be due to:
- The time zone was recently changed
- There’s an error in the system
Contact: support@pickatime.com
---
### **Method 2: Manual Setup (Permanent Links)**
Best for: Teachers who prefer to use one "personal" room link for all their sessions. This option can be used with any virtual provider, including:
- Google
- Zoom
- Teams
- GotoMeeting
- and more!
#### **Step 1: Initial Event Configuration**
You must first enable virtual appointment types. This is required for both entry methods below.
1. Enable Appointment Types: Go to Settings > Admin View Settings. In the Slot Generator section, check Show the "Appointment type".
2. Configure Time Slots: Go to the Appointments tab. Create or update slots and set the type to Virtual or In-person or Virtual.
#### **Step 2: Adding the Links**
Choose one of the following ways to add the teacher's URLs:
- Option A: Manual Entry (Directly in Event) Navigate to the teacher list in the Appointments tab. Double-click the cell in the Virtual Room column to paste the link.
- Option B: Bulk Import (Via Data Files)
1. Update Teachers: Add URLs to the Virtual Room column in your Teachers file and import it (this updates the contact record).
2. Sync to Event: Import your Class file. This is essential to push the links from the teacher records into the specific event.
### **Final Step: Ensure Links are Sent to Parents**
To ensure participants receive their meeting links, you must verify your email macros.
1. Go to **Events Management / Settings / Notification Setup**.
2. In the Confirmation and Reminder emails, ensure that " Replace the Email Body with the Printable Schedule of Appointments is checked.
3. Navigate to **Settings / CUI Messages / Printable Schedule.**
- Ensure the $(Room) macro is present
- This is a "Smart Macro" - it automatically pulls the correct data (Room or Virtual) based on the booked appointment type, regardless of whether you are using the Integration, the Manual Virtual Room, or a physical room number.
##### **Important**
- DO NOT enable your virtual Integration when using this option. Doing so will override your manual Room links with auto-generated ones.
# Google Meet FAQs
##### **Q: How much does the Google integration cost?**
A: Nothing additional on pickAtime’s part, but the integration does require a paid Google account.
##### **Q: Can multiple people receive the Google links?**
A: The links will be in the Printable PDF sent in the Confirmation/Reminder emails, and those only go to the appointment maker. However, those emails can be forwarded to whomever the appointment maker wishes.
##### **Q: How long does it take for the links to be generated?**
A: It can take 40 minutes for a new link to be generated and added to the reports.
##### **Q: Will teachers log in to pick a time to get the link to their virtual conference, or does it create a meeting with a link on their calendar?**
A: Teachers can sign into pickAtime to view their schedule and meeting links by navigating to Reports / Event Reports / Teachers Schedule. Additionally, all the meetings will be automatically available on Google Meet.
##### **Q: My teacher synced their Google Calendar, and now their slots are greyed out **
A: Locate the teacher in Contacts and click on their name, and then click on the Log In As button. Then, on the Main Navigation, navigate to the Calendar section and uncheck the box 'block off time in pickAtime from Google Calendar' and then run the sync.
We do not recommend that teachers check this option.
##### **Q: Can I add my integration retroactively?**
A: Yes, you can do the integration after the event closes. Make sure that you alert parents so that they are aware, and the links will be included in the Printable PDF within the reminder email.
##### **Q: Can there be two virtual hosts?**
A: No, there can be only one host.
##### **Q: How do I change the host?**
A: For the team of teachers, the system will select the first teacher as the host/lead teacher, and the other teacher(s) and parents will then be guests. To change the 'lead' teacher, you would need to add(if they are not already a part of the team) the new lead and remove the other teacher(s) from the team. Then you will allow Google to update to that change (40 minutes) and then re-add the other team members.
##### **Q: Why aren’t my links appearing? I added a service and appointment fields, giving the parents their appointment choice.**
A: For the links to appear, the slots must be Virtual or Virtual/In-Person. Please update your slots to either the Virtual or the In-Person or Virtual option for your parents. To do this, on the Appointment Tab (Events Management), click on the Slots drop-down menu and click Update Slots. From there, you can update your Appointment Type for your slots.
To update the slots appointment type to virtual:
1. On the Settings/Admin View Settings tab, check the box 'Show the "Appointment type" dropdown'
2. On the Appointments tab, select the date on the calendar, then click Slots>Update Slots, select the slots appointment type virtual, and click Ok.
To remove the Services, click the red Xs to the left of the Services.
To remove the Appointment Fields, click on the field in Appointment Fields and then click the right-hand arrowhead to remove the appointment fields.
##### **Q: The help center references a Virtual Room column on the Appointments tab. I don’t see it.**
A: Make sure that your event has either virtual or in-person/virtual appointment slots. If they do, then make sure that you haven’t accidentally activated the integration.
**To update the Slots:**
On the Appointment Tab (Events Management), click on the Slots drop-down menu and click Update Slots. From there, you can update your Appointment Type for your slots.
**To update the slots appointment type to virtual: **
1. On the Settings/Admin View Settings tab, check the box 'Show the "Appointment type" dropdown'
2. On the Appointments tab, select the date on the calendar, then click Slots>Update Slots, select the slots appointment type virtual, and click Ok.
To check that the integration isn’t activated: Go to **Online Scheduler Settings, Advanced Settings.** The drop-down menu should be empty.
##### **Q: I added Virtual links to the Virtual Room column, and I don’t seem them appearing in the reports after someone books, and the links have disappeared.**
A: Please look at the Online Scheduler Settings, Advanced Settings. You will see that you have set up the Google integration.
If you disable this, the links you created will appear.
##### **Q: I don’t want to use an integration or import my teachers’ Google links. Can I add them manually?**
A: Yes, you could add meeting links directly on the Appointments tab in the list of teachers. Then, double-click in the Virtual Room column, and you can edit or paste the meeting link for the teacher.
##### **Q: Will teachers log in to pick a time to get the link to their virtual conference, or does it create a meeting with a link on their calendar?**
A: Teachers can sign into pickAtime to view their schedule and meeting links by navigating to Reports / Event Reports / Teachers Schedule.
##### **Q: Can I add the virtual link to the Calendar invites?**
A: Yes, before opening the event, navigate to Event Management, Settings, Notification Setup, Calendar Event Notification. Click on Insert Macros, and under the Appointment section, add the Room macro to the Description section of the notification.
##### **Q: I created my event with in-person slots, but now my virtual links are not appearing. How can I fix this?**
A: Virtual Links will only appear if the Virtual or In-Person/Virtual slots are selected. To update the Slots:
On the Appointment Tab (Events Management), click on the Slots drop-down menu and click Update Slots. From there, you can update your Appointment Type for your slots.
To update the slots appointment type to virtual:
1. On the Settings/Admin View Settings tab, check the box 'Show the "Appointment type" dropdown.'
2. On the Appointments tab, select the date on the calendar, then click Slots>Update Slots, select the slots appointment type virtual, and click Ok.
To check that the integration isn’t activated: Go to **Online Scheduler Settings, Advanced Settings**. The drop-down menu should be empty.
##### **Q: Once I add my virtual links/ virtual integration to my event, do I need to do anything to my emails to ensure that our parents receive the information?**
A: Ensure that you have the Printable Schedule of Appointments activated on your Confirmation and Reminder emails within the [Notification Setup page](https://pickatime.com/help/NotificationSetupPage.html). To confirm that this setting is activated, go to Events Management/Settings/Notification Setup. You can then check the Replace the Email Body with the Printable Schedule of Appointments option within the Confirmation and Reminder emails. The Printable Schedule of Appointments has the needed macro and formatting for your virtual URLs.
##### **Q: When I sync my calendar, do I have to allow all of the permissions?**
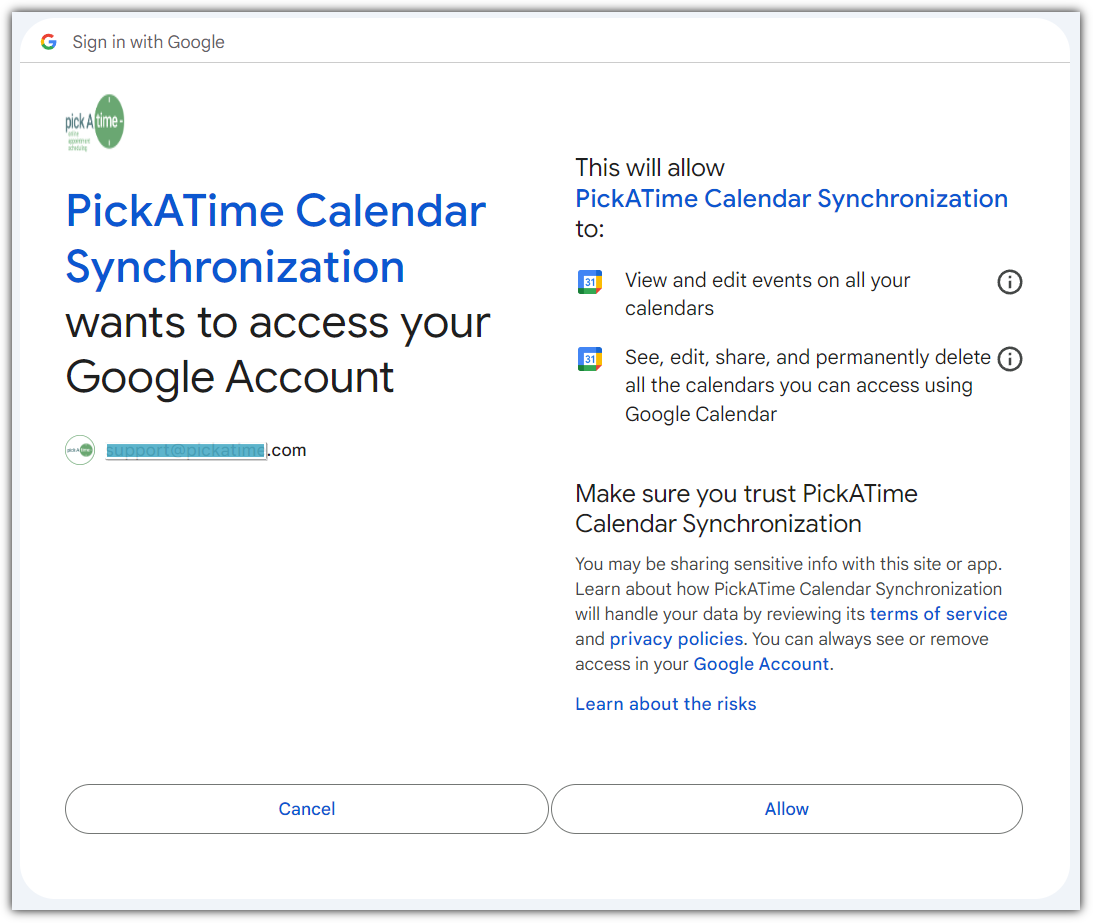
A: Yes, to sync your calendar to utilize the Google Integration, you have to accept all permissions and select which of the Google Calendars you want to connect to.
##### **Q: In a team of teachers (e.g., Teacher A and Teacher B), are both teachers considered organizers for a Google Meet meeting?**
A. No. Only one teacher in the team is designated as the host (organizer). The other teacher(s) in the team are set as guests, similar to the parents who booked the appointments.
##### **Q: How can I ensure all teachers receive a notification when an appointment is booked?**
A. If you would like every teacher in a team to receive a notification for a new booking, please follow these steps:
1. Go to the Settings / Notifications Setup tab.
2. In the Resource Notification Email section, check the box labeled "For resources assigned to a contact, send appointment notification via email".
Once this is enabled, all teachers will receive a notification from pickAtime whenever an appointment is booked.
##### **Q: A teacher has synced their calendar and meeting links were generated for all appointments except one. On the Online Meeting Issues page, this teacher appears in the 'Resources Without Online Meeting URLs' section with a checked box in the 'Setup' column. And the specific appointment appears in the 'Appointments Without Online Meeting URLs' section with a checked box in the 'Only this' column. Why is this happening, and how can it be fixed?**
A. This issue is typically caused by a temporary "sync hiccup" between pickAtime and Google.
To resolve this, a teacher experiencing the issue can sign into pickAtime, navigate to the Calendar Sync page, select the Google tab, and click the Reset and Re-Export button.
Alternatively, as an Administrator, you can resolve this without contacting the teachers by following these steps:
1. Go to the Contacts page.
2. Search for the specific teacher.
3. Select their contact record and click the Login As button under the search console.
4. Perform the "Reset and Re-Export" steps mentioned above while impersonating their account.
##### **Q. Why does my appointment time in Google Calendar look different than my confirmation email?**
This usually happens due to a time zone mismatch.
If an event is created in a different time zone than your local setting, calendar providers like Google or Outlook will automatically adjust the time to match your location. For example, an appointment scheduled for 9:00 AM Central Time will appear as 10:00 AM if your calendar is set to Eastern Time.
If you notice that all appointments for an event are off by an hour, you, as an admin, can fix this by updating the event’s time zone:
1. Log in to the Admin UI
2. Go to [Events / Preview](https://help.pickatime.com/books/additional-event-features/page/events-preview-page)
3. Locate your event and check the Time Zone column
4. Select the correct local time zone (e.g., Eastern Time) from the dropdown
To update existing appointments to the correct time zone, do the following in the Admin UI:
1. Navigate to the Appointments List page.
2. Check the All appointments box.
3. Select the relevant event from the drop-down menu and click Search.
4. Locate your appointment on the right-hand side and select it.
5. Click Send Email > Send email to selected.
6. In the pop-up, choose Send reminder email and click OK.
Once the time zone is set, the reminder emails (which include a calendar attachment) will reflect the updated time. Calendar entries will automatically sync and display the correct time for users.
# Google Calendar Integration
pickAtime offers a Google Calendar integration. When you choose to utilize this sync option, you will have your pickAtime appointments added to either your primary Google account, and the appointments you have on your Google calendars will then be blocked out on your pickAtime schedule.
You can be connected to Google accounts regardless of the number of vendor accounts you are a part of. Please note that your pickAtime appointments will be added to your primary calendar.
You have two options to connect your calendar:
1. Set up the pickAtime - [Google Workspace Integration](https://help.pickatime.com/books/pickatime-virtual-options/page/connecting-pickatime-with-google-workspace) - this action will automatically set the calendar integration for all the teachers.
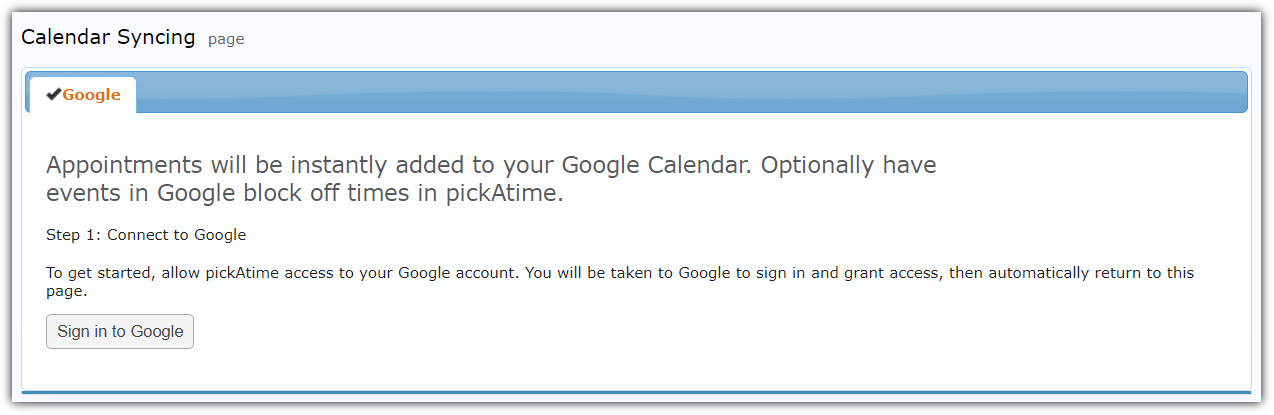
2. Ask teachers to sign into pickAtime and run the [Calendar Sync](https://help.pickatime.com/books/pickatime-virtual-options/page/google-calendar-integration). In the Admin UI tool, on the left-hand side navigation bar, select the Calendar Sync section. Select Google and then follow the steps to sync your Calendar:
1. Go to Calendar Sync and click Sign in to Google
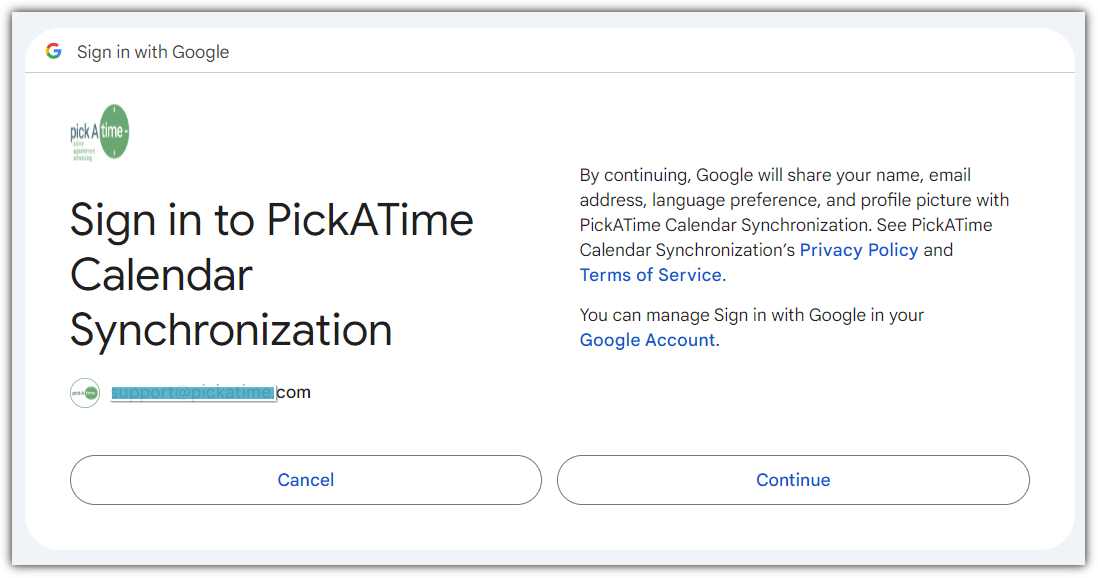
2. If you have multiple accounts, select the one you are going to sync.
3. You will then be prompted to grant pickAtime authorization on your calendar.
Select Continue to give permission, and then select Allow on the next page that comes up.
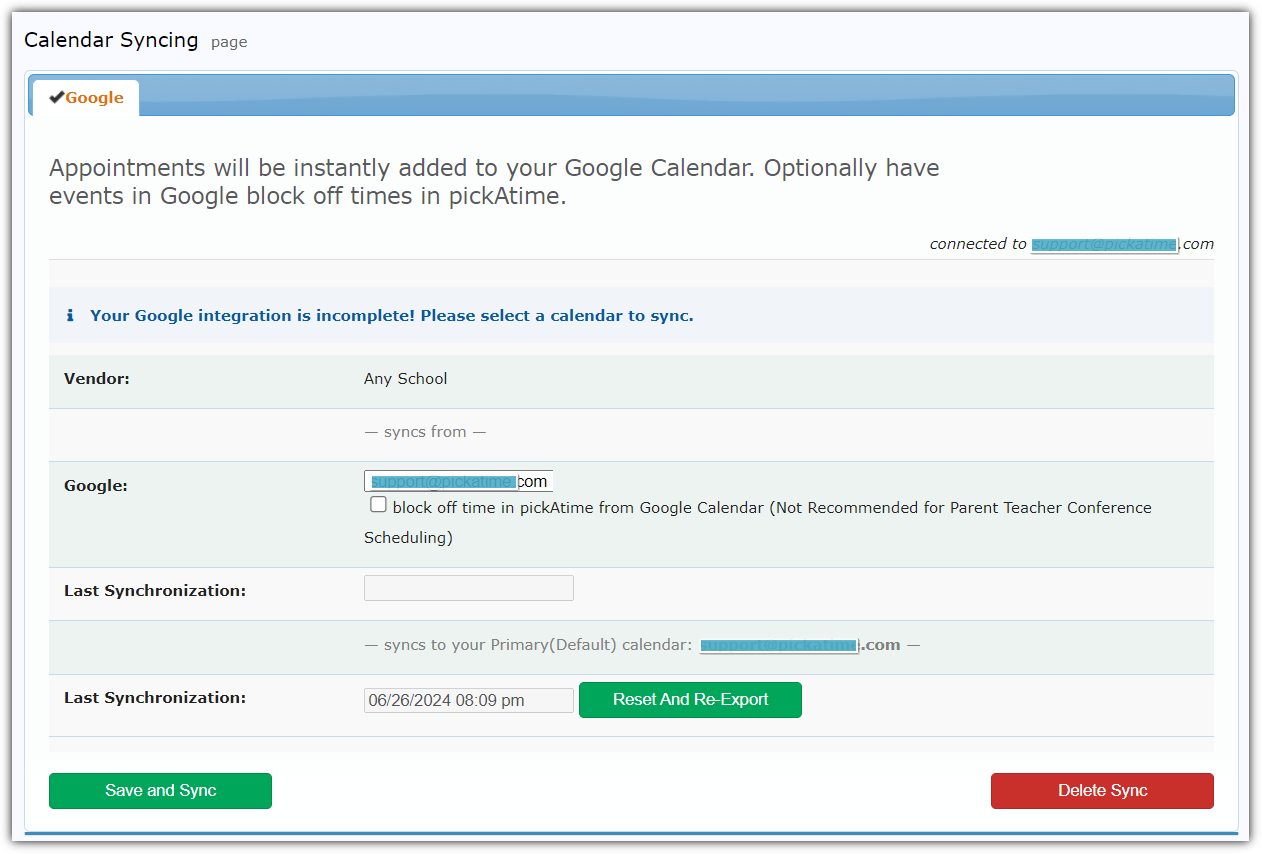
Then you will be sent back to the pickAtime website. From there, you select which of the calendars from your Google account you want to connect and if you want your appointments to be blocked out.
If you are a teacher, you do NOT want to select the option to have blocked off time in pickAtime from the Google Calendar.
Once your sync has been added, you will see that your initial appointments have been imported over from your Google calendar (note that subsequent calendar appointments may take up to 24 hours to see the appointments blocked out).

##### **The columns for the imported appointments are as follows:**
a. the date and time of the imported appointment
b. how long the appointment lasts for in minutes
c. name of the appointment
d. which calendar the appointment came from (Google or Outlook)
e. name of the calendar it came from
f. whether the appointment should be blocked out on the scheduler
Return to Events Management/ Appointments and click the Resources drop-down menu and select Assign Contact. A dialog box will come up where you can select the Contact person for the resource to the current calendar holder.
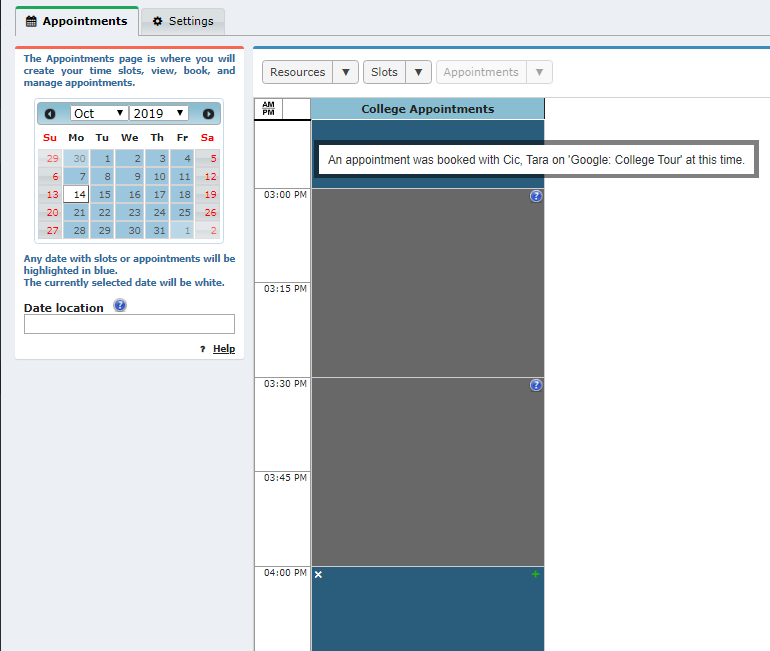
Below is a screenshot of appointments blocked from a Google calendar after a Contact has been assigned to the Resource. The time will appear blocked while giving the title of the appointment and referencing the calendar it originated from.
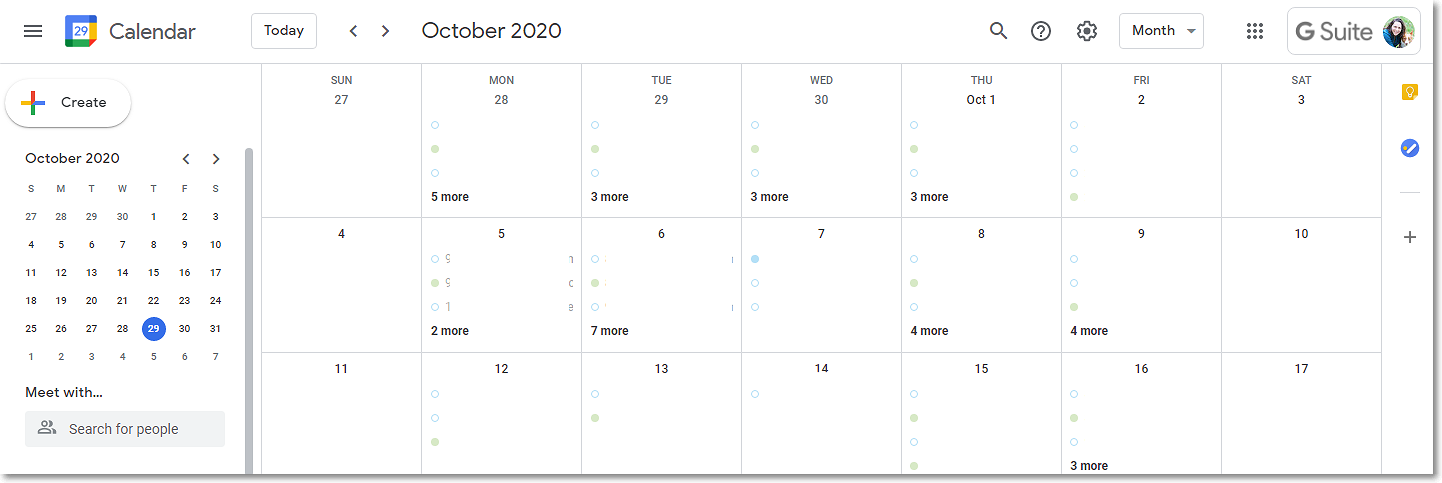
The pickAtime calendar in Google. Note that the pickAtime appointments will be color-coded, display the vendor account, resource name, and state that it's a pickAtime appointment. To help reduce unnecessary email volume, automatic email notifications are disabled when participants create or update Google Calendar events. Notifications will only come from pickAtime.
### **Frequently Asked Questions**
Here are some of the more common FAQ’s:
##### **Q. We are not using the Google Meet Integration; our teachers are simply syncing their Google Calendars. Why are our parents' names and emails being added to the Google Calendar event? Google Calendar is now sending out event invites!**
A. Since your teachers are using the Google Calendar Sync, our system is adding a calendar event/appointment to your Google Calendar. After the calendar sync, Google automatically sends notifications to your guests/parents. To keep this from occurring, your teachers could use the Subscribe to iCal Feed option on the Reports/Event Reports page, the Teachers' Schedule report. On the teachers' calendars would appear all appointments. But for your parents/guests, the calendar notifications would not be sent.
##### **Q. What is the Reset and Re-Export Button?**
A. The "Reset and Re-export" option just means that all appointments will be re-exported to the user's primary calendar. Usually, pickAtime exports new appointments and updates calendar events for appointments that have been changed since the "Last Synchronization" date.
##### **Q. What is the Save and Sync Button?**
A. The "Save and sync" option performs two actions: importing events from the selected calendar and exporting appointments to the primary calendar. If the "block off time in pickAtime from Google Calendar" option is enabled, then pickAtime will automatically import events from the selected calendar every 15 minutes.
##### **Q. Why does my appointment time in Google Calendar look different than my confirmation email?**
This usually happens due to a time zone mismatch.
If an event is created in a different time zone than your local setting, calendar providers like Google or Outlook will automatically adjust the time to match your location. For example, an appointment scheduled for 9:00 AM Central Time will appear as 10:00 AM if your calendar is set to Eastern Time.
If you notice that all appointments for an event are off by an hour, you, as an admin, can fix this by updating the event’s time zone:
1. Log in to the Admin UI
2. Go to Events > Preview
3. Locate your event and check the Time Zone column
4. Select the correct local time zone (e.g., Eastern Time) from the dropdown
To update existing appointments to the correct time zone, do the following in the Admin UI:
1. Navigate to the Appointments List page.
2. Check the All appointments box.
3. Select the relevant event from the drop-down menu and click Search.
4. Locate your appointment on the right-hand side and select it.
5. Click Send Email > Send email to selected.
6. In the pop-up, choose Send reminder email and click OK.
Once the time zone is set, the reminder emails (which include a calendar attachment) will reflect the updated time. Calendar entries will automatically sync and display the correct time for users.
# Connecting pickatime with Google Workspace
### **Connecting pickAtime with Google Workspace**
A Google Workspace Service Account provides a simplified user experience by allowing the account to act on behalf of your users in the background, minimizing the need for individual user configuration and setup.
This integration allows central management of features like Calendar Sync, which will help automatically generate Google Meet links for the virtual appointments.
1. Log in to your Org’s Gmail / Google Workspace (G Suite) Console with a Super administrator's credentials at [https://console.cloud.google.com/](https://console.cloud.google.com/). If you haven’t used the Console before, you will first need to agree to the Console’s Terms of Service.
2. Click the Create Project button.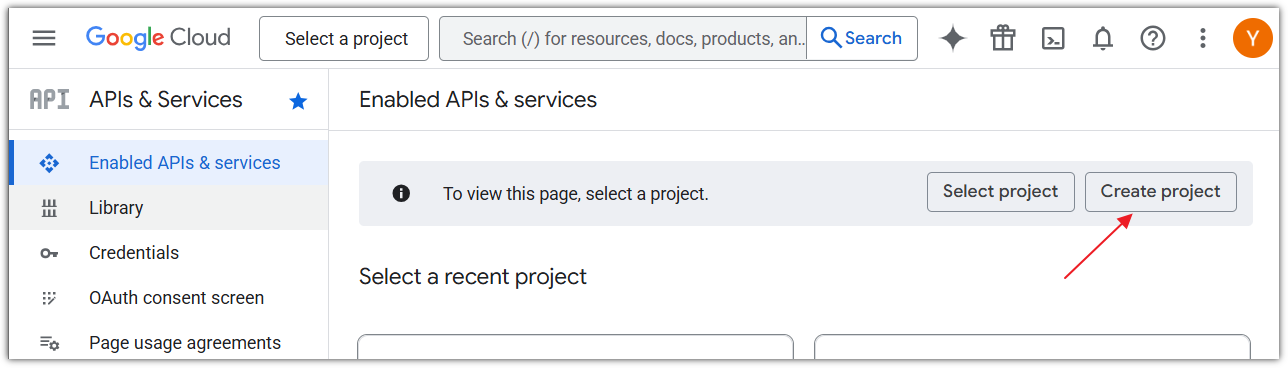
3. Enter a Project name and click Create. In this example, we set the name pickAtime service acc.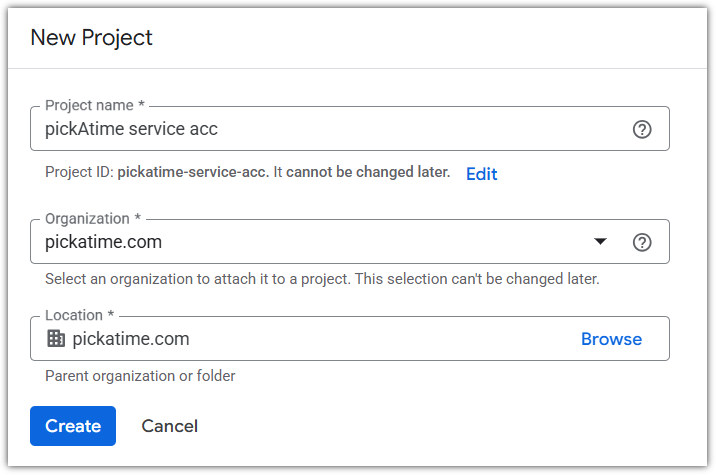
4. In the top left corner of the page, select the Menu button, select APIs & Services in the sidebar. Then select the Enable APIs and Services button.
5. Search for and add the following API keys:
- Admin SDK
- Gmail API
- Google Calendar API
6. Once all API Keys have been added, open the Google Menu and navigate to APIs & Services → Credentials → Create Credentials → Service Account.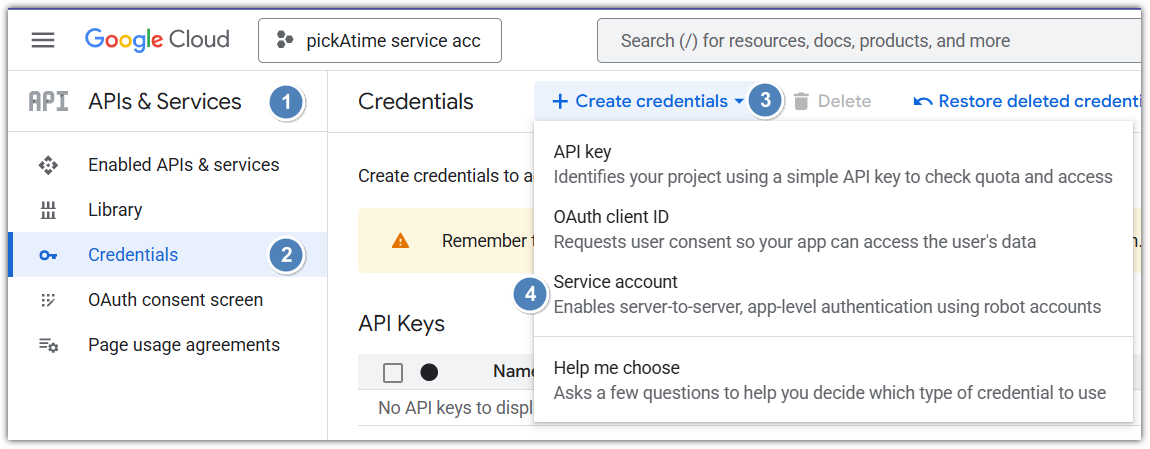
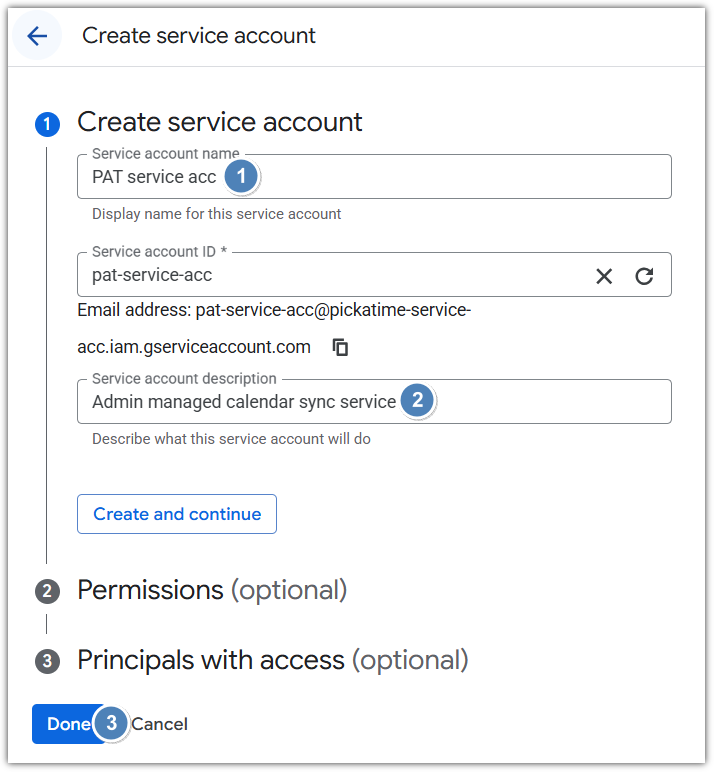
7. On the Create service account wizard:
- Add the Service account name, i.e. ‘PAT service acc’
- Add the Service account descriptions, i.e. ‘Admin managed calendar sync service’
- Steps 2, ‘Permissions,’ and 3, ‘Principals with access,’ are optional and not required.
8. Click Done.
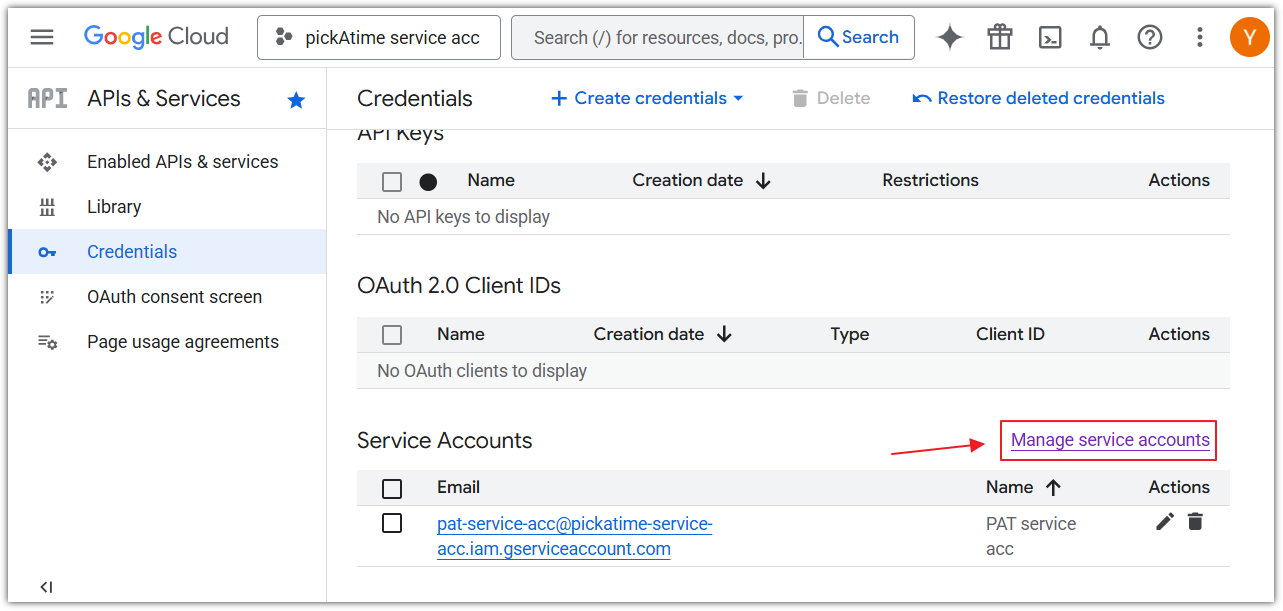
9. Click Manage service accounts
10. For the service account you created, on the far right-hand side in the Actions column, click the 3 dots Menu button > Manage keys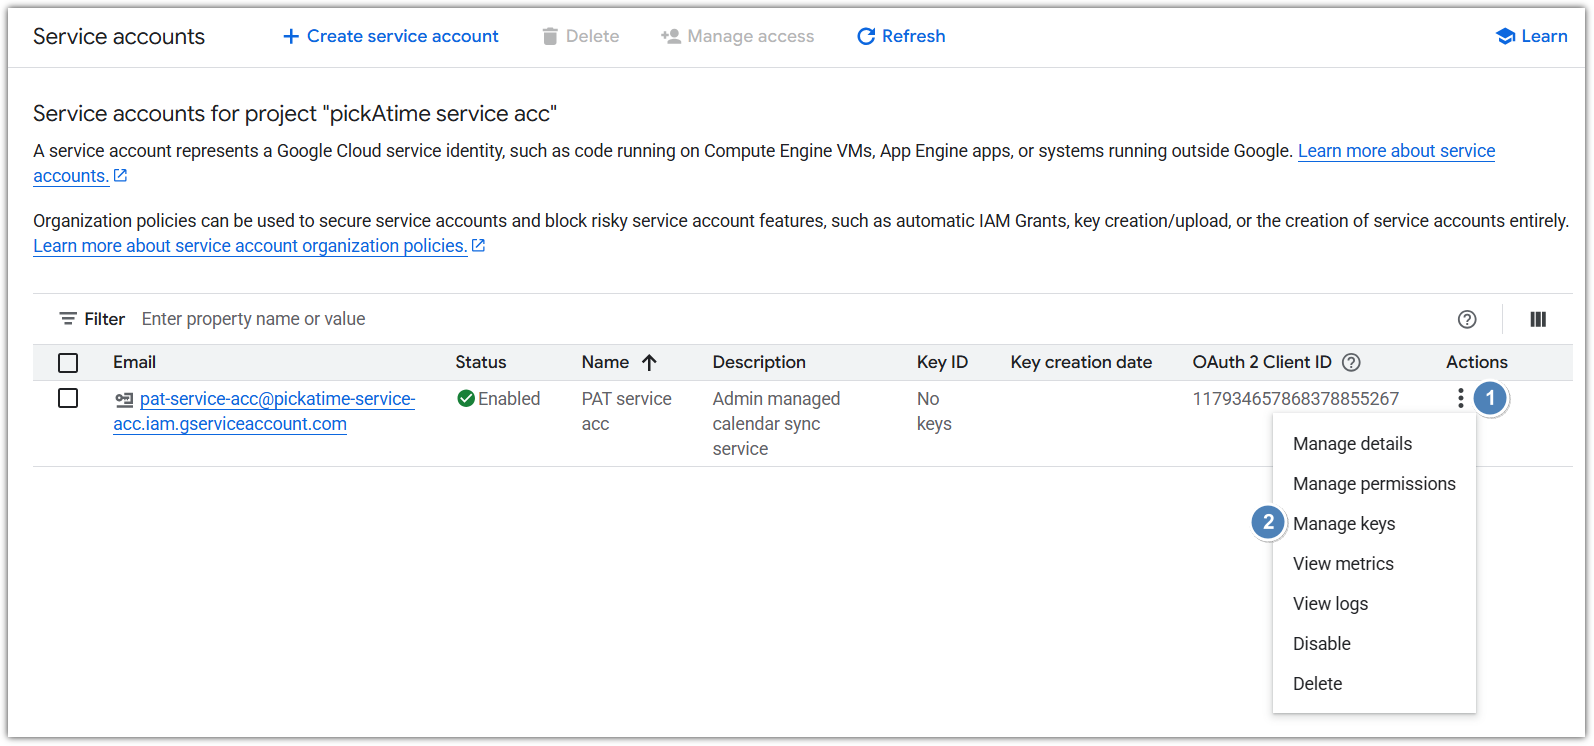
11. On the Keys tab, do the following:
1. Click Add key > Create new key
2. Key type: JSON
3. Click the Create button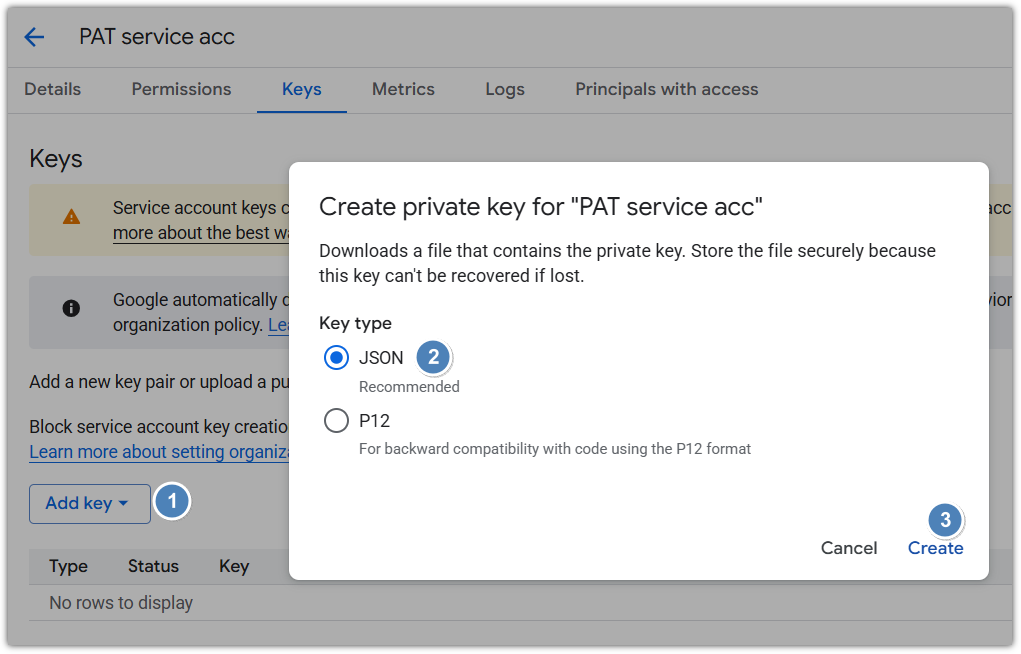
12. On the Details tab, copy the Unique ID value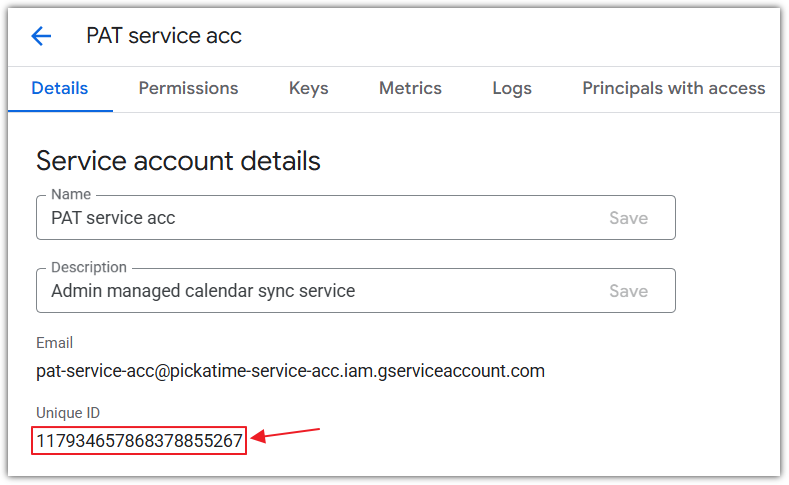
13. Navigate to [admin.google.com](http://admin.google.com/) and do the following:
14. Click Security → Access and Data Control → API Controls.
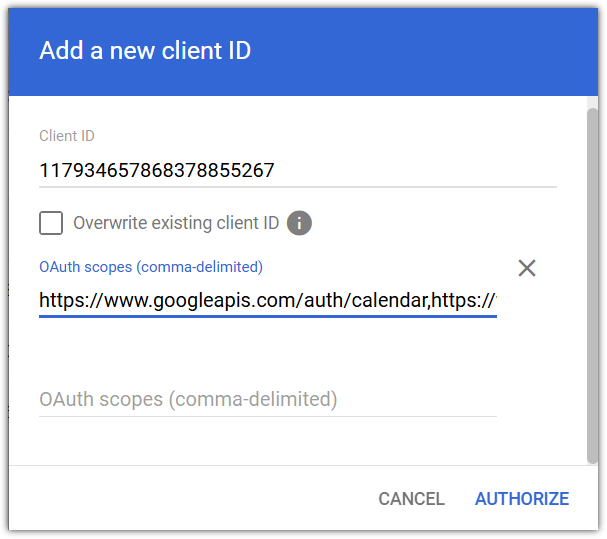
1. Scroll down to the very end, and click Manage Domain Wide Delegation.
2. Click Add new button.
3. In the Client ID field, paste the Unique ID from the previous step.
4. In the OAuth scopes (comma-delimited) paste the following: [https://www.googleapis.com/auth/calendar,https://www.googleapis.com/auth/userinfo.email,https://www.googleapis.com/auth/admin.directory.user.readonly,https://www.googleapis.com/auth/admin.directory.group.readonly,https://www.googleapis.com/auth/calendar.events](https://www.googleapis.com/auth/calendar)
5. Click Authorize
6. 
15. Connect pickAtime with a Google Workspace:
16. Sign in to pickAtime.
17. In the Admin UI tool, go to the Global Setup/Business page, scroll down to the Integration Options > Google Workspace section.
18. In the Super Admin Email field, add the email address of the Super Admin user in the Google Console.
19. In the Service Account Private key field, upload the JSON file (Which will have been exported from Google when following step #10).
20. Click the " Connect and Map Contacts button, and you will see the Google Workspace Integration Result.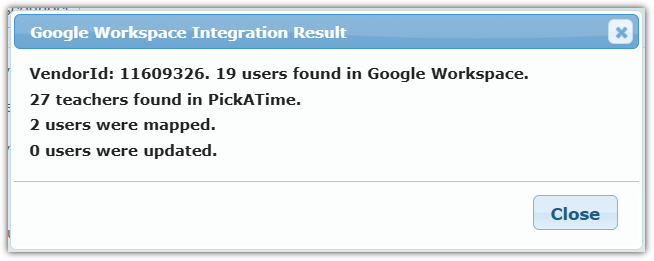
##### **\*\*Please note that the integration will only display “Enabled” when syncing is error-free\*\***