Import Files
- Student File
- Teacher File
- Class File
- Enrollment File
- Parent File
- Parent Student Relationship File
- People File
- Appointments File
- Slots File
- Events File
Student File
The Student File is used to add students to your school account. For multiple PTA events, you only need to import the Student File once. Use the Enrollment File to assign students to specific events.
Required Columns
- StudentID – A unique identifier for each student.
- First – The student’s first name.
- Last – The student’s last name.
- SecurityValue
- A value parents use to identify their child when signing up.
- Example: The student’s birth date (e.g., mm/dd/yyyy).
File Format
- File Type: Tab-delimited text file (*.txt or *.tsv).
- First Row: Must contain column headers labeled exactly as specified above.
- Example Tools: Export from Excel or Google Sheets as Tab-delimited Text.
TEMPLATE
|
StudentID |
First |
Last |
SecurityValue |
|
101 |
Betsy |
Smith |
01/15/2010 |
|
102 |
William |
Johnson |
06/20/2012 |
Key Points
- StudentID:
- Must be unique for each student.
- Recycling StudentIDs:
- Do not reuse StudentIDs without first removing the old student data.
- Example:If StudentID 101 was assigned to Betsy Smith last year and is now assigned to William Johnson, Betsy’s parent will log in and mistakenly see William listed as her child.
- Solution: Remove all contacts before reusing StudentIDs. This can be done via the Global Setup/Contacts Setup page using the Remove All Contacts option.
- SecurityValue Type:
- After importing the file, go to Global Setup/Contacts.
- Set the Type column for the SecurityValue field to Date.
- This allows parents to enter a birth date in the format mm/dd/yyyy.
By following these guidelines, you can efficiently import and manage student data in the system.
The Student File adds students to the account. If multiple PTA events are being held, the Student File only needs to be imported once. The Enrollment File will then be used to associate students with each event.
Where to Check Imported Student Data in the Admin UI
- After importing, go to the Contacts page in the Admin UI.
- Locate students by searching for their StudentID or name.
- Ensure that all expected students appear in the list.
Teacher File
The Teacher File is used to add teachers to your account. For multiple PTA events, you only need to import the Teacher File once. Use the Class File to link teachers to individual events.
Required Columns
- TeacherID - A unique identifier for each teacher.
- First - The teacher’s first name.
- Last - The teacher’s last name.
- Email - The teacher’s email address. Each email must be unique.
Optional Columns
- Password
- Specifies an initial password for the teacher.
- If not provided, teachers will be prompted to create their own password when logging in.
- Room
- Specifies the physical room where the teacher will be during the event.
- Useful for generating reports by room number.
- VirtualRoom
- A virtual meeting link (e.g., Zoom, Google Meet, Microsoft Teams).
- AccessLevel
- Sets the teacher's access level for the system.
- Appointment Viewer (default).
- Appointment Maker (can book appointments for parents).
- Resource Administrator (can block their own schedule).
- Sets the teacher's access level for the system.
File Format
- File Type: Tab-delimited text file (*.txt or *.tsv).
- First Row: Must contain column headers labeled exactly as specified.
- Example Tools: Export from Excel or Google Sheets as Tab-delimited Text.
Template:
|
TeacherID |
First |
Last |
|
Room |
|
T001 |
John |
Doe |
john.doe@school.edu |
123 |
|
T002 |
Jane |
Smith |
jane.smith@school.edu |
321 |
Additional Notes
- Unique Rows:
- Ensure the number of unique rows in your file matches the number of imported rows.
- Mismatches may indicate duplicates or previously imported data.
- Password Reset:
- Once a teacher creates their own password, re-importing the file will not change it.
- To reset all teacher passwords, use the Reset Administrative Password button on the Global Setup / Contacts Setup page.
- Re-imports:
- If re-importing the file with old and new teachers, the system will display the total number of rows and newly added rows.
By following these guidelines, you can efficiently import and manage teacher data.
The Teacher File adds teachers to the account. If multiple PTA events are being held, the Teacher File only needs to be imported once. The Class File will then be used to assign teachers to specific events.
Where to Check Imported Teacher Data in the Admin UI
- After importing, go to the Contacts page in the Admin UI.
- Locate teachers by searching for their TeacherID or name.
- Ensure that all expected teachers appear in the list.
Class File
The Class file is essential for creating and associating classes with teachers in the pickAtime event. Below are the detailed instructions for creating a valid Class File.
Required Columns
- ClassID
- A unique identifier for the class.
- Must be unique per teacher. For example, if one class has multiple sessions taught by different teachers, you’ll need distinct ClassIDs (e.g., "Eng9-869").
- Ensure the same ClassID is used in the Enrollment File.
- TeacherID
- Links the class to the teacher.
- Must match the TeacherID listed in the Teacher File.
- ClassName (Optional)
- Provides a descriptive name for the class (e.g., "Math").
- Useful for display purposes on the CUI legend.
- GroupName (Optional)
- Categorizes teachers into groups (e.g., "Upper School" or "Lower School").
- Helpful for managing time slots for different teacher groups.
- PTAN (Optional)
- Specifies the number of allowed parent appointments per class. Default is 1 if absent.
File Format
- File Type: Tab-delimited text file (*.txt or *.tsv).
- First Row: Must contain column headers labeled exactly as specified.
- Example Tools: Export from Excel or Google Sheets as Tab-delimited Text.
TEMPLATE of a Simple Class File:
|
ClassID |
TeacherID |
ClassName |
|
Math-101 |
T001 |
Math |
|
Science-102 |
T002 |
Science |
TEMPLATE with Additional Columns:
|
ClassID |
TeacherID |
ClassName |
GroupName |
PTAN |
|
Math-101 |
T001 |
Math |
Upper School |
2 |
|
Science-102 |
T002 |
Science |
Lower School |
1 |
PTAN (parent teacher appointment number) is the number of allowed appointments for each student's parent for that class. For example, some schools allow the parent 2 appointments with a home room teacher or an advisor. If the column is not present, 1 is assumed.
The Class File assigns teachers to specific events and their associated classes. Each class must have a unique ClassID, and a TeacherID must match an imported teacher.
Where to Check Imported Class Data in the Admin UI
- Open the event in the Admin UI.
- Go to the Class Editor tab.
- The list of teachers and their imported classes will be displayed.
- Verify that all expected classes are associated with the correct teachers.
If you have older classes and enrollments, you can now delete the event’s existing classes and enrollments directly from the Import page before uploading new data. This option will also delete the classes’ associated teacher resources, making it easier to remove bad data without leaving the Importer page. To locate this feature on the Imports page, click the Class file option within the File Type drop-down menu.
Enrollment File
The enrollment file is used to assign students to their respective classes. Below are the requirements and formatting details for creating a valid enrollment file.
Required Columns
- StudentID - Identifies the student; must match the StudentID in the student file.
- ClassID - Identifies the class; must match the ClassID in the class file.
Important: Ensure the column titles exactly match those listed above.
File Format
- File Type: Tab-delimited text file (*.txt or *.tsv).
- First Row: Must contain column headers.
- Example Tools: Export from Excel or Google Sheets as Tab-delimited Text.
Import Options
Option 1: Multiple Rows per Student
Each row lists a single StudentID and one ClassID. If a student is enrolled in multiple classes, they will have multiple rows.
TEMPLATE:
|
StudentID |
ClassID |
|
123 |
Math |
|
123 |
English |
|
124 |
Science |
Option 2: One Row per Student
Each student has one row, and their classes are listed in separate columns (ClassID1, ClassID2, etc.).
TEMPLATE:
|
StudentID |
ClassID |
ClassID |
ClassID |
|
123 |
Math |
English |
History |
|
124 |
Science |
Math |
|
The Enrollment File assigns students to classes within a specific event. The students and classes referenced must already exist in the system from the Student and Class files.
Where to Check Imported Enrollment Data in the Admin UI
- Open the event in the Admin UI.
- Go to the Class Editor tab.
- Select a class to view the enrolled students.
- Ensure that all expected students are assigned to their correct classes.
Parent File
The Parent File adds parents to the system. This file is required only if you are using Single Sign-On (SSO) authentication.
The Parent File Columns
This file lists all the parents and must contain the following fields:
- ParentID - Identifies the parent. This must be unique.
- First - Contains the first name of the parent.
- Last - Contains the last name of the parent.
- Email - Contains the parent’s email address. Only one email address should be entered here.
File Format
- File Type: Tab-delimited text file (*.txt or *.tsv).
- First Row: Must contain column headers.
- Example Tools: Export from Excel or Google Sheets as Tab-delimited Text.
TEMPLATE
|
ParentID |
First |
Last |
|
|
37890 |
Sarah |
Jones |
sjones@aparent.com |
|
38750 |
Bob |
Williams |
bwilliams@aparent.com |
Important Notes
- ParentID and Email must be unique. If multiple rows contain the same ParentID, only one contact will be created, with each row updating the previously imported record
- If multiple rows contain the same Email, only one contact will be created, with each row updating the previously imported record.
- If you do not want parents to attach students to their accounts, disable this option in Global Setup / Business Setup under Miscellaneous by unchecking "Allow parents to attach and detach students."
Where to Check Imported Data?
- The Parent File imports contact records only.
- Admins can check the Contacts page in the Admin UI to verify the imported parents.
Parent Student Relationship File
The Parent-Student Relationship File connects parents to their respective students. It is only required if your organization uses Single Sign-On (SSO).
Required Fields
The file must contain the following fields:
- ParentID - Identifies the parent (must match the ParentID in the Parent File).
- StudentID - Identifies the student (must match the StudentID in the Student File).
File Format
- File Type: Tab-delimited text file (*.txt or *.tsv).
- First Row: Must contain column headers.
- Example Tools: Export from Excel or Google Sheets as Tab-delimited Text.
TEMPLATE
|
ParentID |
StudentID |
|
37890 |
12345 |
|
38750 |
67890 |
How to Verify Imported Data
Once imported, the parent-student relationships can be verified in the Contacts page of the Admin UI:
- Search for the parent contact using ParentID, Email, or Last Name.
- Select the parent’s contact record in the search result, then select the Parent-Student Relationship tab on the right.
People File
The People File is used to import contact records for use in an event. This file can include different types of participants, such as teachers, students, parents, or staff — each row represents a person.
Required Columns
- ID - A unique identifier for each contact. Each ID must be unique across all imported contacts (Students, Teachers, Parents, People).
- First - The first name of the person.
- Last - The last name of the person.
- Email - A valid email address for the contact. Only one email address per row is allowed.
Format Requirements
- The file must be a tab-delimited text file (*.txt or *.tsv).
- Each row must represent one person.
- Field names (column headers) must exactly match the required field names (case-sensitive).
- Avoid using formulas, merged cells, or formatting.
Sample Table
|
ID |
First |
Last |
|
|
00123 |
Alice |
Martin |
amartin@example.com |
|
00456 |
John |
Stevens |
jstevens@example.org |
|
00789 |
Rosa |
Delgado |
rdegado@example.net |
Where to Check Imported Data
- Go to the Contacts page in the Admin UI to verify that the people have been successfully added.
- You can search by name, ID, or email to confirm individual records.
Appointments File
Importing Appointments
To add Appointments, you first need to import a People file (see "Importing People"). The People file must have a unique identifier for each person. After importing your People file, you can import an Appointment file. The Appointment file must reference the person identifier you previously imported in the People file import.
IMPORTANT NOTE: Appointments can only be imported for Normal event types, not PTA or Simple PTA event types.
1 - Create Your Appointments File
This file lists the appointments to be imported.
Required fields:
- ID: Identifies the person; must match an existing contact person ID
- EventID: Event ID # for the event (found under Reports > Settings)
- Resource: Name of the resource (e.g., Nurse, Health Screenings)
- Date: Date and time of the appointment (e.g., 3/4/09 10:00 AM)
Optionally include additional appointment fields by adding columns. Column headers must match the appointment field titles in the event’s Appointment Fields tab.
TEMPLATE:
|
ID |
EventID |
Resource |
Date |
|
12345 |
6789 |
Nurse |
3/4/09 10:00 AM |
|
67890 |
6789 |
Health Screening |
3/5/09 1:30 PM |
File Format
- File Type: Tab-delimited text file (*.txt or *.tsv).
- First Row: Must contain column headers.
- Example Tools: Export from Excel or Google Sheets as Tab-delimited Text.
2 - Import Your File
- Log in at pickatime.com
- Select Importer
- Select Data Type: Appointments
- Select ID for the Field ID
- Check Send Confirm Email if desired
- Locate and import your file
3 - Confirm the Appointments in the Admin UI
- Open the Admin UI
- You will see a red Appointments List for the imported appointments
- Click an appointment, then click Confirm Appointment
- This will remove the red color and finalize the slot booking
Importing Appointments with SMS Reminder
Before beginning, make sure your account is activated for SMS reminders (contact support for activation; additional charges apply).
This process lets you import appointments and send SMS reminders.
1 - Create Your Appointments File
Required fields:
- ID: Must match existing person ID
- EventID: Event ID # (found in Reports)
- Resource: Resource name (e.g., Nurse)
- Date: Appointment date and time (e.g., 3/4/09 10:00 AM)
- Phone: Phone number to receive SMS reminder
- TimeToRemind (optional): Minutes before appointment to send reminder (e.g., 720 for 12 hours; defaults to 1440 = 24 hrs if blank)
TEMPLATE:
|
ID |
EventID |
Resource |
Date |
Phone |
TimeToRemind |
|
12345 |
6789 |
Nurse |
3/4/09 10:00 AM |
1234445577 |
60 |
|
67890 |
6789 |
Health Screening |
3/5/09 1:30 PM |
(123)4445577 |
120 |
File Format
- File Type: Tab-delimited text file (*.txt or *.tsv).
- First Row: Must contain column headers.
- Example Tools: Export from Excel or Google Sheets as Tab-delimited Text.
2 - Import Your File
- Log in at pickatime.com
- Select Importer
- Select Data Type: Appointments
- Select ID for the Field ID
- Check Send Confirm Email if desired
- Locate and import your file
3 - Confirm the Appointments in the Admin UI
- Open the Admin UI
- You will see a red Appointments List for the imported appointments
- Click an appointment, then click Confirm Appointment
- This will remove the red color and finalize the slot booking
Importing Appointments with Price
Before starting:
- Ensure the event has "Allow to pay later" enabled
- This allows imported appointments to be unpaid, and participants can pay through the online scheduler in Your Schedule
1 - Create Your Appointments File
Required fields:
- ID: Person ID (must match imported People ID)
- EventID: Event ID # (found in Reports)
- Resource: Resource name (e.g., Nurse)
- Date: Appointment date and time (e.g., 3/4/09 10:00 AM)
- Price: Fee to be paid (e.g., 1, 1.5, 20, 2.8 in USD)
TEMPLATE:
|
ID |
EventID |
Resource |
Date |
Price |
|
12345 |
6789 |
Nurse |
3/4/09 10:00 AM |
20 |
|
67890 |
6789 |
Health Screening |
3/5/09 1:30 PM |
15.5 |
File Format
- File Type: Tab-delimited text file (*.txt or *.tsv).
- First Row: Must contain column headers.
- Example Tools: Export from Excel or Google Sheets as Tab-delimited Text.
2 - Import Your File
- Log in at www.pickatime.com
- Select Importer from the navigation bar
- Select Data Type: Appointments
- Select ID for Field ID
- Check Send Confirm Email if desired
- Locate and import your file
Tip: To encourage participants to log in and pay, mention payment instructions in the confirmation/reminder emails. This can be enabled during the import process by checking Send Confirm Email.
Slots File
The Slot File is used to define appointment availability (slots) for an event. Each row represents a time block for a resource (e.g., Nurse, Health Screening). Slots are assigned to a specific event and resource.
If your event does not use time-based appointments (such as a Roster event), this file should not be used.
1 - Create Your Slots File
Required Columns:
- EventID: The ID number for the event. This can be found under Reports / Account Reports /Settings or in the event link under Event Management / Settings / Online Scheduler Settings / Scheduling Link.
- Resource: Name of the resource (e.g., Nurse, Health Screenings). Must match an existing resource in the event.
- Date: Date for the appointment slots (e.g., 03/04/2025). Format: MM/DD/YYYY.
- StartTime: Start time for the first slot (e.g., 10:00 AM). Format: HH:MM AM/PM.
- EndTime: End time for the last slot (e.g., 11:30 AM). Format: HH:MM AM/PM.
- Duration: Length of each slot in minutes (e.g., 10, 15, 20).
- Max: Maximum number of appointments allowed per slot.
TEMPLATE
|
EventID |
Resource |
Date |
StartTime |
EndTime |
Duration |
Max |
|
373933 |
Health Screenings |
03/18/2025 |
09:00 AM |
12:00 PM |
15 |
1 |
|
373937 |
Nurse |
03/18/2025 |
01:00 PM |
03:00 PM |
20 |
2 |
Key Points
EventID:
- Must match an existing event on your account.
- You can find the EventID in the event's Scheduling Link or under Reports.
Resource:
- Must match the resource name as defined in your event.
- If the resource name does not exist or is misspelled, the import will fail.
Time Format:
- Use 12-hour format with AM/PM for StartTime and EndTime.
- Make sure the duration fits evenly into the total time range.
Max:
- Defines how many appointments can be booked in the same time slot.
- Example: A Max of 2 allows two people to book the same time.
Unsupported Fields:
- Slot Type and Slot Appointment Type are not supported in imports.
- All imported slots will default to:
- Slot Type: Visible to Customers
- Appointment Type: In-Person
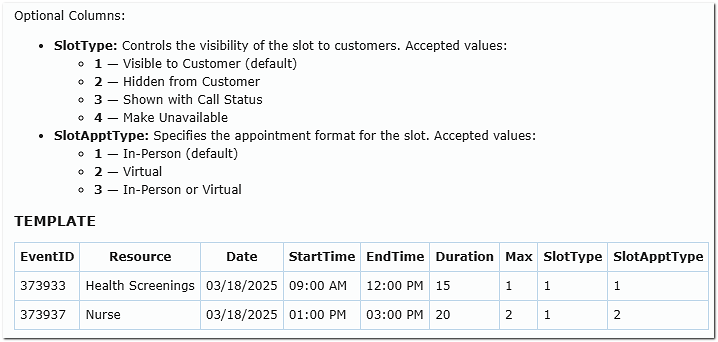
Additional Optional columns:
When importing your Slots file, you can also define both Slot Type and Appointment Type directly within the Slots Import file.
File Format
- File Type: Tab-delimited text file (*.txt or *.tsv).
- First Row: Must contain column headers labeled exactly as listed above
- How to Create:
- In Excel: Save as Text (Tab delimited) (*.txt)
- In Google Sheets: File → Download → Tab-separated values (.tsv)
2 - Import Your File
- Go to pickatime.com and log in from the Login section
- On the left navigation bar, select Importer
- Set the Data Type to Slots.
- Browse your computer and select your prepared tab-delimited file.
- Click Import.
Where to Check Imported Slot Data in the Admin UI
After importing:
- Go to Event Management → Open the Event.
- Click on Time Setup or Schedule Setup.
- Select a Resource and a Date to confirm the slots appear as expected.
Events File
The Events File allows you to import either Normal Events (with appointment slots) or Roster Events (registration-style events) into pickAtime. This document outlines the required format and instructions for both types.
File Format
- File Type: Tab-delimited text file (*.txt or *.tsv).
- First Row: Must contain column headers.
- Example Tools: Export from Excel or Google Sheets as Tab-delimited Text.
Importing Normal Events
1 – Create Your Event File
Each row represents one set of time slots for an event.
Required Columns:
- EventName - The name of your event (e.g., “Vision Screening”).
- EventDate - The label shown in the Event Setup page (e.g., “March 2025”).
- Location - The physical or virtual location where the event is held.
- TimeZone - Time zone in which the event occurs (e.g., “America/New_York”).
- Resource - The name of the resource involved in the event (e.g., “Nurse”).
- Date - The calendar date for the appointment slots (format: MM/DD/YYYY).
- StartTime - Start time for the first appointment slot (format: HH:MM AM/PM).
- EndTime - End time for the last appointment slot (format: HH:MM AM/PM).
- Duration - Duration of each appointment slot in minutes (e.g., 10).
- Max - Maximum number of appointments allowed per slot.
- basedEvent - (Optional) ID of an existing event to use as a template.
- Category - (Optional) Category label for the event.
- Description - (Optional) General description or details about the event.
- ResourceDescription - (Optional) Description of the resource, such as qualifications or instructions.
2 – Import Your File
- Go to pickatime.com and log in.
- From the left-hand menu, select Importer.
- Choose Data Type: Events.
- Choose Event Type: Normal.
- Locate your file and import it.
Important Notes
- If multiple rows in your import file share the same EventName, pickAtime will append the slot data to the existing event. It will not create duplicate events.
- To create two distinct events with the same name, each must be given a unique EventName (e.g., “Bellevue Screening 1”, “Bellevue Screening 2”).
Importing Roster Events
1 – Create the Roster Event File
Each row defines one registration-type event (not based on appointment slots).
Required Columns:
- EventName - The name of your event.
- EventDate - The label shown in the Event Setup page.
- Location - The location of the event.
- TimeZone - The time zone of the event (e.g., “America/Denver”).
- Max - Maximum number of participants allowed in the event.
- basedEvent - (Optional) ID of an event to use as a template.
- Category - (Optional) Category label for your event.
- Description - (Optional) Description or event details.
2 – Import Your File
- Log in at pickatime.com
- From the left-hand menu, select Importer.
- Choose Data Type: Events.
- Choose Event Type: Roster.
- Locate your file and import it.
Important Notes
- If multiple rows in your import file share the same EventName, pickAtime will append the slot data to the existing event. It will not create duplicate events.
- To create two distinct events with the same name, each must be given a unique EventName (e.g., “Bellevue Screening 1”, “Bellevue Screening 2”).