# Blackbaud Management Guide

# Administrator Access

<span class="rvts20">From the **[Contacts](https://help.pickatime.com/books/blackbaud-management-guide/page/contacts)** tab, you can search for a contact, select their name, and adjust the "**Admin Level**" pull down to allow them to log in to the Admin UI and see reports.</span>

<span class="rvts36">To add a new contact, i.e., select the green </span><span class="rvts37">Add </span><span class="rvts36">button. For an Administrator, select Admin... and fill in the Contact information for the Admin.</span>

<span class="rvts36">Select the Admin Level pull-down to set the Contact's access level.</span>

- **<span class="rvts37">Appointment Viewer</span>**<span class="rvts36"> - has the ability to log into the Admin UI and view the appointments, but cannot change anything.</span>
- **<span class="rvts37">Appointment Maker</span>**<span class="rvts36"> - has the ability to make appointments from the Admin UI, but cannot change the setup, add or remove slots.</span>
- **<span class="rvts37">Resource Administrator</span>**<span class="rvts36"> - has the ability to make and cancel appointments and add and remove slots from the Admin UI for the resources to which they have been granted access in the Resource Access section.</span>
- **<span class="rvts37">Event Administrator</span>**<span class="rvts36"> - is a full-powered administrator on one or more events. Use the lower right-hand table labeled Event Access to set the events the contact should have administrative access to.</span>
- **<span class="rvts37">Administrator</span>**<span class="rvts36"> - has full access to the entire account.</span>

<span class="rvts108">For the administrative categories</span>**<span class="rvts110"> </span><span class="rvts109">Appointment Viewer</span><span class="rvts108">,</span><span class="rvts110"> </span><span class="rvts109">Appointment Maker</span><span class="rvts108">, </span>**<span class="rvts108">and</span>**<span class="rvts110"> </span>**<span class="rvts109">**Resource Administrator**,</span><span class="rvts110"> </span><span class="rvts108">be sure to specify the resources the contact should have access to. This is set in the **Vendor Access tab -&gt; Resource Access** block.</span>

<span class="rvts108">For the administrative category </span><span class="rvts109">**Event Administrator**,</span><span class="rvts108"> make sure to set the event that the contact should have access to. This is set in the **Vendor Access tab -&gt; Event Access** block.</span>

<span class="rvts36">All of these settings allow access to the reports.</span>

<span class="rvts36">This new contact will be prompted to create a password the first time they log in. </span>

#### **<span class="rvts36">To Update multiple Teachers</span>**

<span class="rvts36">To update groups of Teachers /Admins to higher (or lower) levels, go to [**Global Setup/Contacts**](https://help.pickatime.com/books/additional-event-features/page/global-setup-contacts-setup) and under Advanced Options / Additionally select the Modify Admin Level button. </span>

[![image.png](https://help.pickatime.com/uploads/images/gallery/2026-05/scaled-1680-/ta3image.png)](https://help.pickatime.com/uploads/images/gallery/2026-05/ta3image.png)

# Allow Teachers to Block Slots

<span class="rvts20">The default Administrative access for teachers is Appointment Viewer access only. You can, however, provide all your teachers with Appointment Maker access. This would allow your teachers to block slots prior to opening up the scheduler to parents. This would be used if an Admin has created an entire batch of slots for all the teachers and wanted each teacher to be able to block specific slots. </span>

<span class="rvts20">To upgrade the teacher access, you would go to the </span>**<span class="rvts21">Global Setup / Contacts Setup</span>**<span class="rvts20"> page. Select </span><span class="rvts21">Show Advanced options</span><span class="rvts20"> and click on the </span><span class="rvts21">Modify Access Level</span><span class="rvts20"> button. Modify your teachers' access from Appointment Viewer to Appointment Maker. </span>

<span class="rvts20">Each teacher will then have access to their own schedule. </span>

<span class="rvts20">A teacher can block their own slots by going into the Admin UI, where they will be immediately in the Reporting section. At the top of the page is a Block Schedule button. This will take the teacher to the Appointments page, where they will see their schedule of available time slots. To block a slot, they should click on the X in the slot cell. The slot will turn red, indicating that it is blocked. To unblock a slot, they can click on the x once again, and the slot will turn blue, indicating that it is available. </span>

# Allow Teachers to Pre-Book Appointments

<span class="rvts20">The default Administrative access for teachers is Appointment Viewer access only. You can, however, provide all your teachers with Resource Administrative access. This would then allow your teachers to book appointments on behalf of parents prior to opening up the scheduler to parents.</span>

<span class="rvts20">To upgrade the teacher access, you would go to the </span>[**<span class="rvts21">Global Setup / Contacts Setup</span>**](https://help.pickatime.com/books/additional-event-features/page/global-setup-contacts-setup)<span class="rvts20"> page. Select </span><span class="rvts21">Show Advanced options</span><span class="rvts20"> and click on the </span><span class="rvts21">Modify Access Level</span><span class="rvts20"> button. On the pop-up, select the Appointment maker access level as a new level for the teachers, and click Ok. Then all the teachers with Appointment Viewer access level will be updated to Appointment Maker, and will be able to book appointments for parents.</span>

<span class="rvts20">Each teacher will have access to their own schedule. </span>

##### **<span class="rvts21">Booking Appointments in the Administrative User Interface (Admin UI)</span>**

<span class="rvts20">Booking an appointment through the CUI will not allow you to override any restrictions you may have established. For example, if the parent requires extra time with a teacher, you will need to use the Admin UI to book the appointment. When making an appointment from the Admin UI, you must select both the parent and the student.</span>

- <span class="rvts20">Select the </span><span class="rvts21">Appointments</span><span class="rvts20"> tab and use the calendar on the left to select the correct day. Click on the teacher name on the right-hand side, and then locate the slot you want to fill. Click on the green plus sign (</span><span class="rvts77">+</span><span class="rvts20">). </span>

- <span class="rvts20">For the PTA product, you will want to have both the student name and the parent name associated with an appointment.</span>

- <span class="rvts20">The students of the teacher you have selected will be displayed for you. If you do not see the student in the list, uncheck the box "students of Teacher Name" and search for the student by name. Select the student from the list on the right, and click on the </span><span class="rvts21">Ok</span><span class="rvts20"> button. </span>

- <span class="rvts20">If a parent is found for the student, you will see the parent's name listed. If multiple parents are found, you can select the correct one from the parent pull-down. </span>

- <span class="rvts20">The appointments box should now list the student's name and the parent's name. </span>

![](https://pickatime.com/help/lib/NewItem%2025.png)<span class="rvts20">Select the class if there is more than one class option, and then press the </span><span class="rvts21">Ok </span><span class="rvts20">button. </span>

<span class="rvts20">If the appointment has a red border around it, click on the appointment to check the error message that is to the left below the calendar. Cancel the appointment with the </span><span class="rvts21">Cancel Appointment</span><span class="rvts20"> button if you made a mistake, or select the </span><span class="rvts21">Confirm Appointment</span><span class="rvts20"> button to force the appointment and remove the red highlighting.</span>

#### **<span class="rvts21">Other Appointment Options</span>**

<span class="rvts20">On the Appointments page, you can click on an existing appointment. Then click on the Appointments button at the top - you will see a drop-down menu.</span>

<span class="rvts20">Select this, and you will have the following options:</span>

**<span class="rvts21">Confirm Appointment</span>**<span class="rvts36">  </span><span class="rvts20">- this will be enabled if you have clicked on a red problem appointment and will allow you to confirm the problem appointment. </span>

**<span class="rvts37">Cancel Appointment</span>**<span class="rvts20"> - will allow you to cancel the appointment and optionally send a cancellation email.</span>

**<span class="rvts21">Edit Appointment</span>**<span class="rvts20"> - will allow you to edit the appointment details for an appointment. For example, if you were prompting your parents for additional appointment-specific information, you would be able to edit it here. </span>

**<span class="rvts21">Change Time</span>**<span class="rvts20"> - will allow you to move the appointment to a new time. </span>

**<span class="rvts21">Send Reminder</span>**<span class="rvts20"> - will send a reminder email to the parent.</span>

**<span class="rvts21">Customer Info</span>**<span class="rvts20"> - will bring up the Contact Information dialog box for the parent.</span>

#### **<span class="rvts0"><span class="rvts96">Adding a New Student/Parent</span></span>**

<span class="rvts53">To add a student, you can do the following:</span>

1. <span class="rvts36">Go into the Contacts section of the Admin UI.</span>
2. <span class="rvts36">Search first for the student by name.</span>
3. <span class="rvts53">If you do not find the student, then click on the Add &gt; Student...</span><span class="rvts36"> button and fill in the fields on the Add New Student form. You only need to fill in the Stu</span><span class="rvts20">dent First Name and Student Last Name. Click on the </span><span class="rvts21">Add</span><span class="rvts20"> button.</span>

<span class="rvts20">You will also need to add in the parent, so the parent can book appointments.</span>

1. <span class="rvts36">Search for the parent by name.</span>
2. <span class="rvts36">If you do not find the parent, then click on the Add &gt; Parent... button and fill in the fields on the Add New Parent form. You will need to fill in the First Name,</span><span class="rvts20"> Last Name, ParentID, Email Address and ParentID. Click on the </span><span class="rvts21">Add</span><span class="rvts20"> button.</span>

#### **<span class="rvts0"><span class="rvts96">Connect the Student with the Parent</span></span>**

1. <span class="rvts36">Search again for the Student by name.</span>
2. <span class="rvts36">Click on the Student (on the left-hand side) and then click on the small Parent-Students Map tab</span>

- - <span class="rvts36">When you select a student (the contact has a StudentID), under the Parent List, you will only see the names of any parents associated with the student. </span>

1. <span class="rvts53">To connect a parent, click the green "Add" button under the Parents List section. The Select Person dialog box will appear with a list of contacts who are without the StudentID value. Select the parent and then click the </span><span class="rvts36">Add button and the contact will be added to the parent list. </span>

#### **<span class="rvts0"><span class="rvts96">Enroll the Student in Classes</span></span>**

1. <span class="rvts36">Go to the Class Editor section.</span>
2. <span class="rvts36">Click on the Teacher Name, and then the Class.</span>
3. <span class="rvts36">In the white entry box above the student roster on the right-hand side, enter your student name in the correct format for your account (either Last Name, First Name or First Name Last Name). When the system finds a match, press Enter. Repeat for each class the student belongs to. To determine the format your account is using, see how the other students in the class are displayed.</span>

# Creating a New Blackbaud User

<span class="rvts36">In order to set up a new user in Blackbaud, please do the following.</span>

1. <span class="rvts20">Go to **Core / Users, Add New User**.</span><span class="rvts104"> </span>
2. <span class="rvts36">First Name, Last Name, and Username are the required fields.</span><span class="rvts104"> </span>
3. <span class="rvts36">Edit the newly created user.</span><span class="rvts104"> </span>
4. <span class="rvts36">Select Role Membership (under Access tab).</span><span class="rvts104"> </span>
5. <span class="rvts36">Select the appropriate roles (PickATime Manager, Platform Manager) and </span><span class="rvts37">Save.</span>

# Creating Teams

<span class="rvts20">You can combine teachers into teams on the </span>**<span class="rvts21">Class Editor</span>**<span class="rvts20"> page. To create a team, you will do the following:</span>

1. <span class="rvts36">Select </span>**<span class="rvts37">Add Teacher / Team</span><span class="rvts36">, </span><span class="rvts37">Add Team</span>**
2. <span class="rvts36">The </span><span class="rvts37">Select Person</span><span class="rvts36"> dialog box will display</span>
3. <span class="rvts36">In the </span><span class="rvts37">Select Person</span><span class="rvts36"> dialog box that displays, search and click on the first teacher you would like on your team, then click on the </span><span class="rvts37">Add to Team</span><span class="rvts36"> button on the Select Person pop-up window in the top left corner. Then search and click on the 2nd teacher you would like in the team, then click on the </span><span class="rvts37">Add to Team</span><span class="rvts36"> button.</span>
4. <span class="rvts36">Once you have your team selected, all team members would be listed in the top-left corner of the Select Person pop-up window - press the </span><span class="rvts37">Ok</span><span class="rvts36"> button.</span>

<span class="rvts20">When a parent books with the team, the corresponding time slots for all individual members of the team will become unavailable. Similarly, when a parent books with an individual teacher, the corresponding time slot for the team will become unavailable.</span>

1. <span class="rvts20">If your teacher is already listed on the </span>**<span class="rvts21">Class Editor</span>**<span class="rvts20"> page and you would like to add teachers to the teacher listing, click on the teacher (on the left-hand side) and then do the following: </span>
2. <span class="rvts36">Select </span>**<span class="rvts37">Assign Contact / Team</span><span class="rvts36"> -&gt; </span><span class="rvts37">Assign Team</span>**<span class="rvts36"> option</span>
3. <span class="rvts36">The Select Person dialog box will display</span>
4. <span class="rvts36">In the </span><span class="rvts37">Select Person</span><span class="rvts36"> dialog box that displays, search and click on the first teacher you would like on your team, then click on the </span><span class="rvts37">Add to Team</span><span class="rvts36"> button on the Select Person pop-up window in the top left corner. Then search and click on the 2nd teacher you would like in the team, then click on the </span><span class="rvts37">Add to Team</span><span class="rvts36"> button.</span>
5. <span class="rvts36">Once you have your team selected, all team members will be listed in the top-left corner of the Select Person pop-up window - press the </span><span class="rvts37">Ok</span><span class="rvts36"> button.</span>

# Contacts

<span class="rvts20">On the **Contacts** tab, you can search for a contact, select the contact, and then view the information about that contact. Your contacts are your list of teachers, administrators, students, and parents. As soon as a parent logs into the online scheduler, their contact information will be stored in the contacts section.</span>

- <span class="rvts20">From the Admin UI, select the </span>**<span class="rvts21">Contacts</span>**<span class="rvts20"> tab on the top line of the screen</span>

<p class="callout info"><span class="rvts20">Note that student and parent names do not </span><span class="rvts22">automatically</span><span class="rvts20"> display in the contacts section. You need to search by either first or last name to find your students and parents.</span></p>

##### **<span class="rvts21">View the Info</span>**

<span class="rvts20">After you search, you can select a contact, and the system will fill in the fields on the right with the contact's information. There are several small tabs on the right.</span>

- <span class="rvts20">The Search Control list will allow you to search by </span><span class="rvts21">Last</span><span class="rvts20"> name, </span><span class="rvts21">First</span><span class="rvts20"> name, </span><span class="rvts21">Email</span><span class="rvts20"> address, and any other fields that you identify as an ID field in the Contacts Setup tab on the Global Setup page.</span>
- <span class="rvts20">You can select a contact record and then click on the Delete button to delete a contact, or click on the Reset PW button to reset the password for a contact.</span>
- <span class="rvts20">The</span><span class="rvts21"> Contact Info</span><span class="rvts20"> tab will display the contact's </span><span class="rvts21">Email</span><span class="rvts20">, </span><span class="rvts21">First name</span><span class="rvts20">, </span><span class="rvts21">Last name</span><span class="rvts20">, admin level, and customer access rights, as well as any fields you may have included from the </span><span class="rvts21">Contacts Setup</span><span class="rvts20"> tab on the </span><span class="rvts21">Global Setup</span><span class="rvts20"> page.</span>
- <span class="rvts20">The </span><span class="rvts21">Teacher/Student/Parent IDs</span><span class="rvts20"> are translated from your school's </span><span class="rvts21">BBID </span><span class="rvts20">and must be included for Single Sign On access.</span>
- <span class="rvts20">The </span><span class="rvts21">Appointments</span><span class="rvts20"> tab, not to be confused with the main </span><span class="rvts21">Appointments </span><span class="rvts20">tab on the top line, shows all the selected contact's appointments. For students, this will display the classes they are enrolled in.</span>
- <span class="rvts20">The </span><span class="rvts21">Log</span><span class="rvts20"> tab shows what emails have been sent and when appointments were booked or canceled.</span>
- <span class="rvts20">The </span><span class="rvts21">Vendor Access</span><span class="rvts20"> tab allows you to set up Resource Access and Event Access for your administrators. </span>
- <span class="rvts20">The </span><span class="rvts21">Parents - Students map</span><span class="rvts20"> tab allows you to view, create, and change the set of students that each parent has. See </span>[Parent - Student Relationships](http://docs.google.com/page.aspx?pageid=parent_-_student_relationships)<span class="rvts20"> for more details.</span>

<p class="callout info">**<span class="rvts109">IMPORTANT NOTE</span>**<span class="rvts108">**:** If you are adding a new contact with an access level of either **Appointment Viewer, Appointment Maker, or Resource Administrator**, make sure you check the resource box in the</span><span class="rvts110"> </span>**<span class="rvts109">Resource Access</span>**<span class="rvts110"> </span><span class="rvts108">section. </span></p>

<p class="callout success"><span class="rvts110">On the </span><span class="rvts116">Vendor Access</span><span class="rvts110"> tab, the </span><span class="rvts116">Master Access</span><span class="rvts110"> section with the '</span><span class="rvts114">allow access to all events and all resources</span><span class="rvts110">' check box is available for </span>**<span class="rvts115">Appointment Viewer</span><span class="rvts110"> </span>**<span class="rvts110">and </span>**<span class="rvts115">Appointment Maker</span>**<span class="rvts110"> access levels only. The </span>**<span class="rvts114">Resource Administrator</span><span class="rvts110"> </span>**<span class="rvts110">and </span>**<span class="rvts114">Event Administrator</span>**<span class="rvts110"> access levels </span><span class="rvts114">do not support the master access</span><span class="rvts110">.</span></p>

<span class="rvts20">Once you have selected a contact, you will also have the option to reset the password for a contact. The </span><span class="rvts21">Reset PW</span><span class="rvts20"> button will reset the password to the stored default password that is set on your account. To view or change this default password, see the </span><span class="rvts21">Global Setup &gt; Contacts Setup</span><span class="rvts20"> page.</span>

### **<span class="rvts0"><span class="rvts24">Add a new Contact</span></span>**

<span class="rvts20">To add a new contact, select the Add button. In the drop-down, you would have 4 options: </span>

1. <span class="rvts20">Teacher</span>
2. <span class="rvts20">Student</span>
3. <span class="rvts20">Parent</span>
4. <span class="rvts20">Other</span>

<span class="rvts20">Selecting one of these options will display an appropriate form; each form includes different contact fields, oriented to the contact you are going to add. On the form, you will need to fill in the fields where you see the text &lt;not entered&gt;.</span>

<p class="callout warning"><span class="rvts20">The form will not allow you to create a new contact record with the email address that already exists on the vendor account.</span></p>

# Directions for Parents (single event)

<span class="rvts20">Follow the directions provided by your school to get to the Parent Teacher Conference Scheduler.</span>

#### **<span class="rvts0"><span class="rvts24">1. Sign In</span></span>**

<span class="rvts20">Parents will access the pickAtime Online Scheduler directly from the Blackbaud Resource Board via a pickAtime tile.</span>

#### **<span class="rvts0"><span class="rvts24">2. Students</span></span>**

- <span class="rvts21"> </span>Your student will already be attached.
- Click the student(s) whose schedule you want to see.
- If your student is attached but doesn't have any classes within the event, please contact the event admin.

#### **<span class="rvts0"><span class="rvts24">3. Select Teachers</span></span>**

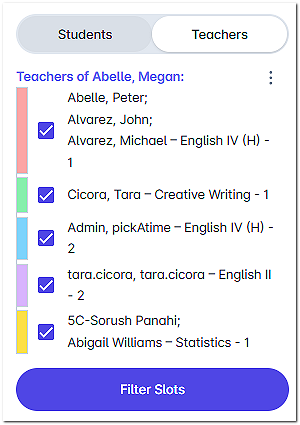
<span class="rvts20">By default, all of your child’s teachers are selected.</span>

- <span class="rvts21">**To exclude a teacher**:</span><span class="rvts20"> Uncheck the box next to their name.</span>
- <span class="rvts21">**To proceed**:</span><span class="rvts20"> Click </span><span class="rvts21">Filter Slots</span><span class="rvts20"> once you have finalized your list.</span>

#### **<span class="rvts0"><span class="rvts24">4. Booking Appointments</span></span>**

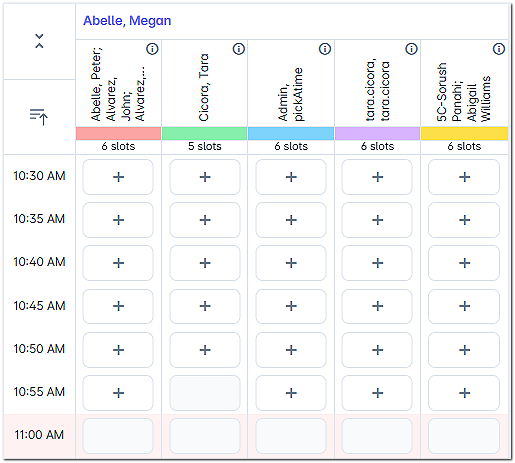
<span class="rvts20">The scheduling grid displays available times as squares with a </span><span class="rvts21">plus sign (+)</span><span class="rvts20">.</span>

1. <span class="rvts20">Click on your preferred </span>**<span class="rvts21">Time Square</span>**<span class="rvts20">.</span>
2. <span class="rvts20">Click </span>**<span class="rvts21">Create Appointment</span>**<span class="rvts20">.</span>
3. <span class="rvts20">A confirmation message will briefly appear at the top of the screen to confirm your booking.</span>
4. <span class="rvts21">Repeat</span><span class="rvts20"> these steps for each teacher you wish to visit.</span>

---

### **<span class="rvts0"><span class="rvts24">Managing Your Schedule</span></span>**

#### **<span class="rvts0"><span class="rvts34">View or Print</span></span>**

<span class="rvts20">To see your full itinerary, click the </span><span class="rvts21">Printable Schedule</span><span class="rvts20"> on the left-hand sidebar.</span>

#### **Changes &amp; Cancellations**

**If you are using a Computer (Desktop):**

1. Click **My Appointments** on the left-hand sidebar.
2. Locate the appointment you wish to change.
3. Hover your mouse over the appointment to reveal the **Details**, **Edit**, and **Cancel** options on the right.

**If you are using a Mobile Phone:**

1. Tap the **Menu Icon (three bars)** in the top-left corner.
2. Select **My Appointments** from the menu.
3. Tap the **three dots (⋮)** next to any appointment to modify or cancel your booking.

# Divorced Parents

<span class="rvts36">There is one appointment per teacher per class rule for Parent Teacher Conference Scheduling. The scheduling system will make sure that the appointments regarding a student will not violate the one appointment per teacher per class rule. This means that two parents can split up the interview process. One can log in and book appointments for half the teachers, and the other can log in and book the appointments for the other half of the teachers. Again, the system makes sure that each teacher only has one conference about each child once per class.</span>

<span class="rvts36">Divorced parents are handled differently because the two parents need to violate the rules. The teacher will need to talk about the child's performance in each class at least twice, once for each divorced parent.</span>

<span class="rvts20">To accommodate divorced parents, you will need to create another child. In the Admin UI, search for the student in the [Contacts ](https://help.pickatime.com/books/blackbaud-management-guide/page/contacts)tab, select the student, and then select the Clone Student button.</span>

<span class="rvts36">The Clone Student feature will create a second child with \* appended to the </span>**<span class="rvts37">StudentID</span>**<span class="rvts36">. You will then be prompted to associate the Cloned Student with one of the parents of the student. </span>

<span class="rvts36">By creating a second child, the system can maintain the one appointment per teacher per class rule, because, as far as pickAtime is concerned, there are two separate children.</span>

<p class="callout success"><span class="rvts36">Note that the import from Blackbaud will bring in each student associated with both parents, regardless of whether you have cloned the student in the past. </span></p>

# Making Parent Appointments

1. <span class="rvts20">Select the </span><span class="rvts21">Appointments</span><span class="rvts20"> tab and use the calendar on the left to select the correct day. In the far right-hand side, click the Select Student option and locate and select the student. You will then see all the teacher names listed for that selected student. </span><span class="rvts14">  
    </span>
2. <span class="rvts20">Click on the green plus sign (</span><span class="rvts77">+</span><span class="rvts20">) in the slot you would like to book. </span>![](https://pickatime.com/help/lib/NewItem%2035.png)
3. <span class="rvts20">You will see the parent name or parent names listed. If multiple parents are found, you can select the correct one from the parent pull-down. </span>![](https://pickatime.com/help/lib/NewItem%2034.png)
4. <span class="rvts36">Select the class if there is more than one class option and then press the </span><span class="rvts37">Ok </span><span class="rvts36">button. The appointments box should now list the parent's name and the student's name.</span>

<span class="rvts36">If the appointment has a red border around it, click on the appointment to check the error message that is to the left below the calendar. Cancel the appointment with the </span>**<span class="rvts37">Cancel Appointment</span>**<span class="rvts36"> button if you made a mistake, or select the </span>**<span class="rvts37">Confirm Appointment</span>**<span class="rvts36"> button to force the appointment and remove the red highlighting.</span>

##### **<span class="rvts21">Other Appointment Options</span>**

<span class="rvts20">On the Appointments page, you can click on an existing appointment. Select the Appointments drop-down to see the following options: </span>

<span class="rvts37">**Confirm Appointment**  </span><span class="rvts20">- this will be enabled if you have clicked on a red problem appointment and will allow you to confirm the problem appointment. </span>

**<span class="rvts37">Cancel Appointment</span>**<span class="rvts20"> - will allow you to cancel the appointment and optionally send a cancellation email.</span>

<span class="rvts21">**Edit Appointment**</span><span class="rvts20"> - will allow you to edit the appointment details for an appointment. For example, if you were prompting your parents for additional appointment-specific information, you would be able to edit it here. </span>

**<span class="rvts21">Change Time</span>**<span class="rvts20"> - will allow you to move the appointment to a new time. </span>

**<span class="rvts21">Send Reminder</span>**<span class="rvts20"> - will send a reminder email to the parent.</span>

**<span class="rvts21">Customer Info</span>**<span class="rvts20"> - will bring up the Contact Information dialog box for the parent. </span>

# Modifying Enrollment Data

1. <span class="rvts20">From the **Admin UI**, select the </span>**<span class="rvts21">Class Editor</span>**<span class="rvts20"> tab.</span>
2. <span class="rvts20">Select a teacher and then select the class. The list of students in the class will be displayed on the right-hand side. </span>
3. <span class="rvts20">To remove a student, select the student and click on the red X to the left of their name. This only removes the student from the class, not from your account.</span>
4. <span class="rvts20">To enroll a student, start typing the student's name in the white box at the top of your roster of students. If your student has already been imported or added to your account, the system will fill in the name if it finds a match. Press enter to confirm and add the student to the roster. If you need to add a new student, select the add user icon (</span>![](https://pickatime.com/help/lib/NewItem%2040.png)<span class="rvts20">). The select person dialog box will pop up. Select the Show Full Dialog button on the bottom right-hand side. This will display the Contact Information fields. Select the </span><span class="rvts21">**Add &gt; Student..**.</span><span class="rvts20"> button and fill in the fields on the **Add New Student** form with the correct values for the new student. Then press the </span>**<span class="rvts21">Ok</span>**<span class="rvts20"> button.</span>

# Moving a Class

1. <span class="rvts36">From the **Admin UI,** select the </span>**<span class="rvts37">Class Editor</span>**<span class="rvts36"> tab</span>
2. <span class="rvts36">Select the Teacher from the list on the left</span>
3. <span class="rvts36">Select the Class to be moved</span>
4. <span class="rvts36">Select the </span><span class="rvts37">Move class</span><span class="rvts36"> tab</span>
5. <span class="rvts36">Select the teacher's name that the class should be moved to </span>

# Parent Student Relationships

#### **<span class="rvts0"><span class="rvts96">How to View the Parent / Student Relationships</span></span>**

<span class="rvts20">On the </span>[**<span class="rvts21">Contacts</span>**](https://help.pickatime.com/books/blackbaud-management-guide/page/contacts)<span class="rvts20"> tab, there is a smaller tab in the rightmost position labeled </span><span class="rvts21">**Parents - Students** map</span><span class="rvts20">. It allows you to view, create, and change the set of students that each parent has.</span>

1. <span class="rvts20">Select the </span>**<span class="rvts21">Contacts</span>**<span class="rvts20"> tab, and then select a contact by searching on the left-hand side.</span>
2. <span class="rvts20">After a contact has been selected on the left, select the </span><span class="rvts21">**Parent - Students** map</span><span class="rvts20">.</span>

<span class="rvts20">If you select a student (the contact has a </span><span class="rvts45">StudentID</span><span class="rvts20">), under the Parent List, you will only see the names of any parents associated with the student. </span>

<span class="rvts36">If you select a parent (the contact has a </span><span class="rvts59">ParentID</span><span class="rvts36">), under the Student List, you will only see the names of any students associated with the parent. </span>

![](https://pickatime.com/help/lib/NewItem%2031.png)<span class="rvts20">You can select either a parent or a student from one of the two lists and remove them from the parent or student list by clicking on the small red x to the left of their name.</span>

#### **<span class="rvts0"><span class="rvts96">Adding a Parent / Student to the Parent-Student Lists</span></span>**

<span class="rvts20">To add a parent, click the green </span><span class="rvts21">Add </span><span class="rvts20">button under the Parents List section. The Select Person dialog box will appear with a list of contacts who are without the StudentID value. Select the parent and then click the </span><span class="rvts21">Add </span><span class="rvts20">button and the contact will be added to the parent list. </span>

<span class="rvts20">To add a student, click the green </span><span class="rvts21">Add </span><span class="rvts20">button under the Student List section. The Select Person dialog box will appear with a list of contacts who have the StudentID value. Select the student and then click the </span><span class="rvts21">Add </span><span class="rvts20">button and the contact will be added to the student list. </span>

# Problem Appointments

[**<span class="rvts36">The </span><span class="rvts37">Appointments List</span>**](https://help.pickatime.com/books/additional-event-features/page/appointments-list)<span class="rvts36">[ ](https://help.pickatime.com/books/additional-event-features/page/appointments-list)page will provide a master list of all appointments. It will also display any appointments that have some sort of problem that needs attention. </span>

<span class="rvts20">Previously booked appointments that break a pre-established rule are displayed in red. There are several ways problem appointments are created.</span>

<span class="rvts36">Appointments created by the vendor that violate the rules set up on the </span>**<span class="rvts37">Settings</span><span class="rvts36"> / </span>**<span class="rvts37">**UI Setup** </span><span class="rvts36">tab will be flagged as a problem. </span>

<span class="rvts36">The screen below shows an example of a problem appointment. When you select the red box, the reason for the problem will show up under the calendar on the left. To force this appointment, select the </span>**<span class="rvts37">Appointments</span>**<span class="rvts36"> drop-down and then select </span><span class="rvts37">Confirm Appointment</span><span class="rvts36">.</span>

<span class="rvts36">Appointments that are in the process of being booked are displayed in orange and cannot be manually deleted or selected for email notification sending. These appointments will be automatically managed and, if necessary, canceled by the system if the user has been inactive for a long time and has not completed creating an appointment.</span>

**<span class="rvts21">NOTE</span>**<span class="rvts20">: <span style="color:rgb(230,126,35);">The </span></span><span class="rvts60" style="color:rgb(230,126,35);">Customer is creating this appointment</span><span class="rvts20"><span style="color:rgb(230,126,35);"> status,</span> which indicates that the parent is in the process of booking the appointment. This will be seen on the Appointments Tab. </span>

<span class="rvts23">These appointments will be automatically managed and, if necessary, canceled by the system if the parent has been inactive for a long time and has not completed creating an appointment. Once the parent completes the appointment booking process and clicks on the **Create Appointment** button, the status will disappear. </span>

<span class="rvts20">This will allow admins who are booking appointments for parents in the Admin UI tool to not select the time slots that are in the booking process.</span>

<span class="rvts36">When you delete a slot, the appointments on that slot will not be deleted. Appointments are not deleted; they are flagged, and all flagged appointments show up in the Appointments List tab on the Admin UI.</span>

<span class="rvts36">To recreate the slot, select the problem appointment and click on the </span><span class="rvts37">Recreate Slot</span><span class="rvts36"> button.</span>

**![](https://pickatime.com/help/lib/NewItem%2033.png)**<span class="rvts37">**IMPORTANT NOTE**:</span><span class="rvts36"> You will want to make sure that your Appointments List does not contain any red appointments. To the parent, these appointments will NOT exist. Once Admin confirms a problem appointment, it will be available for a parent, and only then will any reminder emails that have been set up continue to go out.</span>

# Reports

<span class="rvts36">When you first log in to your account from the pickAtime home page, you will be in the Admin tool and will default to the **Event Reporting** page within the Admin tool. Reports are divided into two categories: **Event-Specific** and **Account-Specific**.</span>

### **<span class="rvts0"><span class="rvts24">Event Specific Reports</span></span>**

<span class="rvts20">Under the </span><span class="rvts21">Event </span><span class="rvts20">pull-down, select your PTA event. On the Event-specific reports, you will see a </span><span class="rvts21">Dates</span><span class="rvts20"> area where you can enter a </span><span class="rvts21">from</span><span class="rvts20"> date and a </span><span class="rvts21">to</span><span class="rvts20"> date. It is only necessary to enter values in these fields if the dates of your event have passed.</span>

<span class="rvts20">You will have the option of the following reports:</span>

#### **<span class="rvts0"><span class="rvts34">Teachers' Schedule</span></span>**

<span class="rvts20">This shows the appointment schedule for each teacher. Under </span><span class="rvts21">Additional report fields,</span><span class="rvts20"> the links "Student's contact's field", "Parent's contact's fields", and "Appointment fields" are available on this report. There will also be a pull-down where you can select the report for a specific teacher name.</span>

<span class="rvts20">You can also check the box "Show All Slots" to review the list of all slots for your teachers.</span>

<span class="rvts20">On the Teachers' schedule, you have the option to email the report to all your teachers or to an individual teacher. In the </span><span class="rvts21">Teacher</span><span class="rvts20"> pull-down, you can select All or the name of an individual teacher and then select the </span><span class="rvts21">Email Report </span><span class="rvts20">button.</span>

#### **<span class="rvts0"><span class="rvts34">Teachers' appts</span></span>**

<span class="rvts20">This report displays the number of appointments that have been scheduled for each teacher.</span>

#### **<span class="rvts0"><span class="rvts34">Teachers' slots</span></span>**

<span class="rvts20">This report displays the number of available slots and the total number of slots for each teacher.</span>

#### **<span class="rvts0"><span class="rvts34">Teacher By Rooms</span></span>**

<span class="rvts20">This will produce a sorted list of all appointments for each room. The report displays the room number, the teacher's name, the time of the appointment, the student's name, and the parent's name. Under </span><span class="rvts21">Additional report fields,</span><span class="rvts20"> you will see three links: "Parents' contact's fields", "Student's contact's fields", and "Appointment fields". These links can be used to add additional information to the report, such as studentID, parent email address, etc.</span>

<span class="rvts20">In this report, you can check the box "print one per page" to have a page break by room.</span>

#### **<span class="rvts0"><span class="rvts34">Parents’ Schedule </span></span>**

<span class="rvts20">This will produce a sorted list of the appointments for each parent. Under </span><span class="rvts21">Additional report fields,</span><span class="rvts20"> the links "Student's contact's field" and "Appointment fields" are available to add additional student and/or appointment information to this report. There will also be a pull-down where you can select the report for a specific parent name.</span>

<span class="rvts20">On the Parents' schedule, you have the option to email the report to all your parents or to an individual parent. In the </span><span class="rvts21">Parent</span><span class="rvts20"> pull-down, you can select All or the name of an individual parent and then select the </span><span class="rvts21">Email Report </span><span class="rvts20">button. </span>

**<span class="rvts0"><span class="rvts34">\*This report can be sent to the parents</span></span>**

#### **<span class="rvts0"><span class="rvts34">Students’ Schedule</span></span>**

<span class="rvts20">This will produce a sorted list of the appointments for each student. Under </span><span class="rvts21">Additional report fields,</span><span class="rvts20"> the links "Parent's contact's field" and "Appointment fields" are available to add additional parent and/or appointment information to this report. There will also be a pull-down where you can select the report for a specific student name.</span>

<span class="rvts20">**<span class="rvts0"><span class="rvts34">\*This report can be sent to the students</span></span>**</span>

#### **<span class="rvts0"><span class="rvts34">Number of parents and students</span></span>**

<span class="rvts20">This will display the number of parents and students who have appointments in the system. This will be sorted by date if your event spans several days. </span>

#### **<span class="rvts0"><span class="rvts34">Appointment Histogram</span></span>**

<span class="rvts20">This report shows the number of appointments by date and time.</span>

#### **<span class="rvts0"><span class="rvts34">Appointment Count by parent</span></span>**

<span class="rvts20">This will provide a list of all the parents who have booked appointments and the number of appointments they have made. Under </span><span class="rvts21">Additional report fields,</span><span class="rvts20"> the link “Parent’s contact’s fields” is available to add information (such as email address) to this report.</span>

#### **<span class="rvts0"><span class="rvts34">Appointment Count by student</span></span>**

<span class="rvts20">This will provide a list of all the students where the parent has made an appointment. Under </span><span class="rvts21">Additional report fields,</span><span class="rvts20"> the link "Student's contact's fields" is available to add student information to this report.</span>

#### **Students without any scheduled parent-teacher appointments**

<span class="rvts20">This will provide a list of all the students whose parents have not made an appointment.</span>

<span class="rvts20">**<span class="rvts0"><span class="rvts34">\*This report can be sent to the parents</span></span>**</span>

#### **Students without any scheduled parent-teacher appointments by class**

<span class="rvts20">This will provide a list of all the students whose parents have not made an appointment for a class. If a student is enrolled in 7 classes, and the parent has booked appointments with 5 of the 7 teachers, this report will list the 2 teachers where the parent has not booked an appointment.</span>

<span class="rvts20">**<span class="rvts0"><span class="rvts34">\*This report can be sent to the parents</span></span>**</span>

#### **<span class="rvts0"><span class="rvts34">All Teacher/Team Appointments</span></span>**

<span class="rvts20">This report is similar to the Teachers' Schedule report. However, if you have created any teams of teachers, each teacher will have a master schedule showing all appointments booked with them individually and all appointments booked with them as a team. </span>

#### **<span class="rvts0"><span class="rvts34">Class Rosters</span></span>**

<span class="rvts20">This report will show the class roster for each teacher/class.</span>

#### **<span class="rvts0"><span class="rvts34">Appointments by Date/Time</span></span>**

<span class="rvts20">This report will list each appointment by date and time. </span>

#### **<span class="rvts0"><span class="rvts34">Display only empty (not blocked) slots</span></span>**

<span class="rvts20">This report displays a list of empty slots for each teacher. </span>

### **Managing Reports**

For every report generated, you have the following options:

- **Format:** Print, Export to XML, or Export to a Tab-delimited file (Excel compatible).
- **Email:** Send the report directly to yourself or others.
- **Save Settings:** If you customise a report (e.g., by adding "Additional report fields"), click **Save Report Settings**. The system will remember these preferences the next time you run the report.
- **Automated Delivery:** Administrators can click **Schedule Report Delivery** to set a date range, time of day, and frequency for automated email delivery.

#### **<span class="rvts0"><span class="rvts34">Save Report Settings</span></span>**

<span class="rvts20">There is also an option on any report to save the settings for that report. For example, if you add additional fields to your report, such as the email address of the participant, you can now add these fields and then select the </span><span class="rvts21">Save Report Settings</span><span class="rvts20"> button, and your new selection will be saved. The next time you return to this report, you will see the additional fields displayed.</span>

---

### **<span class="rvts0"><span class="rvts24">Account Specific Reports</span></span>**

Select the Account Reports mode.

You will have the option of the following reports:

#### **Settings**

The Settings report will list the URL that was automatically created for your online scheduler.

#### **Account - Invoices and Payments**

This report will display the balance on your account. It will also list your invoices and payments. You can click on an invoice # to see the invoice. On any invoice page, you will have the option to pay by credit card.

#### **Problem Appointments**

If there are any "problem appointments" on your account, this report will provide you with a list of these appointments. A "problem appointment" is an appointment that has been placed "on hold". For example, if you delete a slot that had an appointment on it, the appointment is not automatically deleted. The appointment is tagged as a "problem appointment", and you must decide what you will do with this appointment.

#### **Appointments from all events**

This report will display a list of all appointments from all your events.

#### **Appointments for all Roster events**

This report will display a list of all appointments from all Roster events.

#### **Contacts without appointments**

This report will display a list of all the contacts that have logged into your account and have not booked an appointment. The "Contact's fields" link is available on this report to add contact information (ex. email address) to your report.

#### **List of Admins**

This report will display a list of your admins. It will show you the email address that was imported, as well as the Access Level provided to each admin. When teachers are imported, they are automatically given Appointment Viewer access, and this report will also show you the resources (teacher names) that each teacher has access to. To see when your admin(s) last logged in, click the green “Additional Fields” button and then select “Last Logged In.”

#### **% Full**

If you have multiple events, this will show you the percentage of booked slots out of the total available slots.

#### **Cancelled Appointments**

This report lists all cancelled appointments, the date and time the appointment was cancelled, and the email address of the Contact Person who cancelled the appointment.

#### **Appointment Counts for all Events**

This will provide you with the total appointment counts for all your events.

#### **Resource Mapping**

This report ​shows all the Resources on your events and the contacts (if any) associated with each Resource.​ For Parent Teacher Conference scheduling, this will allow you to check the connection between assigned contacts (teachers) and Teams.

#### **Parents without Students**

This report ​displays a list of parents ​who are not associated with any students.

#### **Students without Parents**

This report ​displays a list of students ​who are not associated with any parents.

#### **Parent-Student Relationship**

This report ​displays a table ​showing the association between parents and students. ​

#### **Scheduled Report Delivery**

This report ​displays the details of ​your Scheduled Report Delivery settings. This shows the reports you have scheduled for delivery, what the time period is for those reports, who the report is going to, the interval frequency of the report, and when the report was last sent. You can also cancel the Scheduled Report Delivery from here by selecting the delete option next to the report.

#### **Appointments Summary by Contacts**

This report allows admins to see appointments booked by contact(s) on all events across the Vendor account.

# Rooms

<span class="rvts20">The room column can be shown on the event scheduler by going to the </span><span class="rvts42">Admin UI</span><span class="rvts20"> page under </span><span class="rvts21">Settings </span><span class="rvts20">and selecting the option </span><span class="rvts21">Display Class Name</span><span class="rvts20"> under </span><span class="rvts21">Scheduler Display.</span><span class="rvts36"> </span><span class="rvts20">The room column is also</span><span class="rvts36"> used for the "Teachers by Room" report, which shows all the appointments that take place in a single room. Some schools put multiple teachers in one room for the Parent / Teacher interviews, and this report makes it easy to see which parents will be in that room. To change the room number, do the following:</span>

1. <span class="rvts36">Select the </span><span class="rvts37">Appointments</span><span class="rvts36"> tab</span>
2. <span class="rvts36">You will see the room listed next to the teacher, where it can be edited</span>

<span class="rvts20">If all teachers have a new room number, then you can update it via import:</span>

<span class="rvts20">You have to import the Teacher file with updated Room numbers, then import the Class file. After this action, the room number would be updated for all individual teachers you have on the event. This would not work for the Team of teachers; you would need to edit the room number for Teams manually.</span>

<span class="rvts20"> Using pickAtime with ZOOM, Google Hangouts Meet, Skype, and GoToMeeting</span>

<span class="rvts20"> You can also add a URL for various virtual meeting sites (Zoom, Google, Microsoft, GoToMeeting, Skype) to either our confirmation or reminder email by using the Room column on your Parent-Teacher event. </span><span class="rvts36"> </span><span class="rvts20">You can then use the macro </span><span class="rvts21">$(ROOM)</span><span class="rvts20"> in your confirmation and reminder emails, and the virtual meeting information will appear in the emails. </span>

# Sending Custom Emails

<span class="rvts20">From the </span>[<span class="rvts21">Appointments List</span>](https://help.pickatime.com/books/additional-event-features/page/appointments-list)<span class="rvts20"> page (not the Appointments page) in the Admin UI, you can search by a single date, a range of dates, or by an event. This will then bring up a list of parents with appointments for that date, date, or event. </span>

<span class="rvts20">On this page, you can email participants, delete, confirm, and recreate slots and appointments.</span>

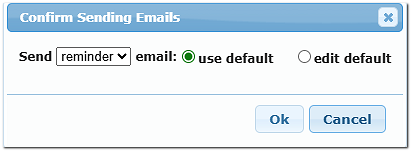
<span class="rvts53"> </span><span class="rvts20">At the top of the page is the </span><span class="rvts21">Send Email </span><span class="rvts20">button. You can then select the option to </span><span class="rvts21">Send to All</span><span class="rvts20"> or to </span><span class="rvts21">Send to Selected</span><span class="rvts20">. A dialog box will come up that looks like this: </span>![](https://pickatime.com/help/lib/NewItem%2029.png)

<span class="rvts20">This will let you send a Reminder email or a Custom email to your group of parents. You can use the current email template, or you can customize it as needed. The template for both emails is located on the </span><span class="rvts21">Settings / Notification Setup</span><span class="rvts20"> page. </span>

# Teacher Access

<span class="rvts36">Teachers are able to view their schedule either by logging in to the School account at </span>[pickAtime.com](http://pickatime.com/)<span class="rvts36"> or from the Blackbaud Portal in the same manner as a parent would. The SSO access works based on the role that the BBID holder has. So a teacher or admin (their BBID becomes a TeacherID) will be immediately taken to the Report page, where they will view any booked appointments.</span>![](https://pickatime.com/help/lib/NewItem%2026.png)

<span class="rvts36">For teachers who are also parents of students at the school (dual role holders - their BBID will appear twice, once as a parent and once as a teacher), they will first see the parent scheduling page, but will also have a link to click called the Admin UI. This link will take these teachers/parents to the Reporting section of the site, where they can view their schedule of appointments. See the </span>[Reports](https://pickatime.com/help/TeacherAccess1.html)<span class="rvts36"> section for details on the different reports.</span>

# Types of Parents within your pickAtime account

<span class="rvts36">You will notice that parents who are current vs prospective are marked differently within contacts.</span>

- <span class="rvts37">**Current Parent**</span><span class="rvts36"> (this parent would generally be accessing Parent-Teacher Conferences)</span>
- **<span class="rvts21">Prospective Parent</span>**<span class="rvts20"> (this parent would generally be accessing interview-like events) </span><span class="rvts36"> </span>![](https://pickatime.com/help/lib/NewItem%2041.png)<span class="rvts36"> </span>
- <span class="rvts36">**Import Parent Type**: </span><span class="rvts37">Prospective</span><span class="rvts36"> in pickAtime includes Blackbaud's roles </span><span class="rvts59">Parent of Candidate</span><span class="rvts36">; </span><span class="rvts59">Parent of Incoming Student</span><span class="rvts36">. </span>

# Viewing Appointments in the Admin UI

<span class="rvts36">You can alter several display settings to make the appointments easier to read.</span>

- <span class="rvts36">To make the time taller (the boxes bigger vertically), go to the </span><span class="rvts37">Appointments</span><span class="rvts36"> tab, move the mouse over one of the horizontal lines on the appointments tab that occur just above each time marker, then click and drag vertically.</span>

- <span class="rvts36">You can drag each resource column wider by putting the mouse over the space between the two resources, then clicking and dragging.</span>

- <span class="rvts36">You can alter when times and gray lines are displayed on the appointments tab by altering the "Time Mark Display on the Appointments page" settings on the </span><span class="rvts37">Settings</span><span class="rvts36"> / </span><span class="rvts37">Vendor UI Setup</span><span class="rvts36"> page.</span>

- <span class="rvts36">On the </span><span class="rvts37">Settings / Vendor UI Setup</span><span class="rvts36"> page under "Hours visible on the Appointments page," you can alter the maximum and minimum value of the scroll bar on the </span><span class="rvts37">Appointments</span><span class="rvts36"> page. They can be different for each event, but they are not unique for each day. So if one day has slots from 8-5, and another has them from 9-6, they should be set for 8-6 to allow the scroll bar to scroll to all possible slot times.</span>

# Blackbaud PTA Videos

##### **<span class="rvts21">Getting Started with your PTA event</span>**

- [Creating a company account](https://www.youtube.com/watch?v=l6fzIhUJKVM)
- [How to add an event in a ](https://www.youtube.com/watch?v=MjfSrgEcZZY)[Parent Teacher Conference](https://www.youtube.com/watch?v=MjfSrgEcZZY)[ Event](https://www.youtube.com/watch?v=MjfSrgEcZZY)
- [Duplicating vs Creating a new Parent-Teacher Event](https://www.youtube.com/watch?v=taVvC2TuYYM)
- [How it All Works](https://youtu.be/lvnhQ9rCicE)

---

##### **<span class="rvts21">Single Sign-On</span>**

- [Setting Up Your School's Single Sign O](https://youtu.be/2IHBBM2hXUk)[n For New Schools](https://youtu.be/2IHBBM2hXUk)
- [Setting Up Your School's Single Sign On For Established Schools](https://youtu.be/5RR7hv-nnBA)

---

##### **<span class="rvts21">The Backend</span>**

- [A Tour of the Admin UI](https://www.youtube.com/watch?v=3Ens9nxJW3w)
- [CUI Messaging](https://www.youtube.com/watch?v=-MrsIZRYmRU)

---

##### **<span class="rvts21">Working with slots in your PTA event</span><span class="rvts125"> </span>**

- [Creating Slots in your Parent-Teacher Conference](https://www.youtube.com/watch?v=xteXvbGRDG0)
- [Adding in ](https://www.youtube.com/watch?v=5P1KYs4PGrc)[Travel Break](https://www.youtube.com/watch?v=5P1KYs4PGrc)[s](https://www.youtube.com/watch?v=5P1KYs4PGrc)
- [Handling ](https://www.youtube.com/watch?v=HNdej9JWcxk)[Lunch and Dinner Breaks](https://www.youtube.com/watch?v=HNdej9JWcxk)
- [Copying vs Moving Slots](https://www.youtube.com/watch?v=0vYZ2tlLvLk)

---

##### **<span class="rvts36"> </span><span class="rvts125">Working with classes and teachers at your PTA event</span><span class="rvts36"> </span>**

- [Understanding t](https://www.youtube.com/watch?v=A92tzT04-Tw)[he Class Editor](https://www.youtube.com/watch?v=A92tzT04-Tw)
- [Creating a Teacher Team](https://youtu.be/ogI8oYsYXvw)
- [Understanding the difference between administrative levels](https://www.youtube.com/watch?v=9pBFXuPK-KY)
- [Understanding the difference between ](https://www.youtube.com/watch?v=oCz7fexfcTI)[Appointment viewer vs maker](https://www.youtube.com/watch?v=oCz7fexfcTI)
- [How Teachers block their own schedule](https://www.youtube.com/watch?v=mwFHvKN5GWo)
- [How to order teachers](https://www.youtube.com/watch?v=F2O2lah6DYo)[ alphabetically](https://www.youtube.com/watch?v=F2O2lah6DYo)
- [Displaying Class Names in a Parent-Teacher Conference](https://www.youtube.com/watch?v=jGOwvLewqpQ)

---

##### **<span class="rvts36"> </span><span class="rvts125">Working with parents and students at your PTA event</span><span class="rvts36"> </span>**

- [The Login As Feature](https://www.youtube.com/watch?v=QbDt2GMju64&t=6s)
- [Cloning Students](https://www.youtube.com/watch?v=une98JRwR7Y)
- [Manually scheduling an appointment](https://www.youtube.com/watch?v=Z1Leg51CDZQ)[ in a Parent-Teacher Conference](https://www.youtube.com/watch?v=Z1Leg51CDZQ)
- [Using the Select Student in a Parent-Teacher Conference Event](https://www.youtube.com/watch?v=p_a26vUSEJk)
- [How to remove Appointment Times](https://www.youtube.com/watch?v=_Ol2BBsCQas)

---

##### **<span class="rvts36"> </span><span class="rvts125">Additional features</span><span class="rvts36"> </span>**

- [Customizing emails](https://www.youtube.com/watch?v=i4cfxptfQw8)
- [Understanding Appointment Fields](https://www.youtube.com/watch?v=YNU1S2qDRrY)
- [Understanding reports](https://www.youtube.com/watch?v=Zc-fJ_SkBTQ)

# Advanced Options

# Adding Counselors or other non Teachers to your event

<span class="rvts21">**Q**:</span><span class="rvts20"> *Our counselors don't have specific student groups assigned in Blackbaud. Can we mass-import a custom list of "counselors” (teachers),* </span>*<span class="rvts53">as well as class-teacher and class-student associations, into pickAtime?</span>*

---

<span class="rvts21">Yes</span><span class="rvts20">, you can achieve this by using the </span><span class="rvts21">pickAtime Importer</span><span class="rvts20"> to bypass the standard Blackbaud SKY API sync. This allows you to manually define counselor-student relationships.</span>

#### **<span class="rvts0"><span class="rvts24">Step 1: Adjust Your Settings</span></span>**

<span class="rvts20">To allow manual imports while using Blackbaud, you must first disable the automated sync:</span>

- <span class="rvts20">Navigate to </span><span class="rvts21">Global Setup / Business</span><span class="rvts20">.</span>
- <span class="rvts20">In the </span><span class="rvts21">Single Sign On</span><span class="rvts20"> section, </span><span class="rvts21">uncheck</span><span class="rvts20"> the box labeled </span><span class="rvts21">"Use SKY API, Importer.".</span>

#### **<span class="rvts0"><span class="rvts24">Step 2: Prepare Your Data Files</span></span>**

<span class="rvts20">You will need to create and import three </span><span class="rvts119">Tab-delimited text file (</span><span class="rvts120">\*.txt</span><span class="rvts119"> or </span><span class="rvts120">\*.tsv</span><span class="rvts119">)</span><span class="rvts20">:</span>

<div class="rvps10" id="bkmrk-file-type-requiremen"><table><tbody><tr><td>**<span class="rvts21">File Type</span>**

</td><td>**<span class="rvts21">Requirement</span>**

</td><td>**<span class="rvts21">Key Instruction</span>**

</td></tr><tr><td>[Teacher file](https://pickatime.com/help/TeacherFile.html)

</td><td><span class="rvts20">List of Counselors</span>

</td><td><span class="rvts20">Use their </span><span class="rvts21">BlackbaudID</span><span class="rvts20"> as the </span><span class="rvts117">TeacherID</span><span class="rvts20">.</span>

</td></tr><tr><td>[Class file](https://pickatime.com/help/ClassFile.html)

</td><td><span class="rvts20">"Counselor Classes"</span>

</td><td><span class="rvts20">Create a unique </span><span class="rvts117">ClassID</span><span class="rvts20"> (e.g., </span><span class="rvts117">smith\_counselor</span><span class="rvts20">) and </span><span class="rvts117">ClassName</span><span class="rvts20"> (e.g. </span><span class="rvts118">Counselor John Smith</span><span class="rvts20">) for each counselor. </span>

</td></tr><tr><td>[Enrollment file](https://pickatime.com/help/EnrollmentFile.html)

</td><td><span class="rvts20">Student Rosters</span>

</td><td><span class="rvts20">Use the </span><span class="rvts117">ClassID</span><span class="rvts20"> from Step 2 and the </span><span class="rvts21">StudentID</span><span class="rvts20"> from Blackbaud to link them.</span>

</td></tr></tbody></table>

</div>#### **<span class="rvts0"><span class="rvts24">Step 3: Run the Import</span></span>**

1. <span class="rvts20">Go to the </span><span class="rvts21">Importer</span><span class="rvts20"> page.</span>
2. <span class="rvts20">Set </span><span class="rvts21">Data Type</span><span class="rvts20"> to "School".</span>
3. <span class="rvts20">Select your specific event from the </span><span class="rvts21">Event</span><span class="rvts20"> dropdown.</span>
4. <span class="rvts20">Upload the files one by one in this order: </span><span class="rvts21">Teacher → Class → Enrollment</span><span class="rvts20">.</span>
5. <span class="rvts20">Click </span><span class="rvts21">Select File and Import</span><span class="rvts20"> for each.</span>

#### **<span class="rvts0"><span class="rvts24">Step 4: Verification</span></span>**

<span class="rvts20">Once the imports are complete, open your event in the </span><span class="rvts21">Admin UI</span><span class="rvts20"> and navigate to the </span><span class="rvts21">Class Editor</span><span class="rvts20">. Here, you can verify that the counselors are correctly linked to their assigned students.</span>

---

<span class="rvts21">Note:</span><span class="rvts20"> Because you are unchecking the "Use SKY API Importer" box, ensure that any other automated data syncs you rely on won't be negatively impacted during this manual process. Once you complete the import of the data files, you can activate the ‘Use SKY API Importer’ again.</span>

# Admissions Importing and Events

<span class="rvts36">To import the role of Parent of Candidate and Parent of Incoming Student, select the import option of the Admission event. No event is selected for this type of import, as this import type brings in parents' contact records </span><span class="rvts59">to the entire school vendor account in pickAtime</span><span class="rvts36">. Once you do the initial import, this will sync </span><span class="rvts37">daily</span><span class="rvts36">.</span>

<p class="callout info">**<span class="rvts37">NOTE: </span>**<span class="rvts37">The<span class="rvts36"> </span>Admission</span><span class="rvts36"> import will include contact records with roles: </span><span class="rvts20">Parent of Candidate; Parent of Incoming Student.</span></p>

# Other Event Scheduling

<span class="rvts36">pickAtime online scheduling system is primarily utilized by Blackbaud for parent-teacher conferences, but it's versatile enough to cater to a variety of events.</span>

<span class="rvts36">Whether it's school tours, admissions interviews, counseling appointments, summer school registration, career fairs, teacher training, volunteer sign-ups, college representative visits, iPad/laptop checkout appointments, shadow student visit days, uniform fittings, senior photos, or parent surveys, pickAtime offers two convenient event types: </span>[Normal](https://docs.google.com/document/d/1hdfZcyQw6Z-_PRSuU0JgLdzBwLzSFRLETm3ZLTf9Ef4/edit#bookmark=id.4b89ap1ckvr2)<span class="rvts36"> and </span>[Roster](https://docs.google.com/document/d/1hdfZcyQw6Z-_PRSuU0JgLdzBwLzSFRLETm3ZLTf9Ef4/edit#bookmark=id.xxuk4fdcc2vl)<span class="rvts36">.</span>

<span class="rvts36">This ensures easy scheduling for all your diverse event needs.</span>

<span class="rvts36">FYI, on each of the mentioned event types, we provide a special option for Blackbaud schools - Just for Admins Event.</span>

<span class="rvts36">This option is available on the Event Management, Settings / UI Setup tab at the very bottom.</span>

<span class="rvts36">There is a checkbox </span><span class="rvts21">Display CUI as the default page for Admins after the login process </span>

<p class="callout info"><span class="rvts20">**NOTE**: If this option is activated, the event will not be available for the regular users (parents). It would be available for Admins only.</span></p>

# SSO - Directing Parents to a Predetermined Event

<span class="rvts36">You can direct parents to a specific event based on their student's grade. For example, a parent of a student in grade 9 would only see the grade 9 event, a parent of a student in grade 10 would only see the grade 10 event, and so on. </span>

<span class="rvts36">Each parent contact will be associated with a unique EventID. This connection is made by importing a parent file with a column labeled EventID. Each row should be filled with the unique event identifier for the event that the parent should have access to. When that parent logs in, they would ONLY see the event they had access to.</span>

<span class="rvts36">First, create the parent file.</span>

<span class="rvts20">This file lists all the parents. The parent file must contain the following fields:</span>

- **<span class="rvts21">ParentID</span>**<span class="rvts20"> identifies the parent</span>
- **<span class="rvts21">First</span>**<span class="rvts20"> contains the first name of the parent</span>
- **<span class="rvts21">Last</span>**<span class="rvts20"> contains the last name of the parent</span>
- <span class="rvts20">The **email** contains the parent's email address. Only one email address should be entered here.</span>
- **<span class="rvts21">EventID </span>**<span class="rvts20">(special column) - contains event ID. The EventID is the unique identifier for the event that the parent should have access to. These unique ID #'s can be located on the </span><span class="rvts21">Reports</span><span class="rvts20"> page. Select the </span><span class="rvts21">Account Reports</span><span class="rvts20"> option and then select the report labeled </span><span class="rvts21">Settings</span><span class="rvts20">. </span>

<span class="rvts20">In your parent file, fill the </span><span class="rvts76">EventID</span><span class="rvts20"> column with the EventID # corresponding to the event the parent should have access to. For example, if you have the following events: Grade 9 Counseling Appointments and Grade 10 Counseling Appointments, you would use the unique EventID for each event and associate this EventID with the parent.</span>

<span class="rvts20">To include multiple EventIDs, simply separate the IDs by a semi-colon and include no spaces (e.g., 28972x;28973x). If you include multiple EventIDs, parents will then see a drop-down and can toggle between any of the events they have access to. </span><span class="rvts36"> </span>

<div class="rvps10" id="bkmrk-%C2%A0parentid-first%C2%A0-%C2%A0la"><table><tbody><tr><td>**<span class="rvts20"> ParentID</span>**

</td><td>**<span class="rvts20">First </span>**

</td><td>**<span class="rvts20"> Last</span>**

</td><td>**<span class="rvts20"> Email</span>**

</td><td>**<span class="rvts20"> EventID</span>**

</td></tr><tr><td><span class="rvts20"> 29786</span>

</td><td><span class="rvts20"> Sally</span>

</td><td><span class="rvts20"> Jones</span>

</td><td><span class="rvts20"> sally.jones@noemail.com</span>

</td><td><span class="rvts20"> 28972X</span>

</td></tr><tr><td><span class="rvts20"> 27856</span>

</td><td><span class="rvts20"> Bob</span>

</td><td><span class="rvts20"> Williamson</span>

</td><td><span class="rvts20"> bob.williamson@noemail.com</span>

</td><td><span class="rvts20"> 28973X</span>

</td></tr></tbody></table>

</div><span class="rvts36">Import this file using the pickAtime Importer:</span>

<span class="rvts36">1. Turn off the Blackbaud import option on your account:</span>

- <span class="rvts36">Go to the </span><span class="rvts39">[Global Setup / Business](https://help.pickatime.com/books/additional-event-features/page/global-setup-business-page), Show Advanced Options, Single Sign On Options, Blackbaud</span><span class="rvts36"> section</span>
- <span class="rvts36">Remove the School System Login/ID</span>

<span class="rvts36">After importing your data via the pickAtime Importer, you would have to restore your School System Login/ID </span>

<span class="rvts36">2. On the left-hand side dashboard, select the Importer option. Here, you would be able to see pickAtime Importer (Data Importer):</span>

- <span class="rvts36">Data type - set the radio button to 'School'</span>
- <span class="rvts36">Event - select your 'event name' from the drop-down</span>
- <span class="rvts36">File type - select 'parents (optional)'</span>
- <span class="rvts36">File - select the parent file on your computer and click 'Open.'</span>
- <span class="rvts36">Then click the 'Import' button</span>

<span class="rvts36">When a parent logs in, they will be directed to the correct event. </span>

### **Category Options**

If you are intending to use the **Category Sort** option for your Prospective and Current parents, pickAtime has added an option on **Global Setup /Contacts/Advanced Options/Setup Parents Category.** This option offers a multi-select dropdown menu for event categories, offering you the ability to easily give each section its own CategoryID.

<span class="rvts36">If you need any assistance with these options, please email <span style="color: rgb(53, 152, 219);">support@pickatime.com</span></span>

# Types of Parents within your pickatime account

<span class="rvts36">You will notice that parents who are current vs prospective are marked differently within contacts.</span>

**<span class="rvts37">Current Parent</span>**<span class="rvts36"> (this parent would generally be accessing *Parent-Teacher Conferences*)</span>

**<span class="rvts21">Prospective Parent</span>**<span class="rvts20"> (this parent would generally be accessing i*nterview-like events*) </span><span class="rvts36"> </span>![](https://pickatime.com/help/lib/NewItem%2024.png)<span class="rvts36"> Import Parent Type: </span><span class="rvts37">Prospective</span><span class="rvts36"> in pickAtime includes Blackbaud's roles </span><span class="rvts59">Parent of Candidate</span><span class="rvts36">; </span><span class="rvts59">Parent of Incoming Student</span><span class="rvts36">. </span>

---

#### **<span class="rvts36">Helping your Prospective Parents access their events.</span>**

<span class="rvts36">The roles of Parent of Candidate and Parent of Incoming Student don't have </span>[access to the resource boards](https://kb.blackbaud.com/knowledgebase/Article/109627)<span class="rvts36">. Therefore, you will need to assist them by utilizing Blackbaud's Smart Tuition SSO. This text could be added to the </span>[Admissions Progress Text Box](https://www.blackbaud.com/files/support/howto/coveo/k12/ems-admissions-progress-text.html)<span class="rvts36"> or as a Checklist Step.</span>

##### **<span class="rvts21">Accessing the Admission Setup</span>**

<span class="rvts36">To add </span><span class="rvts61">Blackbaud's </span><span class="rvts36">Smart Tuition SSO,</span><span class="rvts61"> you need to be able to view the Admission Setup. </span><span class="rvts36">To see Admissions setup, you need to have the "Admissions Manager" role (Note: after applying the new role to the account, you </span><span class="rvts61">must</span><span class="rvts36"> log out and log in again).</span>

##### **<span class="rvts21">Creating the Smart Tutorial SSO for the Admissions Text Box</span>**

1. <span class="rvts36">While in Enrollment Management, go to the Admissions drop-down menu and select Admissions Setup.</span>
2. <span class="rvts36">Under Admissions Setup, select 'Candidate Progress Text and type out the message that you want to present to the </span><span class="rvts23">Parents of Candidates; Parents of Incoming Students. Select the line of text that you want to hyperlink and select the hyperlink button. </span>
3. <span class="rvts36">The URL that you want to add is the URL that is located in Core =&gt; Security =&gt; Authenticate Settings =&gt; SSO Settings (</span>[review steps 3-6 of SSO Setup](http://docs.google.com/default.aspx#pageid=creating_your_sso___current_schools)<span class="rvts36">)</span>
4. <span class="rvts36">If you want to customize your link with color please note that there is no built-in feature to change text color, so you need to open the Source Code viewer (by clicking the "&lt;&gt;" button in the left upper corner) and place </span><span class="rvts122">style=" color: red;"</span><span class="rvts61"> in &lt;a href="Real SSO link" </span><span class="rvts121">...</span><span class="rvts36">&gt;Text visible to Parents of Candidate&lt;/a&gt;</span>
5. <span class="rvts36">You have now set up your message and URL information. Now you can test it.</span>

##### **<span class="rvts21">Testing your Smart Tuition SSO </span>**

<span class="rvts36">Return to Core and under your account name, select the Impersonate User option. Be sure to select a user who only has the role of </span><span class="rvts59">Parent of Candidate</span><span class="rvts36"> or </span><span class="rvts59">Parent of Incoming Student</span><span class="rvts36">.</span>

![](https://pickatime.com/help/lib/NewItem%2023.png)<span class="rvts36">You will see on the right-hand side of the page the new information and URL.</span>

---

#### **<span class="rvts21">Adding the pickAtime link as a Checklist Step</span>**

1. <span class="rvts20">While in Enrollment Management, go to the Admissions drop-down menu and select Admissions Setup.</span>
2. <span class="rvts36">Then Select 'Checklists.'</span>
3. <span class="rvts36">Select the Checklist that you wish to add the step to by clicking edit.</span>
4. <span class="rvts36">Locate which stage of the checklist you want to add your step to and click 'Add Step.'</span>
5. <span class="rvts36">Fill out the form. Be sure to fill out the type, name, due date, staff assigned, whether it's required, and click 'yes' on Candidate Publishing Options.</span>
6. <span class="rvts36">Add the Step Name, Description, and then add the URL </span><span class="rvts20">that is located in Core =&gt; Security =&gt; Authenticate Settings =&gt; SSO Settings (</span>[review steps 3-6 of SSO Setup](http://docs.google.com/default.aspx#pageid=creating_your_sso___current_schools)<span class="rvts20">). Optionally, you can add an image.</span>
7. <span class="rvts36">Click 'Show Details' and then click 'Save'.</span>
8. <span class="rvts20">This action may affect your candidates. If it does, you can choose to update/ change which candidates need to have access.</span>
9. <span class="rvts36">Once you confirm which candidates have access, you will see the step in the checklist.</span>

#### **<span class="rvts21">Testing the Checklist Step via Impersonation</span>**

<span class="rvts20">Return to Core and under your account name select the Impersonate User option. Be sure to select a user who only has the role of Parent of Candidate or Parent of Incoming Student.</span>![](https://pickatime.com/help/lib/NewItem%2022.png)

<span class="rvts36">You will now see the step in the student's checklist.</span>

# Blackbaud FAQs

### **<span class="rvts0"><span class="rvts24">Setting up and using your Blackbaud integration and SSO</span></span>**

#### **<span class="rvts0"><span class="rvts96">Do I have to connect to the SKY API?</span></span>**

<span class="rvts20">Yes, pickAtime has transitioned to the SKY API. Support for the non-SKY API SSO has been discontinued</span>

#### **<span class="rvts0"><span class="rvts96">I'm ready to test my event. Why can't I see my account URL?</span></span>**

<span class="rvts20">When using Blackbaud, you need to create your Resource Tile and its SSO link using these instructions: </span>[Create the SSO - new schools](https://docs.google.com/document/d/1eqCIfeJ2OGfGmfcrqVYorkffxl52BEd_wKQ-_YLqeg4/edit?tab=t.0#heading=h.1m3zgzsndym8)<span class="rvts20">. It will take parents into account, which will allow parents to see the events.</span>

#### **<span class="rvts0"><span class="rvts96">I'm using SSO. Why is there an </span></span><span class="rvts0"><span class="rvts126">SSO Login URL?</span></span>**

<span class="rvts23">The SSO Login URL (located in </span><span class="rvts39">Global Setup / Business, Show Advanced Options, Single Sign On Options, Blackbaud</span><span class="rvts23">) is used to redirect Administrators to a login page after their session expires, allowing them to re-access our system without requiring them to use SSO again.</span>

#### **<span class="rvts0"><span class="rvts96">Why are our parents not being taken to our pickAtime event when using the Blackbaud SSO Integration?</span></span>**

<span class="rvts20">Please check and confirm that:</span>

1. <span class="rvts20">You have integrated the Blackbaud SKY API and reconnected to pickAtime from the </span>[Blackbaud Marketplace](http://docs.google.com/default.aspx#pageid=blackbaud_update)<span class="rvts20">.</span>
2. <span class="rvts20">Your </span>[SSO URL ](http://docs.google.com/default.aspx#pageid=creating_your_sso___current_schools)<span class="rvts20">is created correctly.</span>

### **<span class="rvts0"><span class="rvts24">Using the SKY API Data Importer and Errors</span></span>**

#### **<span class="rvts0"><span class="rvts96">I integrated pickAtime from the Blackbaud Marketplace, but when I go to the importer, I don’t see the SKY API importer option.</span></span>**

<span class="rvts61">In the Admin UI tool, go to the </span><span class="rvts39">Global Setup / Business, Show Advanced Options, Single Sign On Options, Blackbaud</span><span class="rvts61">, and check the box 'Use SKY API, Importer'. This will activate the SKY Importer on your account.</span>

#### **<span class="rvts0"><span class="rvts96">I added an event, but when I try to import from Blackbaud, the import doesn't show any events available to import. How do I fix this?</span></span>**

<span class="rvts20">Blackbaud will only import into a PTA event type, not a Normal or Simple PTA. Please create the event on the Events/ Preview page with the PTA event type and try again.</span>

#### **<span class="rvts0"><span class="rvts96">I have an administrator role in Blackbaud, but I am being told that I don't have access to any SKY API Blackbaud products and that I have to contact my organization's administrator. I don't have the ability to use the importer when I am in PickATime.</span></span>**

<span class="rvts61">In order for your user credentials to work, your username must have</span>[ ](https://developer.blackbaud.com/skyapi/apis/school/blackbaud-id)a [BBID](https://developer.blackbaud.com/skyapi/apis/school/blackbaud-id)<span class="rvts36"> </span><span class="rvts61">and also have one of the following roles: 'Academic Group Manager', 'Schedule Manager', or 'Platform Manager', </span><span class="rvts82">and</span><span class="rvts61"> the 'SKY API Data Sync' role in Blackbaud.</span>

<span class="rvts61">**NOTE**: if you establish one of the roles for your account, you have to log out of</span><span class="rvts61"> Blackbaud and then log in again.</span>

#### **<span class="rvts0"><span class="rvts96">On the Blackbaud Importer page, I received the following error: </span></span><span class="rvts0"><span class="rvts128">Error during obtaining Year/Term</span></span><span class="rvts0"><span class="rvts127"> list from Blackbaud SKY API. Response Code: Unauthorized. Reason: Unauthorized. Details: {"errors" \[{"message","User has no access.","error\_code": 401, "error\_name":"ServiceClientException","raw\_message":"User has no access"}\]}.</span></span>**

<span class="rvts61">Please make sure that the account you are using to run the import has </span>[BBID](https://developer.blackbaud.com/skyapi/apis/school/blackbaud-id)<span class="rvts61">, and one of the following roles ('Academic Group Manager', 'Schedule Manager', or 'Platform Manager') </span><span class="rvts82">and</span><span class="rvts61"> the 'SKY API Data Sync' role in Blackbaud.</span>

<span class="rvts61">**NOTE**: if you establish one of the roles for your account, you have to </span><span class="rvts132">LOGOUT</span><span class="rvts36"> </span><span class="rvts61">from Blackbaud and then login again.</span>

#### **<span class="rvts0"><span class="rvts96">On the Blackbaud Importer page I received the following error: </span></span><span class="rvts0"><span class="rvts128">Error during </span></span><span class="rvts0"><span class="rvts127">obtaining 'selected term' list from Blackbaud SKY API. Response Code: NotFound. Reason:Not Found. .Details: {"errors":\[{"message":"One PodLookup Service returned a 404. Check to make sure the mapping between the service type Blackbaud.EduLegacy. Service and the environment id xxxxxxxxxxxxxxxxx exists in Blackbaud.One.PodLookup.DataService</span></span><span class="rvts0"><span class="rvts96">.</span></span>**

<span class="rvts61">This indicates a problem with the production environment and the SKY API. </span><span class="rvts61">Please contact Blackbaud to resolve this issue.</span>

#### **<span class="rvts0"><span class="rvts96">On the Blackbaud Importer page, I received the following error: </span></span><span class="rvts0"><span class="rvts127">Error during obtaining OfferingType list from Blackbaud SKY API. Response: Forbidden. </span></span><span class="rvts0"><span class="rvts96">Also the server error pop-up would appear.</span></span>**

<span class="rvts53">Blackbaud has made an update, where the 'scopes' check was added.</span>

<span class="rvts53">For such an error, we got the following details from Blackbaud: "This application has insufficient scope to perform the operation. This application's scopes configuration is either insufficient for the request or the Blackbaud Environment Admin has not yet approved the application's updated access configuration. Learn more: </span>[https://developer.blackbaud.com/skyapi/docs/applications/scopes](https://developer.blackbaud.com/skyapi/docs/applications/scopes)<span class="rvts53">"</span>

#### **<span class="rvts0"><span class="rvts96">I just imported it into pickAtime, but nothing is there! What did I do wrong?</span></span>**

<span class="rvts53">Check Blackbaud to confirm that the term that you selected has data. You may need to select a different term.</span>

#### **<span class="rvts0"><span class="rvts96">I did an admissions import, and now I get daily emails. How do I make them stop?</span></span>**

<span class="rvts61">This is normal after establishing the admissions import. The admissions import will resync daily, which leads to you getting daily emails. You can stop getting notifications by going to the Global</span><span class="rvts82"> Setup / Business page, Advanced Options, Sync Notification Contact</span><span class="rvts61"> section, and unchecking the box in front of your name.</span>

<span class="rvts61">If you don’t want a daily sync, you can also log out of the Blackbaud importer; the data sync will no longer be valid, and the system will also stop sending notifications.</span>

#### **<span class="rvts0"><span class="rvts96">How do I add a new teacher and class without doing another import from Blackbaud?</span></span>**

<span class="rvts36">Navigate to </span><span class="rvts37">Events Management</span><span class="rvts36"> and select </span><span class="rvts37">Class Editor</span><span class="rvts36">. </span>

<span class="rvts36">Select the option </span><span class="rvts37">Add Teacher/Team</span><span class="rvts36"> and then </span><span class="rvts37">Add Teacher</span><span class="rvts36"> and locate or add the new teacher.</span>

<span class="rvts36">Once you see the teacher listed on the left-hand side, select the teacher and select </span><span class="rvts37">Add Class</span><span class="rvts36">. Add in the new class. </span>

<span class="rvts36">Once you see the class listed, click on the class, and then in the white entry box, start typing in the name of the student in the format last, first name. When the system locates the student, press Enter. Unless you have 100s of students to add, this will move quickly. </span>

<span class="rvts36">Alternatively, you can turn off the Blackbaud importer and </span><span class="rvts42">import .txt (Tab-delimited) files</span><span class="rvts36">. </span>

<span class="rvts36">See also: </span><span class="rvts20"> </span>[Modifying Enrollment Data](https://docs.google.com/document/d/1eqCIfeJ2OGfGmfcrqVYorkffxl52BEd_wKQ-_YLqeg4/edit#heading=h.6ss19jrn502b),<span class="rvts20"> </span>[Modifying Teacher or Room Data](https://docs.google.com/document/d/1eqCIfeJ2OGfGmfcrqVYorkffxl52BEd_wKQ-_YLqeg4/edit#heading=h.wyhlurtjwgnl)<span class="rvts20"> </span>

### **<span class="rvts0"><span class="rvts24">Testing the SSO and SSO Errors</span></span>**

#### **<span class="rvts0"><span class="rvts96">What does </span></span><span class="rvts0"><span class="rvts126">"the integration with pickatime is not set up correctly" mean?</span></span>**

<span class="rvts20">This appears when you have added your vendor ID # to the end of the secret key (located in </span><span class="rvts21">Global Setup / Business, Show Advanced Options, Single Sign On Options, Blackbaud</span><span class="rvts20">). The secret key should be empty after the ==.</span>

#### **<span class="rvts0"><span class="rvts96">When I click on the Resource Tile, I get an error message saying '</span></span><span class="rvts0"><span class="rvts127">Failed to get Blackbaud Account Information.</span></span><span class="rvts0"><span class="rvts96">'</span></span>**

<span class="rvts20">Confirm that your</span>[ SSO URL](https://docs.google.com/document/d/1eqCIfeJ2OGfGmfcrqVYorkffxl52BEd_wKQ-_YLqeg4/edit#heading=h.dn26smfnu26s)<span class="rvts36"> </span><span class="rvts20">is created correctly. </span><span class="rvts21">NOTE</span><span class="rvts20">: your SSO URL is </span><span class="rvts21">not </span><span class="rvts20">your redirect URL; the layout for your SSO URL resembles a layout similar to this: </span><span class="rvts131">https://11451.myschooldemo.com</span><span class="rvts130">/</span><span class="rvts40">app/sso/auth/pickatime</span><span class="rvts130">.</span><span class="rvts36"> </span><span class="rvts23"> It is located in the </span><span class="rvts39">Content </span><span class="rvts23">menu under </span><span class="rvts39">**Additional Content Types, Links.** </span><span class="rvts23">To create the link, take the first portion from your Blackbaud URL and the second from your SSO link (See step 5, </span><span class="rvts39">Core / Security, Authentication settings, SSO Settings</span><span class="rvts23">). </span>

<span class="rvts39">If this information is correct, then check that you have entered an 88-character SSO Key.</span>

#### **<span class="rvts0"><span class="rvts96">What does "There was an error: Blackbaud user not found" mean?</span></span>**

<span class="rvts23">This appears when pickAtime is not able to locate a user with a Blackbaud email within our Database. Users must exist in both pickAtime and Blackbaud with a matching </span><span class="rvts39">User ID (parentID or teacherID).</span><span class="rvts23"> Check and confirm that the user exists in both systems, and if they do confirm that their User ID data matches.</span>

#### **<span class="rvts0"><span class="rvts96">What does </span></span><span class="rvts0"><span class="rvts126">"Failed to get Blackbaud user" mean?</span></span>**

<span class="rvts20">This appears when pickAtime is not able to communicate with BB communication. Please c</span><span class="rvts23">heck and confirm that the user exists in both systems, and if they do confirm that the User ID data matches, try again.</span>

#### **<span class="rvts0"><span class="rvts96">Our parents are trying to log into our event and are receiving the error "We do not have that email in our database," but they do not have the option to create an account. Why is this happening?</span></span>**

<span class="rvts20">When the Blackbaud Integration is in use, parents can only access the school account from the Resource Board. Parents </span><span class="rvts21">cannot </span><span class="rvts20">log in from pickatime.com; they must be directed to use either the Resource Board.</span>

#### **<span class="rvts0"><span class="rvts96">Why is it that when one of my teachers accesses the event on pickAtime, they are sent to the parent side and not the teacher/ administrator side?</span></span>**

<span class="rvts20">Administrators (including teachers) have their Blackbaud UserID added to their pickAtime Contact accounts as a TeacherID and Parents and Students have their UserIDs added to their pickAtime Contact accounts as ParentIDs and StudentIDs. TeacherID holders are sent to the Reports section within the Admin Side, ParentID and StudentID holders are sent to the Customer/Parent side. Teachers who are also parents, however, have access to both, landing on the Customer/Parent side with the ability to access their Reports via an Admin UI button at the top of the page. Your teacher should be directed to use this. If your teacher doesn't see this, check their Contact account to confirm that they have their UserID placed in both the TeacherID and ParentID fields. If it is not, you can place the UserID in the TeacherID field.</span>

#### **<span class="rvts0"><span class="rvts96">I am experiencing a situation where only parents or teachers can access the link from the Resource Board, but the other group cannot. But I set my link to give access to both groups. How do I fix this?</span></span>**

<span class="rvts23">1) Open the "SSO Setup" page \[Core &gt; Security (menu) &gt; Authentication Settings (menu item) &gt; SSO Settings (tab)\] and review the SSO settings for pickatime.</span>

<span class="rvts61">2) Now open the "</span><span class="rvts23">Additional content types</span><span class="rvts61">" page \[</span><span class="rvts23">Core &gt; Content (menu) &gt; Additional Content Types (menu item) &gt; Links (tab)\] </span><span class="rvts61">and compare the Category Settings that the PickAtime SSO Link belongs to. </span>

<span class="rvts61">Pay attention to the selected type of access to the category \[Public/Secure\]. If you have selected the Secure option, please make sure that </span><span class="rvts129">appropriate</span><span class="rvts61"> roles are added to the right list. If not, add them and test the SSO. </span>

<span class="rvts61">If this does not help, go to the steps below.</span>

<span class="rvts61">3) Click on the category name to see a list of links that belong to it.</span>

<span class="rvts61">4) Press the Edit link button and review the settings. Make sure that the Publish date is </span><span class="rvts82">less</span><span class="rvts61"> than the current date. Copy the Destination URL for further use.</span>

<span class="rvts61">5) Open the "</span><span class="rvts23">Resource Boards</span><span class="rvts61">" page \[Core &gt; Content (menu) &gt; Resource boards (menu item)\]. Press the "Edit post" button and make sure that Category and Category Link correspond to those that you opened in the previous steps. Send the direct SSO link from the previous step to your parents/faculty members so they can test it directly. </span>

<span class="rvts61">6) Open the "</span><span class="rvts23">Users</span><span class="rvts61">" page and find the user(s) who cannot access pickAtime via the PickAtime SSO tile. Press on this user and select the Access tab in the Contact card, and review their Personas and Roles sections.</span>

<span class="rvts61">7) Click on the "Employment" button and click on the Edit button, and ensure that they have the correct roles.</span>

#### **<span class="rvts0"><span class="rvts96">What does "pickAtime user not found by Blackbaud userID" mean?</span></span>**

<span class="rvts23">This appears when pickAtime is not able to locate a user with a Blackbaud ID within our Database. Users must exist in both pickAtime and Blackbaud with a matching </span><span class="rvts39">User ID (parentID or teacherID).</span><span class="rvts23"> Check and confirm that the user exists in both systems and if they do confirm that their User ID data matches.</span>

### **<span class="rvts23">Event Creation</span>**

#### **Why are some of my time slots yellow?**

PickAtime automatically displays older Time slots in yellow to indicate that the scheduled time has already passed. These slots will not appear to your participants. Check the date of the slots, and either delete them or move them to the correct date. Slots on the correct date will be blue and will allow you to book and block.