VeraCross
Veracross - Setting Up the Integration
This guide explains how to connect Veracross with pickAtime. Please note that the setup process is completed inside the Veracross Axiom backend.
Before You Begin
- You must have one of the following Veracross roles or permissions:
-
-
System Administrator
-
IT Administrator
-
API Administrator
-
Integration Manager
-
If you do not see the integration settings described below, contact your school’s Veracross administrator or IT department.
-
2. Contact pickAtime so that the integration can be activated on the pickAtime side.
Step 1: Confirm API Permissions
Before creating the integration, your Veracross account must have the OAuth_App_Admin security role assigned.
Important: Even standard System Administrator accounts cannot create API integrations unless this permission is specifically enabled.
Without this role:
-
Integration setup buttons may be hidden
-
Fields may appear read-only
-
OAuth applications may not be accessible
If needed, ask your Veracross administrator to assign this permission.
Step 2: Log Into Veracross Axiom
-
Log into your school’s Veracross Axiom dashboard using your administrator credentials.
-
Open the Identity & Access Management section.
-
Under the Configuration area, select OAuth Applications
This page manages third-party integrations.
Step 3: Create a New OAuth Application
-
Select Add Record or Add OAuth Application
-
Fill out the basic application information.
Recommended settings:
Name
Enter a recognizable name such as:
-
pickAtime Integration
-
pickAtime Scheduling Sync
Internal Notes
Add a short description for your staff. For example: “Integration used for conference scheduling and roster imports.”
Contact Email
Enter the support or technical contact email address.
Step 4: Configure API Permissions (Scopes)
Once the application is created:
-
Open the Scopes tab on the left-hand side.
-
Enable the permissions required for your integration.
Required Scopes for Imports
Enable the following permissions:
-
staff_faculty:list
-
staff_faculty:read
-
parents:list
-
parents:read
-
students:list
-
students:read
-
relationships:list
-
relationships:read
-
academics.config.grading_periods:list
-
academics.config.grading_periods:read
-
academics.classes:list
-
academics.classes:read
-
academics.enrollments:list
-
academics.enrollments:read
Required Scope for Single Sign-On (SSO)
If using Single Sign-On, also enable:
-
sso
After selecting the required permissions, click Save or Update. Your Veracross integration application is now created.
Step 5: Copy Client ID and Client Secret
Return to the General tab of the OAuth application.
You will see two important credentials:
Client ID - A unique identifier for the integration.
Client Secret - A secure password-like key used to connect systems.
Copy both values.
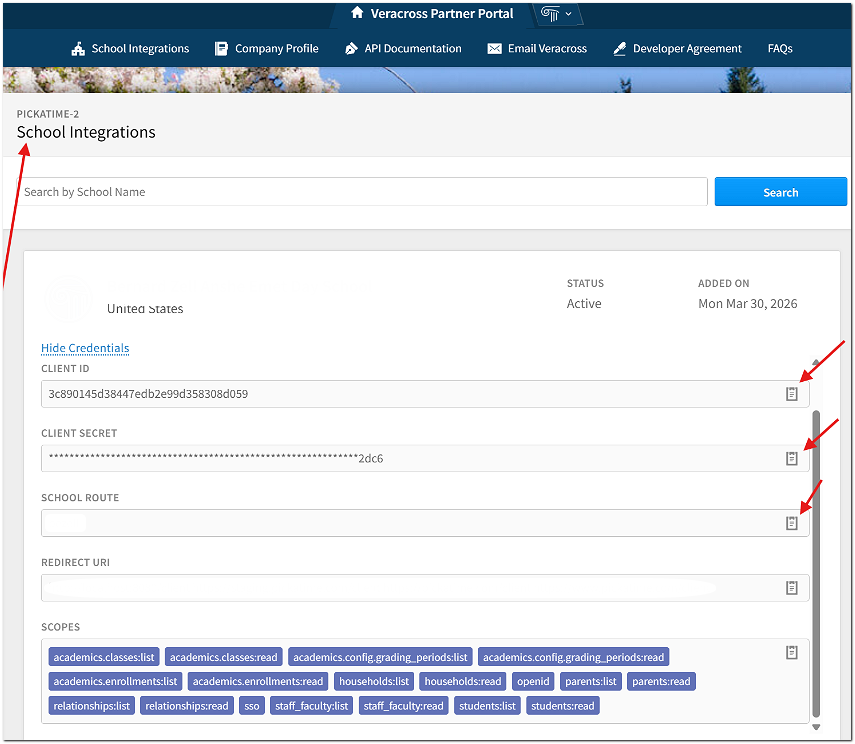
Important: The Client Secret may only be fully visible once immediately after creation. If you leave or refresh the page, it may become hidden for security reasons.
Step 6: Add Credentials to pickAtime
-
Log in to your pickAtime administrator account.
-
Navigate to Global Setup / Business/Integration Options/Veracross Integration.
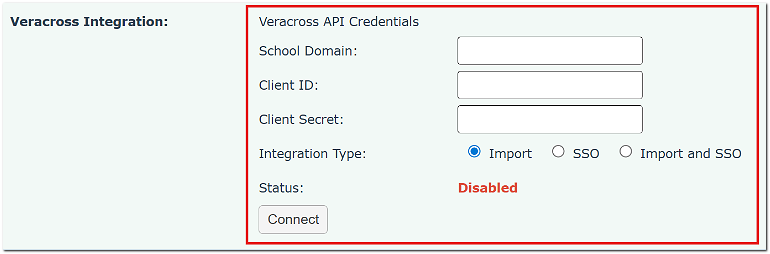
Enter:
-
School Domain - this should be your school's name. The easiest place to find this is in the Veracross URL your school uses to access Axiom.
-
Client ID
-
Client Secret
-
Integration Type
Then click Connect
Please note that if you get an error message similar to the one below, it means you aren't using the correct School Domain. Often the School Domain is simply your school's name.

Step 7: Add Redirect URLs for SSO (If Using)
If your school is using Veracross Single Sign-On (SSO), add the following redirect URLs to the allowed redirect list inside Veracross:
If these URLs are missing, users may receive an authentication or redirect error when attempting to log into pickAtime through Veracross.
No query parameters (like ?ven=XXXXXX or school/account names) should be added to the Veracross redirect list. The schools should enter the base URLs exactly as written:
Step 8: Run Your First Sync
Once connected, create an event and run the importer inside pickAtime.
Using SSO?
Be sure to add the pickAtime URL to the Veracross Parent Portal. Click here for instructions.
Recommended Best Practices
Before opening scheduling to families:
-
Run a test import
-
Verify that the information has been added to pickAtime correctly
-
Test the scheduler as a parent
Need Help?
If you need assistance:
-
Contact your Veracross administrator
-
Reach out to your school’s IT department
-
Contact pickAtime Support
Parent Instructions for VeraCross SSO
Step 1: Sign In
- Sign in to the Veracross Parent Portal and click your school's Parent-Teacher Conferences or Schedule Appointments link.
- You will be automatically authenticated and taken directly into pickAtime.
Step 2: Select Your Student(s)
Your student will already be attached to your account.
- Click the student(s) whose schedule you'd like to view.
If a student is attached but shows no classes within the event, please contact the event administrator.
Step 3: Select Teachers
By default, all of your student's teachers are selected.
- To exclude a teacher: Uncheck the box next to their name.
- When ready: Click Filter Slots.
Step 4: Book Appointments
The scheduling grid displays available times as squares with a plus sign (+).
- Click your preferred time square.
- Click Create Appointment.
- A confirmation message will briefly appear at the top of the screen.
- Repeat for each teacher you'd like to visit.
Managing Your Schedule
View or Print Your Schedule
Click Printable Schedule in the left-hand sidebar to see your full itinerary.
Changes & Cancellations
On a computer:
- Click My Appointments in the left-hand sidebar.
- Locate the appointment you'd like to change.
- Hover over the appointment to reveal Details, Edit, and Cancel options.
On a mobile phone: