**Important:** Even standard System Administrator accounts cannot create API integrations unless this permission is specifically enabled.
Without this role: - Integration setup buttons may be hidden - Fields may appear read-only - OAuth applications may not be accessible If needed, ask your Veracross administrator to assign this permission. ### **Step 2: Log Into Veracross Axiom** 1. Log into your school’s Veracross Axiom dashboard using your administrator credentials. 2. Open the **Identity & Access Management** section. 3. Under the Configuration area, select **OAuth Applications** This page manages third-party integrations. ### **Step 3: Create a New OAuth Application** 1. Select **Add Record** or **Add OAuth Application** 2. Fill out the basic application information. #### **Recommended settings:** ##### **Name** Enter a recognizable name such as: - pickAtime Integration - pickAtime Scheduling Sync ##### **Internal Notes** Add a short description for your staff. For example: “Integration used for conference scheduling and roster imports.” ##### **Contact Email** Enter the support or technical contact email address. ### **Step 4: Configure API Permissions (Scopes)** Once the application is created: 1. Open the **Scopes** tab on the left-hand side. 2. Enable the permissions required for your integration. #### **Required Scopes for Imports** Enable the following permissions: 1. staff\_faculty:list 2. staff\_faculty:read 3. parents:list 4. parents:read 5. students:list 6. students:read 7. relationships:list 8. relationships:read 9. academics.config.grading\_periods:list 10. academics.config.grading\_periods:read 11. academics.classes:list 12. academics.classes:read 13. academics.enrollments:list 14. academics.enrollments:read #### **Required Scope for Single Sign-On (SSO)** If using Single Sign-On, also enable: 1. sso After selecting the required permissions, click **Save** or **Update.** Your Veracross integration application is now created. ### **Step 5: Copy Client ID and Client Secret** Return to the General tab of the OAuth application. You will see two important credentials: **Client ID -** A unique identifier for the integration. **Client Secret -** A secure password-like key used to connect systems. Copy both values. [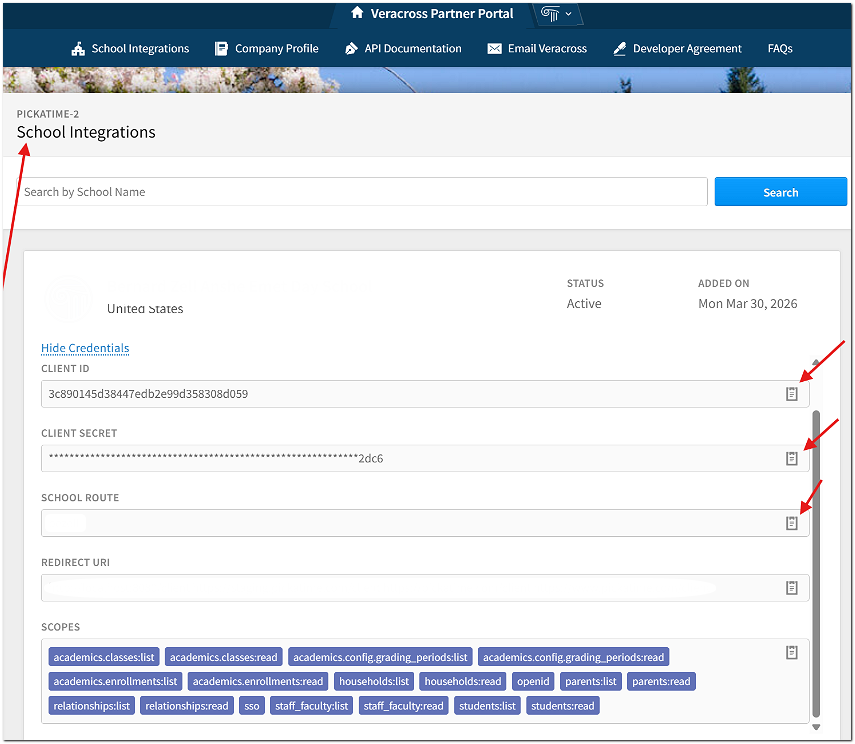](https://help.pickatime.com/uploads/images/gallery/2026-05/TWZimage.png)Important: The Client Secret may only be fully visible once immediately after creation. If you leave or refresh the page, it may become hidden for security reasons.
### **Step 6: Add Credentials to pickAtime** 1. Log in to your pickAtime administrator account. 2. Navigate to **Global Setup / Business/Integration Options/Veracross Integration**. [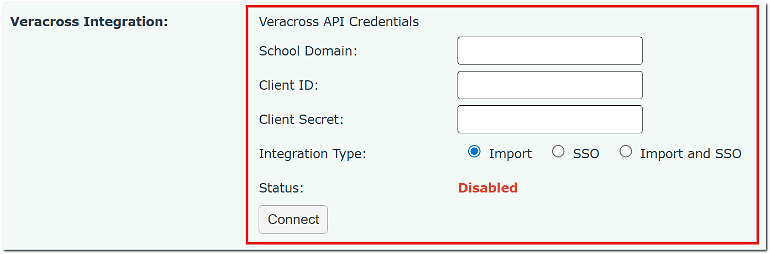](https://help.pickatime.com/uploads/images/gallery/2026-05/Dgsimage.png) Enter: - School Domain - Client ID - Client Secret - Integration Type Then click **Connect** ### **Step 7: Add Redirect URLs for SSO (If Using)** If your school is using Veracross Single Sign-On (SSO), add the following redirect URLs to the allowed redirect list inside Veracross: - [https://pickatime.com/client](https://pickatime.com/client) - [https://www.pickatime.com/client](https://www.pickatime.com/client) If these URLs are missing, users may receive an authentication or redirect error when attempting to log into pickAtime through Veracross. ### **Step 8: Run Your First Sync** Once connected, create an event and run the importer inside pickAtime. --- ### **Recommended Best Practices** Before opening scheduling to families: - Run a test import - Verify that the information has been added to pickAtime correctly - Test the scheduler as a parent ### **Need Help?** If you need assistance: - Contact your Veracross administrator - Reach out to your school’s IT department - Contact pickAtime Support