# Microsoft Entra ID (Formerly Azure AD)
pickAtime offers SSO integration with Microsoft Entra ID. This option will allow your participants to access pickAtime from the Entra ID Portal without the need to create an account. This guide walks you through configuring Microsoft Entra ID (Azure AD) SSO for PickATime.
### **Setting up Entra ID**
Required for Setup
- You must be an admin
- This setup is for single-tenant only
- Please review the [Multifactor authentication](https://learn.microsoft.com/en-us/entra/identity/conditional-access/policy-all-users-mfa-strength) and [Conditional Access](https://learn.microsoft.com/en-us/entra/identity/conditional-access/concept-conditional-access-policies) policies if applicable for your situation.
#### **Setup Steps**
1. Login Entra ID
2. Navigate to App Registrations
3. Click “New Registration.”
4. Name, i.e., PickAtime
5. To control who can use this application or access this API, set Accounts in this organization directory only (Default Directory only - Single tenant).
6. Applicable URIs
A. Go back to the PickATime app and go to **Global Setup/Business/Integration Options**, and within the Single Sign On drop-down menu, select Azure Ad. You will then see the redirect URL.
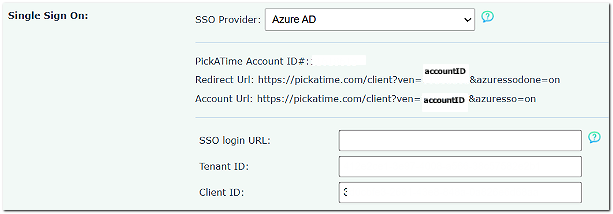
B. Copy and paste the URI in the Redirect URI field within Entra ID. The format will resemble:
https://pickatime.com/client?ven=11600000&azuresso=on
7. The app 'PickAtime' will appear in the sidebar.
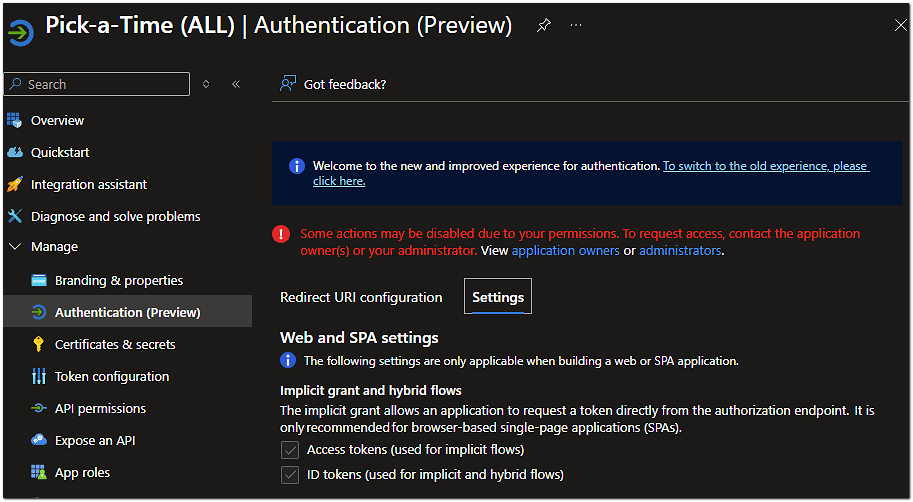
8. Click Authentication.
9. Then, under the “Settings” tab, navigate to Web and SPA settings, check the boxes 'Access tokens' and 'ID tokens', and click 'Save' at the top.
10. On the sidebar, click 'Overview'. You will then copy and paste the 'Application (client) ID' and 'Directory (tenant) ID' into the pickAtime [Global Setup/Business](https://help.pickatime.com/books/additional-event-features/page/global-setup-business-page) page, Advanced Options, Azure AD Integration section.
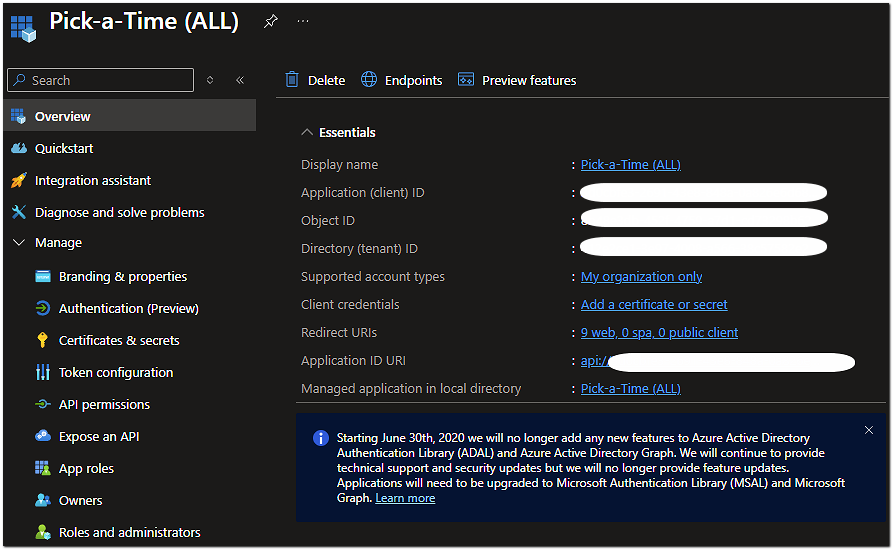
When all the above are completed, you would use the URL in the following format: https://pickatime.com/client?ven=11600000&azuresso=on
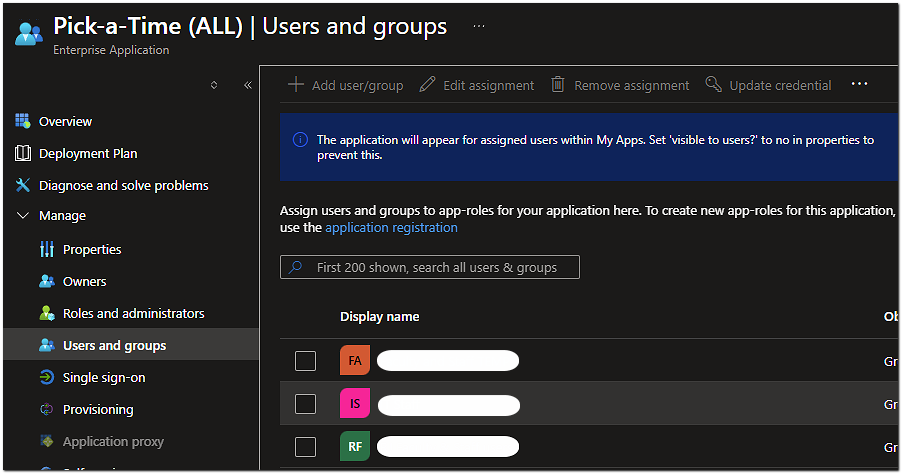
11. Next, navigate to Enterprise Applications in Entra ID, select the corresponding Application, and go to “Users and Groups.” Here, add groups that you want to have access to the PickATime account.
### **How to add/invite users into Entra ID Active Directory**
1. Select Entra ID Active Directory
2. In the sidebar, select Users
3. The 'All Users (Preview)' page would appear.
4. Click 'New User' at the top, then set the radio button 'Invite user', then enter the email address and click the ' Invite button.
*Note: On the 'All Users (Preview)' page, you can select your user contact on the profile tab. Then make sure that the selected user has an email address in the Contact Info section, Email field.*
### **Single Sign On with Entra ID**
##### **Step 1 – In pickAtime **
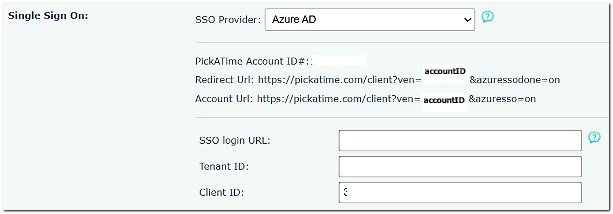
In the Admin UI tool, go to the [Global Setup/Business](https://help.pickatime.com/books/additional-event-features/page/global-setup-business-page)/Single Sign On, SSO Provider = Azure AD
Copy and paste the Client ID and Tenant ID
##### **Step 2 - In Entra ID**
Go to App Registrations → select your existing pickAtime app
1. Check the pickAtime Account ID with the Environment
2. Check Settings (check Access to Tokens)
##### **Navigate to Authentication**
1. In Redirect URIs, click Add URI
2. Paste the new Redirect URL
3. Click Save
#### **Testing the URL**
Once you have set up the integration, test the SSO by having a user access pickAtime via the portal.