Only fields in the **Included Fields** section are shown to participants during registration.
[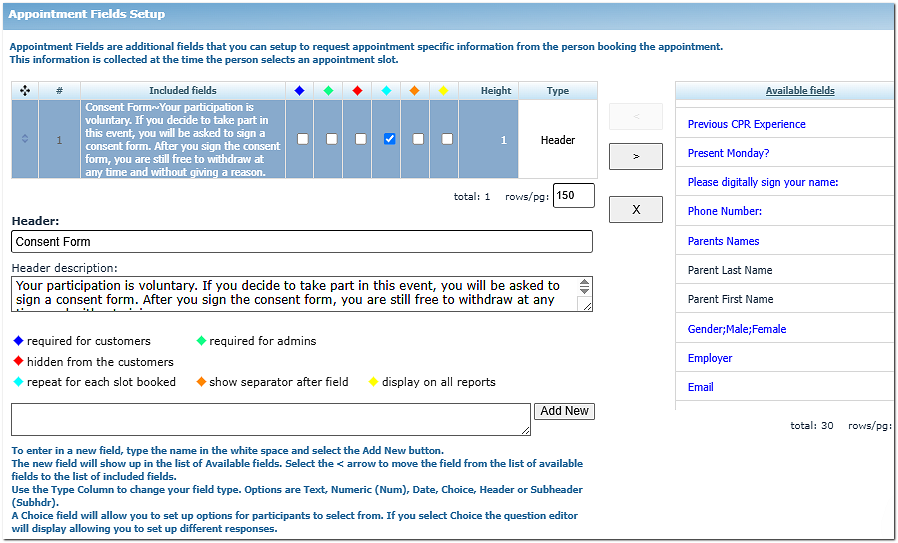](https://help.pickatime.com/uploads/images/gallery/2026-08/image.png) ##### **2. Configure and Add the Response option for your participants** For your participant's response, create a new field 1. 1. 1. 1. Under **Type,** select **Choice**. 2. Under **Choice Type,** select one of the following: - - Radio Buttons - Drop-down List - Checkboxes 3. Enter the responses participants can choose. For example, *Yes* or *No* 4. Click **Add New Option** after entering each option. 5. Use the arrow controls to change the order if needed. 6. Click the blue diamond. This makes the field **required**. This prevents participants from completing their registration without answering the consent question. [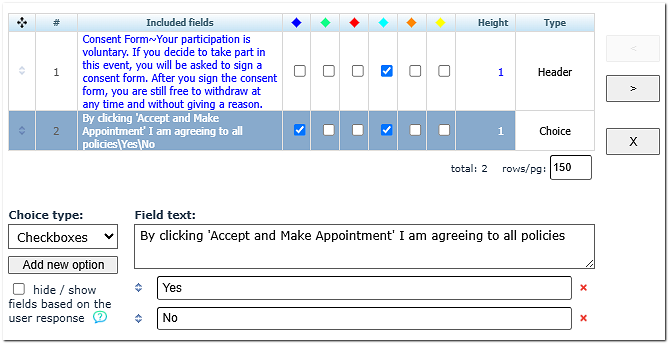](https://help.pickatime.com/uploads/images/gallery/2026-08/g6nimage.png) ##### **3. Test Your Consent Form** 1. Before making your event available, open your Online Scheduler and begin a test registration. Verify that: - The consent question appears. - The response options display correctly and are clear and easy to understand. - The field is required (if configured). - The confirmation email includes any consent information or links you added. 2.Use **Appointment Fields** for consent that must be collected with each booking.
Use **Contact Fields** only for information collected once per participant, such as phone numbers or mailing addresses.
### **Different Ways of Creating Consent Forms** #### **1. Consent checkbox or acknowledgment — Appointment Fields** Best for: Waivers, permissions, agreements, and acknowledgments that need to be completed when someone registers or books. You can create an Appointment Field such as: *I have read and agree to the School's Summer Camp Participation and Liability Waiver.* Then configure it as a Choice field with a checkbox or another response format. pickAtime supports radio buttons, drop-down lists, and checkboxes for Choice fields. ##### **Example** Question: I have read and agree to the Summer Camp Waiver. Response: ☐ I Agree You can make the field required, so the participant must respond by completing the registration, depending on your event configuration. #### **2. A more detailed consent form — Multiple Appointment Fields** Best for: Schools that need to collect several pieces of information as part of a waiver or registration form. Instead of creating one large consent question, you can create a series of fields. For example: ##### **Summer Athletic Program Consent** **Participant Information** - Student's name - Grade - Emergency contact - Emergency phone number **Consent verbiage** - I agree to the athletic participation waiver. - I acknowledge the school's code of conduct. - I give permission for emergency medical treatment. - I give permission for photographs/video to be taken. Each item can be configured as an individual Appointment Field. You can also use [conditional logic to show or hide additional fields based on a participant's response](https://help.pickatime.com/books/additional-event-features/page/collecting-information-from-customers-contact-appointment-fields?utm_source=chatgpt.com). **For example:** Do you give permission for your student to participate in off-campus activities? **Yes** → show the transportation permission fields. **No** → hide those fields. #### **3. Link to the full waiver + collect an acknowledgment** Best for: Long legal documents that would be difficult to display directly in the scheduler. Rather than putting the entire waiver into a field, you can provide a link to the school's full consent document and then collect an acknowledgment in pickAtime. **For example:** Please review the complete Summer Athletic Participation Waiver before registering. *\[View the Summer Athletic Participation Waiver\]* ☐ I have read and agree to the terms of the waiver. ### **Additional Options** #### **Include the consent information in confirmation emails** Admins can send [customized confirmation, reminder, and cancellation emails](https://help.pickatime.com/books/additional-event-features/page/notification-setup-page?utm_source=chatgpt.com) with text, links, graphics, and [macros](https://help.pickatime.com/books/additional-event-features/page/macros). #### **Reviewing Responses in the Reports** Admins can review responses within the [Reports](https://help.pickatime.com/books/event-management-guide/page/reports). By clicking the yellow diamond for each field, the field and its response will appear in all reports. Alternatively, the admin can choose within each report which fields they want to include. ### **Contact Fields vs Appointment Fields for Consent Forms** ##### **Why use Appointment Fields?** Appointment Fields are associated with the specific appointment/registration, rather than simply the person's contact record. This makes them particularly useful when consent applies to a specific program, appointment, camp, class, or event. ##### **Why use Contact Fields?** Contact Fields are best for information or permissions that should be associated with the participant/contact rather than a specific appointment. **Contact Fields** vs **Appointment Fields**:| **Field** | **Collected** | **Best for** | **Example** |
| Contact Field | When the person creates their account | Information that applies to the person | *I give permission for the school to contact me by text message.* |
| Appointment Field | Each time they book | Information that applies to a specific appointment | *I agree to the Summer Basketball Camp participation waiver.* |