# Clever Integration
### **How the Integration works**
The integration with Clever will bring in students, teachers, classes, and enrollment, and no SSO. You will do a one-time import to bring in the initial data. Optionally, the data could be synced nightly at 1 AM. Once the data has been imported, it will be available on your account in the Admin tool, and you will then be able to create the slots for your parents and open them up for booking.
**For any of our integrations, we do charge a 3rd-party integration fee of $230 annually per school attached. **
1. To start the process, we would send you an invite from Clever.
2. Once accepted, we will set up your account for the Clever data sync, and you will create an event on your account. Then, when you import your files, you will see that the importer is set up for Clever. You will select the Terms to import, which will kick off the sync.
### **Locating Data within a Term in Clever**
Clever places the data into different Terms. These Terms may or may not match what your school has in its SIS. We encourage you to review the data before importing.
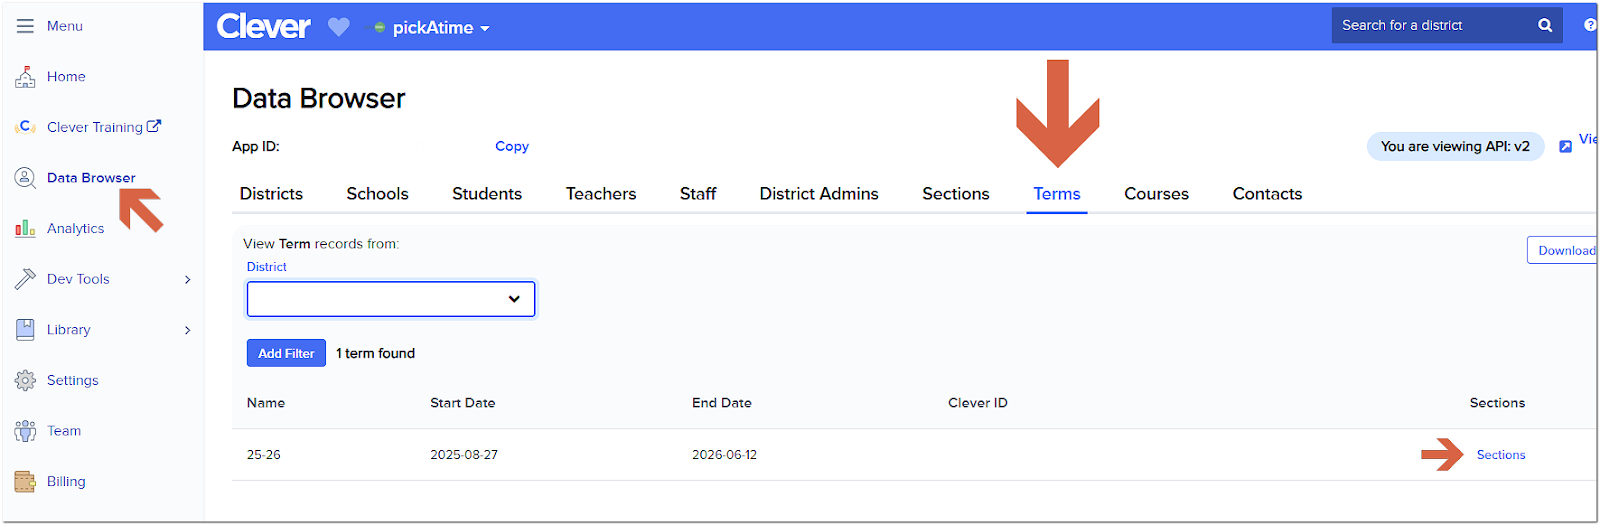
To review your information, go to the Data Browser, and under Terms and Sections, you can review the data that is within each section.
#### **Data Transfer**
The integration will give your students and teachers different IDs from your SIS.
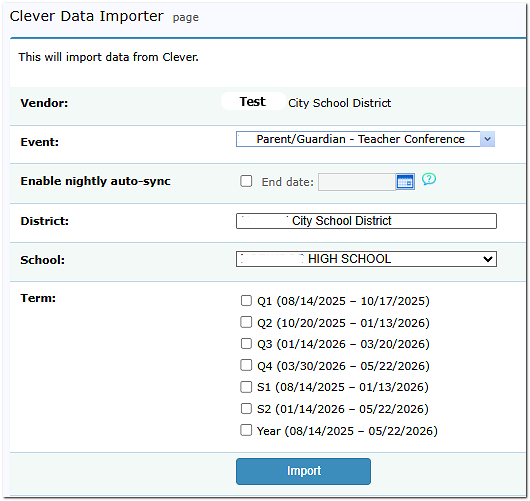
To do the data transfer, go to the Importer under Main Navigation. Select the event, your school, and the term. Once you have done the initial import into your event, the integration will do a nightly sync for individual events.
#### **Removing Classes from Your Event**
In the Admin UI tool, open the event, and go to the Class Editor tab. Tick the box labeled 'show only classes' on the far side. This will present a list of all the classes you have imported. Select the classes to be removed and then click on the Delete Class option. This will remove all of those classes.
To remove a single class, click the red x to the left of the class name within the Class Editor.
However, these classes will reappear when the nightly data import occurs. To maintain the nightly sync and not have the classes appear within the event, select the Hide option within the Class Editor under the ‘Type’ column for the class.
The nightly sync can be disabled by clicking the "Stop Sync For the Selected Event" or "Stop Sync For All Events" buttons. When you do this, you will see a confirmation prompt, and in the dialog for "Stop Sync For All Events", a list of events with sync enabled will be displayed.
#### **NOTE: Preventing Duplicate Contacts for Existing pickAtime Accounts**
If your school has used pickAtime without integration, imported data files manually, and now wants to enable a Clever integration, duplicate contact records may occur due to differing contact IDs (teacherID, studentID, parentID).
Recommendation: Clear old data before the new import.
**Steps to remove old data:**
1. Create a new event using a past event as a template to preserve settings, notifications, and appointment fields.
2. (Optional) Export reports from past events on the Reports page.
3. Delete all past events except the new one.
4. Go to Global Setup / Contacts / Advanced Options, then click Delete All Contacts. In the pop-up, select Level to delete: Admin Level - Event Administrator (this removes contacts with lower access level and contacts with customer access level - parents and students).
5. Run the new integration import.
This ensures clean data syncing without duplicates. Contact support@pickatime.com if needed.