Additional Event Features
- Adding Counselors or other non-Teachers to your event
- Adding Students to a Normal Event
- Allow Customers to take multiple slots
- Appointments List
- Built-in Browser Translation Tool
- Calendar Invite Options
- Category Options
- Collecting Information from Customers (Contact & Appointment Fields)
- Creating Consent Forms
- Creating different time slot durations for the same teacher
- Creating an Event with multiple services
- Date Location Option
- Directing Parents to a Predetermined Event
- Eligibility File
- Events Preview Page
- Event Display Options
- Global Setup
- Invoices
- Insert Logo / Image / Document
- Login Options
- Macros
- Notification Setup Page
- Propagate Settings
- SMS Messaging
- Scheduler Settings Pages
Adding Counselors or other non-Teachers to your event
Adding Counselors or Other Non-Teachers to Your Event
Q: Our counselors don't have specific classes with students. Can we mass-import a custom list of "counselors" (as teachers), along with counselor-student associations?
Yes — use the pickAtime Importer to define these relationships manually, even though counselors don't map to traditional classes.
Step 1: Prepare Your Data Files
You'll need three tab-delimited text files (.txt or .tsv):
| File | Purpose | Key Instructions |
|---|---|---|
| Teacher file | List of counselors | Use existing staff IDs as the TeacherID. If counselors don't have one, generate a custom ID — it must be unique and alphanumeric only. |
| Class file | "Counselor classes" | Create a unique ClassID (e.g., smith_counselor) and ClassName (e.g., Counselor John Smith) for each counselor. |
| Enrollment file | Student rosters | Link students to counselors using the ClassID from the Class file and the StudentID from your existing student file. |
Only a few counselors? You can skip the Teacher and Class file imports and add them manually instead — see below.
Alternative: Add Counselors Manually (No Import Needed)
- Go to Class Editor.
- Click Add Teacher/Team → Add Teacher.
- In the dialog, search for and select the counselor, or click Add to create a new one.
- The counselor will now appear on the left side of Class Editor. Select them.
- Click Add Class, and name it something you'll reference in your Enrollment file (e.g.,
Counselor Smith).
You can then import just the Enrollment file to populate student rosters for these manually created classes.
Step 2: Run the Import
- Go to the Importer page.
- Set Data Type to "School."
- Select your event from the Event drop-down.
- Upload files in this order: Teacher → Class → Enrollment.
- For each file, click Select File, then Import.
Step 3: Verify
- Open your event in the Admin UI.
- Go to Class Editor.
- Confirm counselors are correctly linked to their assigned students.
Adding Students to a Normal Event
Adding Students to a Normal Event
Q: We'd like our Normal event to let parents attach their students. Can we import a student list into pickAtime?
Yes. Follow these steps to set up student-participant relationships, similar to a standard PTA event:
Step 1: Import Your Data
- Update and import your student data.
- (Optional) Set up and import a participant-student relationship file
Step 2: Enable the Student Selection Setting
Go to the Settings / Online Scheduler Settings / Scheduler Settings / Miscellaneous, and enable: "Require participants to select their student name from a drop-down when booking an appointment."
What This Changes for Participants
Once enabled, the booking flow will work like a standard PTA event:
- When participants first enter the event, they'll be prompted to attach or review their students, then click Filter Slots to see available times.
- When booking, they'll select the correct student from a drop-down list.
This ensures every appointment is correctly tied to a student.
Allow Customers to take multiple slots
Allow Customers to Take Multiple Slots
Use this feature when you want a single login to book multiple appointment slots at once.
Example use cases:
- A parent booking flu shot appointments for three children
- A parent booking a school tour for mom, dad, and child
- A supervisor registering multiple team members for an event
Enabling the Feature
- Go to Settings / Online Scheduler Settings / Advanced Settings / Multiple Appointment Booking.
- Check "Allow customers to take multiple slots."
On the scheduling page, this adds a pull-down above the available slots, letting customers select how many slots they want to book. They can never book more than the number currently available.
Capturing Per-Slot Information
Since each slot may belong to a different person (e.g., a different child or team member), you'll likely want to capture details for each individual appointment.
- Go to Settings / Appointment Fields.
- Create a custom field — e.g., "Participant Name" — which participants will fill out for each slot they book.
Customizing the Confirmation Email
When multiple appointments are booked in one session, pickAtime sends one combined email rather than one email per appointment. This email has three parts:
| Section | Behavior |
|---|---|
| Header | Appears once, at the top |
| Body | Repeats once per appointment booked |
| Footer | Appears once, at the bottom |
Put anything you don't want repeated in the Header or Footer — not the Body.
Example: Desired email output
Dear Joan Smith,

Thank you for scheduling the following appointments:
John Smith at 2:00 on July 15, 2012
Sue Smith at 2:00 on July 15, 2012
Billy Smith at 2:00 on July 15, 2012

Please arrive early to find parking.
How to structure this on the Email Templates page:
| Section | Content |
|---|---|
| Header | Dear $(C_FIRST) $(C_LAST),Thank you for scheduling the following appointment(s): |
| Body | $(AF_PARTICIPANT_NAME) at $(TIME) on $(D_FULL) |
| Footer | Please arrive 15 minutes early to find parking. |
Available Macro Fields
Fields starting with $ are macros that auto-fill with appointment-specific data:
| Macro | What it inserts |
|---|---|
$(C_FIRST) $(C_LAST) |
First/last name of the contact person (the one logging in and booking) |
$(TIME) |
Time of the booked appointment |
$(D_LONG) |
Date of the booked appointment |
$(AF_PARTICIPANT_NAME) |
Name of the participant taking that specific slot, entered at booking time. (This field is custom — created via Settings / Appointment Fields.) |
Appointments List
The Appointment List page is your central hub for viewing and managing event bookings across your entire account. Accessible via the left-side navigation menu, it allows administrators to view and manage all event appointments (past, current, and upcoming) — across all events.
Common Administrative Uses
- Mass Management: Delete all appointments or specific selections within an event.
- Targeted Outreach: Send specialized or custom emails to specific groups.
- SMS Communication: Send text messages to participants, where applicable.
Data Columns
The list displays essential details for every booking, including:
- Time & Date: Appointment date, time, and total duration.
- Participant Details: The holder’s name and phone number (if provided).
- Event Logistics: The specific Event name, Resource Name, and any selected Services.
- Status & Feedback: Current appointment status and any relevant appointment notes.
- Phone: The participant’s phone number (if entered)
Sections of the Appointment List Page
Search Appointments console
Located on the left side of the page, the search bar allows you to filter results based on specific criteria:
|
Tool |
Functionality |
|
All Appointments |
Will show all appointments on the selected Event/Resource if specified. |
|
Date Selection |
Filter by an Exact Day or define a specific Range of dates. |
|
Problem Appointments |
Filter for "problem appointments" only. |
|
Event & Resource |
Narrow results to a specific Event and its associated Resources. |
Color Legend for Problem Appointments:
- Red text: Problem appointment in the future.
- Yellow text: Appointment is currently in the process of creation.
- Red text on the Gray background: Problem appointment in the past.
Appointment Action Bar
Use the top toolbar to perform bulk or individual actions on selected appointments:
-
- Send Email: Dispatch standard event notifications or custom messages to individuals or all holders.
- Options for email are custom, follow-up, and reminder emails (even if reminders are disabled for the event, and are labeled: “Sent Reminder Forced” within the Contact’s log.
- Delete: Permanently remove individual bookings or clear all appointments within an event.
- Recreate Slot: Restore an appointment slot to the event after it has been deleted.
- Confirm Appt: Manually validate and resolve a "problem" appointment status.
- Send SMS: Send additional text messages to participants signed up for the service (Normal events only).
- Send Email: Dispatch standard event notifications or custom messages to individuals or all holders.
Built-in Browser Translation Tool
Here is how to use the translation features in the 6 most popular browsers in the US: Chrome, Safari, Edge, Firefox, Samsung Internet (Mobile) and Opera.
1. Google Chrome (Desktop & Mobile)
Chrome uses Google Translate technology. By default, it will automatically detect if a page is in a different language than your system settings.
- How to translate: * Automatic Prompt: When you visit a foreign site, a small Translate icon usually pops up in the address bar (right side). Click it and select your language.
- Manual Trigger: If the prompt doesn’t appear, right-click anywhere on the page and select "Translate to [Your Language]".
- Specific Sections: Highlight a specific paragraph, right-click it, and select "Translate selection to..." to see a focused translation.
- Pro Tip: Click the three dots within the translation bubble to select "Always translate [Language]" if you visit a specific foreign site frequently.
2. Apple Safari (macOS & iOS)
Safari’s translation is highly integrated and privacy-focused, often processing data on-device.
- On iPhone/iPad:
- Tap the "AA" icon or the Translate icon (which looks like two speech bubbles) on the left side of the address bar.
- Tap "Translate Website..." and choose your language.
- On Mac:
- Click the Translate icon in the Smart Search field (address bar).
- Select "Translate to [Language]".
- Pro Tip: If you want to see the original text again, just tap the icon and select "View Original."
3. Microsoft Edge (Desktop & Mobile)
Edge uses Microsoft Translator and offers some of the most robust "Always Translate" settings.
- How to translate:
- When you land on a foreign page, the Translate icon (a blue/white character) will appear in the address bar.
- Click it to open the menu and hit "Translate."
- Mobile: Tap the three-line menu (bottom right) and select the Translate icon.
- Pro Tip: Edge allows you to translate Immersive Reader content. If you are in "Reading Mode," you can translate the text while maintaining a clean, ad-free layout.
4. Mozilla Firefox (Desktop)
Firefox is unique because its translation engine works entirely offline to protect your privacy. It doesn't send your data to a cloud server.
- How to translate:
- A translation toolbar will automatically appear at the top of the page when a foreign language is detected.
- Select your target language and click "Translate."
- Manual Trigger: If the toolbar is hidden, click the Translation icon (resembling a document with a character) in the address bar.
- Note: Because it works offline, Firefox may ask you to download a small language file (e.g., "Spanish to English") the first time you use it for a specific language pair.
5. Samsung Internet (Mobile)
This browser has recently been supercharged with "Galaxy AI."
- How to translate:
- Tap the three horizontal lines (Tools menu) in the bottom right corner.
- Select the "Translate" or "Browsing Assist" button.
- If it’s your first time, you may need to download a language pack (this allows for faster, more private on-device translation).
- Choose your target language, and the page will refresh with the translated text.
- Pro Tip: If you have a newer Galaxy device (2024+), look for the Sparkle (AI) icon in the toolbar. This can not only translate but also summarize the entire webpage for you into bullet points in your preferred language.
6. Opera / Opera One (Desktop & Mobile)
It has its own native "Opera Translate" engine.
- On Desktop:
- Look for the Globe icon on the right side of the address bar.
- A pop-up will appear asking if you want to translate the page. Click "Translate."
- You can also highlight any specific sentence; a small pop-up will appear with an option to "Translate" just that selection using Aria (Opera's AI).
- On Mobile (Opera for Android/iOS):
- Tap the Opera "O" logo or the three dots in the corner.
- Select "Translate" from the menu.
- Pro Tip: Opera’s translation is powered by Lingvanex and is hosted on secure servers that don't store your personal data, making it a great middle-ground for privacy.
Calendar Invite Options
PickAtime allows your participants and admins to add their appointments to their calendars. Follow the instructions below
Participants side
The option to have your participants add their appointments to their calendars is automatically offered on the Appointment Details page.
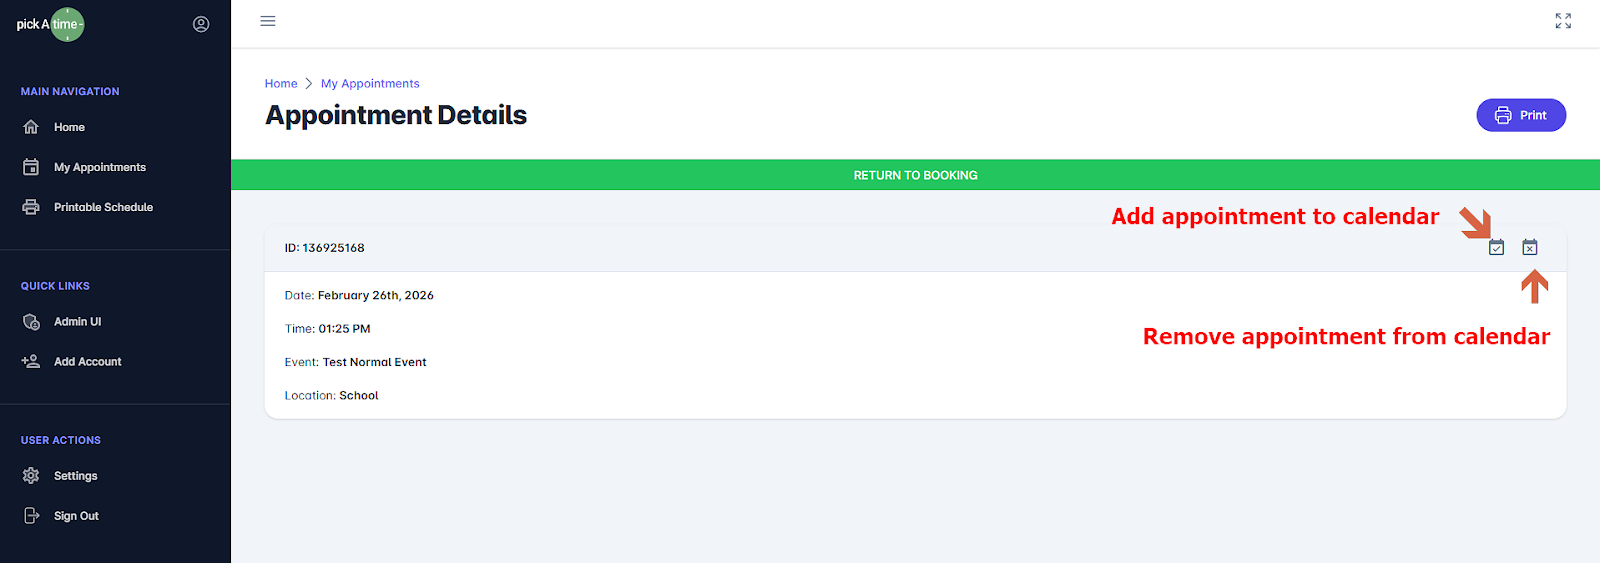
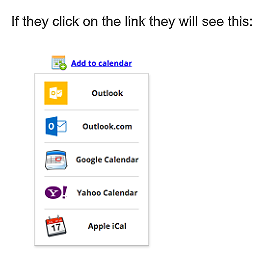
The appointment confirmation email that the participant will receive will also include the calendar option. For Gmail users, the appointment will automatically be added to their calendar. For Outlook users, they will be able to add the appointment to their calendar via the ICS file.
To make changes to the Calendar Notification, go to the notification content:
- Events Management, Settings, Notification Setup, and Calendar Event Notification.
Calendar Event Notification Section
At the top of the Calendar Event Notification section is the following:
Your Title* line, which allows for customization.
The Description of the notification.
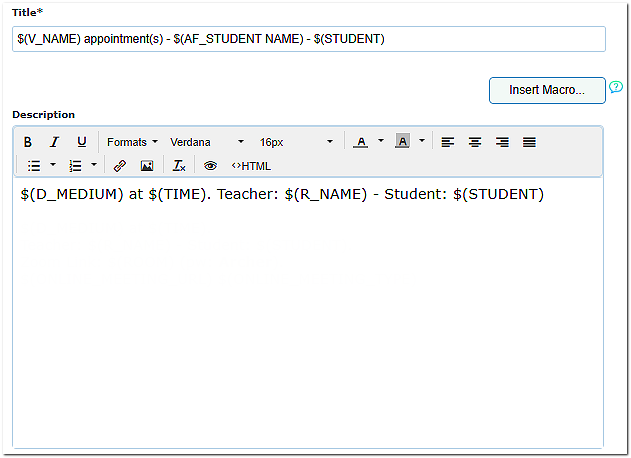
Insert Macro allows you to insert the correct macro for customization. Click here to learn more about Macros.
Your Location* section can be customized with the text, links, and graphics required.
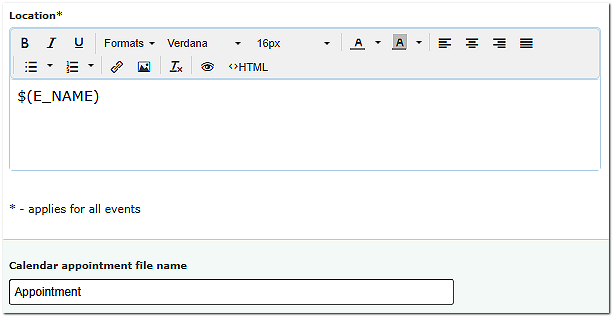
Your Calendar appointment file name can be customized to what would work best for your participants.
For your Admins
To allow admins to add appointments booked with them to a calendar, there are two different options:
1) The Resource Notification Email
You can receive an appointment notification email that you can add to your calendar each time a participant books an appointment. The Resource notification email that the admin will receive will include the calendar option.
You would do the following:
- To turn on the option, go to the Settings/Notification Setup page. Check the box labeled "for resources assigned to a contact, send appointment notification via email."
- Assign a contact person to your resource (the resource holds the slots). Go to the Appointments page. Click on the Resource column. Click on Resources and then Assign Contact. Locate the contact person in the contacts as the contact to receive the email. Click on the name and press select. The contact person is now assigned to the resource, and you'll notice that the Resource Name in the Appointments page has been changed to the contact name. To change this to something else (e.g., a generic name), click in the label area and change the name.
The option to check the For resources assigned to a contact, send appointment notification via email option. This option must be checked for emails to go out.
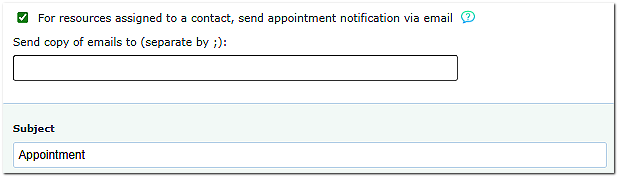
Insert Macro allows you to insert the correct macro for customization. Each email template is already preset with the general macro required for most events. Click here to learn more about Macros.
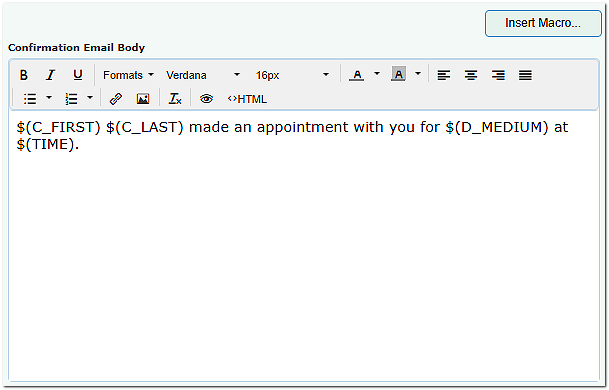
Your Confirmation Email Body and Cancellation Email Body sections can be customized with the text, links, and graphics needed.
2) Subscribe to iCal Feed
Subscribe to the calendar of appointments. On the Reports / Event Reports page, we have 'Subscribe to iCal Feed' option.
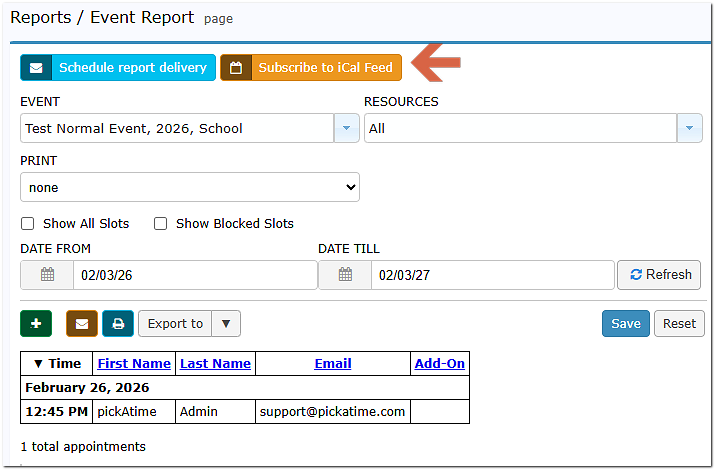
If you check this box, you will see 'Link to subscribe' and 'Download ICS file' options.
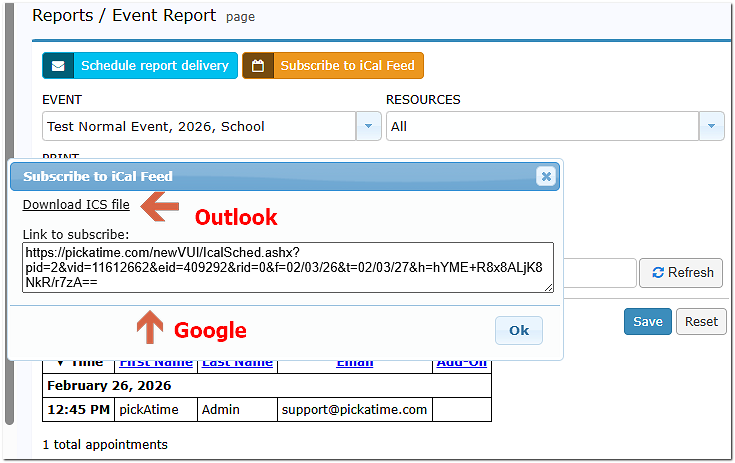
If you use the 'Link to subscribe', your calendar will be automatically updated when new appointments are booked or canceled. If you are using the 'Download ICS file', new appointments will not automatically show up in your calendar application. Also, note that when deleting the iCal Feed, it may take up to 24 hours for the appointments to disappear.
If you are using Google Calendar:
Click on the Other Calendars function button, then select:
- 'Add by URL' option - if you want to use 'Link to Subscribe'.
- 'Import calendar' option - if you want to 'Download ICS file' and import it.
Category Options
Function
The Category Sort option allows you to display your events by category, instead of all at once. This helps your participants navigate your account (especially if you have a large volume of events) with ease. It can also be used to direct participants to a certain event without an option to toggle to the other open event on the account.
Location
On the Events Preview page, you will see the grey button Event Settings. Click on the button to access the settings and the category sort.
At the bottom of the Events Settings page is the Category Sort section (the page may be collapsed and expanded when you access it)
Manage Categories for Events
This area allows you to show your events by category, instead of all at once. This may help your participants navigate your account (especially if you have a large volume of events). Below are the areas of this section.
Category Sort
|
Categories Page Title: |
This feature allows you to name the Categories page |
|
Allow customer to select category first |
allows you to have an initial sort on your account before the events are displayed. |
|
Category selector not displayed |
allows you to create a URL based on the category you entered in the Category column for your event(s). |
Events Categories
This table allows you to manage categories for your events.
Ways to Use
Display all events by category
To have your participants use the account URL and then see all of the events. Add the category for each event on the Events Preview page.
On the Global Setup / Business page, create a customized account URL for your company, such as https://pickatime.com/nameofyourcompany
On the Events / Preview page, enter text in the Category column for each event. For example, if you wanted the event URL to be https://pickatime.com/nameofyourcompany/PTA, then enter PTA in the category column.
On the Events Preview/Event Settings page, go to Manage Categories for Events and click Allow customer to select category first.
On the Event Management/Settings/Online Scheduler Settings, Scheduling Link section, you will see the Scheduling Link for the account. This is the URL you provide to your participants.
Display the events by a custom URL
You can use the Category Option if you want to direct participants to a certain event without an option to toggle to the other open event on the account.
On the Global Setup / Business page, create a customized account URL for your company, such as https://pickatime.com/nameofyourcompany
On the Events / Preview page, enter text in the Category column for each event. For example, if you wanted the event URL to be https://pickatime.com/nameofyourcompany/PTA, then enter PTA in the category column.
On the Events Preview/Event Settings page, go to Manage Categories for Events and click Allow customer to select category first, and then the Category selector is not displayed
On the Event Management level, on the Settings/Online Scheduler Settings tab, Scheduling Link section, you would see the Scheduling link for the category. This is the URL you provide to your participants.

Collecting Information from Customers (Contact & Appointment Fields)
pickAtime lets you collect custom information from participants at two different points:
- When they create an account (Contact Fields)
- When they book a specific appointment (Appointment Fields)
Both support various answer types — including text, date, radio buttons, drop-down lists, and checkboxes.
1. Choosing the Right Field Type
| Contact Fields | Appointment Fields | |
|---|---|---|
| When it's collected | During initial account sign-up | Every time a slot is booked |
| Frequency | Once per user | Once per appointment |
| Best used for | Phone number, address, language preference — info tied to the person | Student name, meeting topic, teacher-specific questions — info tied to the appointment |
| Location | Global Setup / Contacts / Contact Fields | Settings / Appointment Fields |
2. Setting Up a Field
Both field types use the same basic process:
- Go to either Global Setup / Contacts or Settings / Appointment Fields, depending on which type you're creating.
- Add the field: Type the field name (e.g., "Phone Number") into the Add New box and click Add.
- Activate the field: It will appear under Available Fields — select it, then click the
<button to move it into Included Fields. - Admin visibility: Check "Required for Admins" if you want staff to see/fill out this field when testing the system.
💡 Pro tip: Don't create custom fields for First Name, Last Name, or Email — these are already collected automatically during registration. Adding them again will prompt users to enter the same information twice.
3. Configuring a Question with Multiple Choice Answers
If you want a field to use radio buttons, a drop-down list, or checkboxes, you'll configure it as a "Choice" type field:
- In Included Fields, locate the Type column for your question.
- Click the cell and select "Choice" from the drop-down.
- The Question Editor will open. Click Add New Option to add each possible response.
- Choose a display format:
- Drop-down list
- Radio buttons
- Checkboxes
- Use the arrows (
<>) to reorder the options as needed.
4. Conditional Logic: Show/Hide Fields Based on Responses
You can make fields appear or disappear dynamically based on how a participant answers a Choice-type question.
Each Included Field is assigned a number, which is used to reference it in the conditional logic.
To enable this: Check "Hide/Show fields based on the user response" on the question you want to control others with.
To configure it: Next to each answer option, enter the field numbers to hide or show when that option is selected:
- To hide fields: Enter their numbers directly — e.g.,
3,4,5or3-5 - To show specific fields instead: Prefix each number with a
/— e.g.,/5, /6
⚠️ This logic only applies to fields that come after the conditional field in the list — it cannot affect fields earlier in the form.
Example: If a participant selects "Junior" for a given question, you could configure the rule to show only fields 5 and 6 — hiding everything else beyond that point unless explicitly shown.
5. Restricting Date Ranges
For Date-type fields (e.g., Date of Birth), you can restrict the range of dates a participant is allowed to enter.
Why this matters: Schools have reported participants accidentally entering today's date in a DOB field. The Restrict Dates option helps prevent this kind of erroneous entry.
To use it: On a Date-type field (in either Contact Fields or Appointment Fields setup), enable Restrict Dates and define the valid range — e.g., no dates after the year 2000.
6. Viewing the Collected Data
In the Appointments Grid (Admin View): For Appointment Fields, you can view responses immediately without running a report:
- Go to the Appointments page.
- Click any booked slot.
- View the participant's custom field responses in the section below the calendar (left-hand side).
In Reports: To include custom fields as report columns:
- Go to the Event Report section.
- Click the blue Contact Fields or Appointment Fields link.
- Check the box in the upper-right corner of the pop-up to select all fields, or choose specific ones.
- Confirm your selection — the fields will now appear as columns in your report.
Creating Consent Forms
Adding Consent Forms in pickAtime
If you need participants or parents to acknowledge and agree to specific terms (e.g., loan agreements, waivers, policies) during an event, pickAtime provides flexible options using the Appointment Fields page.
Common Uses
Create a consent form to collect:
-
Permission slips
-
Liability waivers
-
Media release acknowledgements
-
Health questionnaires
-
Code of conduct agreements
-
Event policies
-
Emergency contact information
-
Transportation permissions
Creating your Consent Form
1. Create a New Appointment Field:
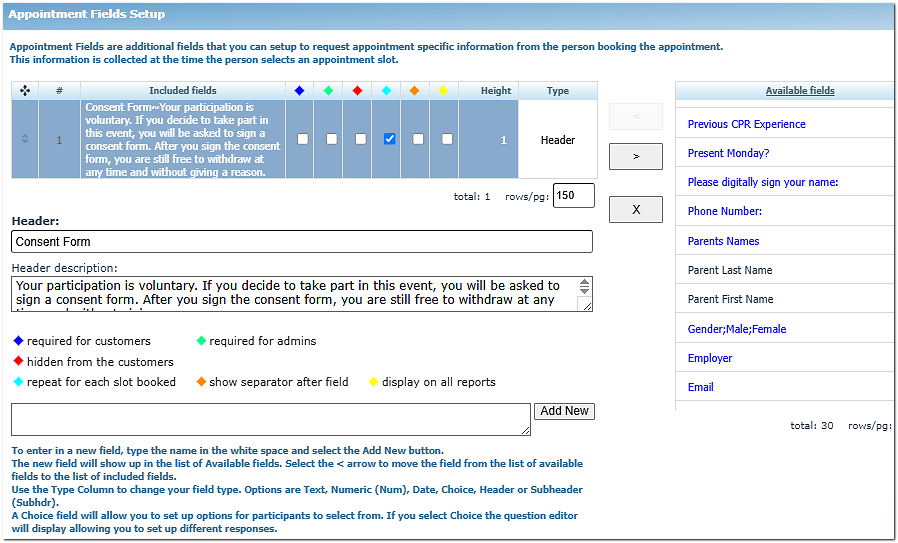
2. Configure and Add the Response option for your participants
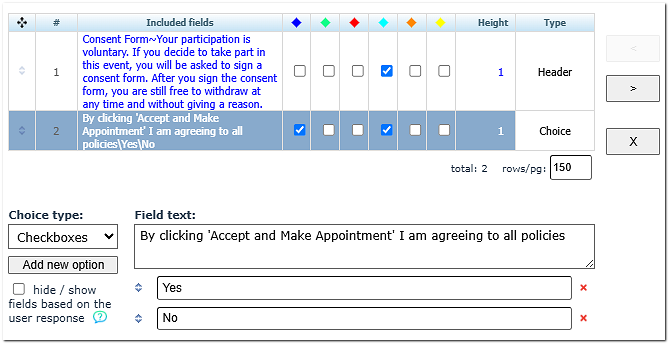
For your participant's response, create a new field
-
-
-
- Under Type, select Choice.
- Under Choice Type, select one of the following:
-
-
Radio Buttons
-
Drop-down List
-
Checkboxes
-
-
-
Enter the responses participants can choose. For example, Yes or No
- Click Add New Option after entering each option.
- Use the arrow controls to change the order if needed.
- Click the blue diamond. This makes the field required. This prevents participants from completing their registration without answering the consent question.
-

-
3. Test Your Consent Form
-
Before making your event available, open your Online Scheduler and begin a test registration.
Verify that:
- The consent question appears.
- The response options display correctly and are clear and easy to understand.
- The field is required (if configured).
- The confirmation email includes any consent information or links you added.
-
Use Appointment Fields for consent that must be collected with each booking.
Use Contact Fields only for information collected once per participant, such as phone numbers or mailing addresses.
Different Ways of Creating Consent Forms
1. Consent checkbox or acknowledgment — Appointment Fields
Best for: Waivers, permissions, agreements, and acknowledgments that need to be completed when someone registers or books.
You can create an Appointment Field such as: I have read and agree to the School's Summer Camp Participation and Liability Waiver.
Then configure it as a Choice field with a checkbox or another response format. pickAtime supports radio buttons, drop-down lists, and checkboxes for Choice fields.
Example
Question: I have read and agree to the Summer Camp Waiver.
Response: ☐ I Agree
You can make the field required, so the participant must respond by completing the registration, depending on your event configuration.
2. A more detailed consent form — Multiple Appointment Fields
Best for: Schools that need to collect several pieces of information as part of a waiver or registration form.
Instead of creating one large consent question, you can create a series of fields.
For example:
Summer Athletic Program Consent
Participant Information
-
Student's name
-
Grade
-
Emergency contact
-
Emergency phone number
Consent verbiage
-
I agree to the athletic participation waiver.
-
I acknowledge the school's code of conduct.
-
I give permission for emergency medical treatment.
-
I give permission for photographs/video to be taken.
Each item can be configured as an individual Appointment Field.
You can also use conditional logic to show or hide additional fields based on a participant's response.
For example: Do you give permission for your student to participate in off-campus activities?
Yes → show the transportation permission fields.
No → hide those fields.
3. Link to the full waiver + collect an acknowledgment
Best for: Long legal documents that would be difficult to display directly in the scheduler.
Rather than putting the entire waiver into a field, you can provide a link to the school's full consent document and then collect an acknowledgment in pickAtime.
For example:
Please review the complete Summer Athletic Participation Waiver before registering.
[View the Summer Athletic Participation Waiver]
☐ I have read and agree to the terms of the waiver.
Additional Options
Include the consent information in confirmation emails
Admins can send customized confirmation, reminder, and cancellation emails with text, links, graphics, and macros.
Reviewing Responses in the Reports
Admins can review responses within the Reports.
By clicking the yellow diamond for each field, the field and its response will appear in all reports. Alternatively, the admin can choose within each report which fields they want to include.
Contact Fields vs Appointment Fields for Consent Forms
Why use Appointment Fields?
Appointment Fields are associated with the specific appointment/registration, rather than simply the person's contact record. This makes them particularly useful when consent applies to a specific program, appointment, camp, class, or event.
Why use Contact Fields?
Contact Fields are best for information or permissions that should be associated with the participant/contact rather than a specific appointment.
Contact Fields vs Appointment Fields:
|
Field |
Collected |
Best for |
Example |
|
Contact Field |
When the person creates their account |
Information that applies to the person |
I give permission for the school to contact me by text message. |
|
Appointment Field |
Each time they book |
Information that applies to a specific appointment |
I agree to the Summer Basketball Camp participation waiver. |
Need Help?
If you have questions about configuring consent forms, Appointment Fields, or Notification Setup, contact the pickAtime Support Team:
Email: support@pickatime.com
The support team can help you configure custom Appointment Fields, email templates, and other event settings.
Creating different time slot durations for the same teacher
Scenario: A teacher needs different slot durations for different classes — e.g., 15-minute slots for First Grade, 30-minute slots for Kindergarten. Since she only appears once in the Class Editor, both classes are currently forced to share one slot duration.
Solution: List the teacher resource twice in the Class Editor — once per duration needed — so each listing can have its own slot duration in the Slot Editor.
Step 1: Add the teacher a second time
- Go to the Class Editor page.
- Click Add Teacher. This opens the Select Person dialog.
- Locate and select the teacher's name, then click Select.
The teacher's name will now appear twice in the Class Editor.
The teacher contact account will remain the same for each of the resources.
Step 2: Move one class to the second listing
- Select the second listing of the teacher's name.
- Select her Kindergarten class, then click Move Class.
- Select the first listing of the teacher's name as the destination.
The Kindergarten class is now under the first listing.
Step 3: Rename each listing for clarity
To easily tell the listings apart when creating slots, edit each name — for example:
- First listing:
Sue Smith - Kindergarten - Second listing:
Sue Smith - First Grade
Step 4: Create separate slot durations
- Go to the Slot Editor page.
- You'll see both listings. Create slots with the appropriate duration for each — e.g., 30 minutes for Kindergarten, 15 minutes for First Grade.
Since both listings are tied to the same underlying contact, the system prevents double-booking — booking a slot on one listing automatically blocks the corresponding time on the other.
Creating an Event with multiple services
The Services Setup feature lets you offer multiple appointment types — each with its own duration — under a single event. This is especially useful for businesses like health & wellness providers, photo studios, auto shops, and law offices.
Example use cases:
- A photo studio offering 20-minute headshots and 40-minute family sessions
- An auto shop scheduling 30-minute oil changes and 60-minute brake jobs
- A law office offering 15-minute consultations and 45-minute client meetings
Step 1: Create a New Event
- Go to the pickAtime dashboard.
- Create a new Normal event.
Step 2: Create Time Slots (Using Your Shortest Duration)
- Click Go To Event, then select the Appointments tab.
- Create your time slots using the shortest service duration you offer.
Example: If you offer both 20-minute and 40-minute services, create all base slots as 20 minutes. Longer services will later combine multiple slots (see Step 3).
Step 3: Set Up Services
- Go to Settings → Services Setup.
- Click the green + to add a new service.
- Enter a description, and specify how many base slots this service should occupy.
Example: If your base slot is 20 minutes and this service takes 40 minutes, enter 2 in the Slots column.
The system will automatically reserve the correct number of consecutive slots for longer services, preventing overbooking.
Step 4: Customize Service Details
For each service, add a clear name and brief description so participants can easily identify it when booking.
What Participants See
- On the scheduling site, participants first select a service from a drop-down list.
- They click Filter Slots.
- Only time slots that fit the selected service's duration will appear as bookable.
Date Location Option
The Date Location option adds day-by-day flexibility for multi-date events — useful when details like room, instructor, or service specifics change depending on the date.
Note: Available for Normal event types only.
Where to Find It
Go to the Appointments page. The Date Location input field is located directly below the calendar.
Practical Use Cases
This field handles "exceptions to the rule" for a specific date, without requiring a separate event type:
- Variable room assignments — e.g., a seminar moves from "Room A" on Monday to "The Auditorium" on Wednesday
- Specific service details — e.g., a clinic offering different vaccine types (Trivalent vs. Quadrivalent) on different days
- Instructor changes — e.g., different staff covering different days of a multi-day workshop
Displaying This Info with the Macro Field
To show this date-specific text to participants, insert the macro $(D_LOCATION) into your scheduling page text and/or email templates.
On the Scheduling Page:
- Go to Settings / CUI Messages.
- Go to Text View / Box Message.
- Insert
$(D_LOCATION)into your message template.
In Email Notifications:
- Go to Settings / Notification Setup.
- Insert
$(D_LOCATION)into your message template.
Example template:
Your appointment is confirmed for $(DATE). Location/Note: $(D_LOCATION)When the message is sent, $(D_LOCATION) will automatically be replaced with the specific text you entered for that date.
Directing Parents to a Predetermined Event
You can route parents directly to a specific event — for example, showing Grade 9 parents only the Grade 9 Counseling event, and Grade 10 parents only the Grade 10 Counseling event.
This works by importing a parent file that links each parent to one (or more) EventID(s). When that parent logs in, they'll only see the event(s) they've been assigned.
Step 1: Create the Parent File
Your parent file must include the following columns:
| Field | Description |
|---|---|
| ParentID | Unique identifier for the parent |
| First | Parent's first name |
| Last | Parent's last name |
| Parent's email address (one only) | |
| EventID | The event(s) this parent should have access to |
Finding your EventID(s): Go to Reports / Account Reports / Settings. This report lists the unique EventID for each event on your account.
For multiple events per parent: Separate EventIDs with a semicolon, no spaces — e.g., 28972x;28973x. Parents with multiple EventIDs will see a drop-down letting them toggle between their assigned events.
Example file:
| ParentID | First | Last | EventID | |
|---|---|---|---|---|
| 29786 | Sally | Jones | sj@school.com | 28972x |
| 27856 | Bob | Williamson | bw@school.com | 28973x |
Step 2: Import the File
- Go to the Importer option in the left-hand dashboard.
- Set Data Type to "School."
- Select your event from the Event drop-down.
- Set File Type to "Parents (optional)."
- Click Select File, choose your parent file, and click Open.
- Click Import.
Result
Once imported, parents will be automatically directed to the correct event(s) when they log in.
Need help with this setup? Email support@pickatime.com.
Eligibility File
The Eligibility File feature allows you to limit scheduling access to only those participants included in an imported People file. When combined with Employee ID Login, participants will use their Employee ID to access the scheduler.
This is commonly used for:
-
Employee benefits enrollment
-
Open enrollment appointments
-
HR meetings
-
Wellness screenings
-
Staff training
-
Employee evaluations
-
Internal scheduling events
Step 1: Enable Employee ID Login
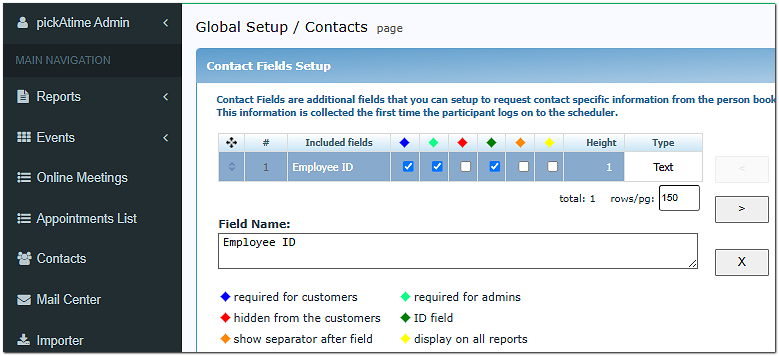
- Go to Global Setup/Contacts/ContactFieldSetup
- Create and add a field called Employee ID - or whichever unique field name you choose
- Click the green diamond to make an ID Field
- Go to Global Setup/Business/Account Level Settings/AccountURL
- Set the participant login method to Use ID Field.
- And then in the drop-down, select your newly created ID Field
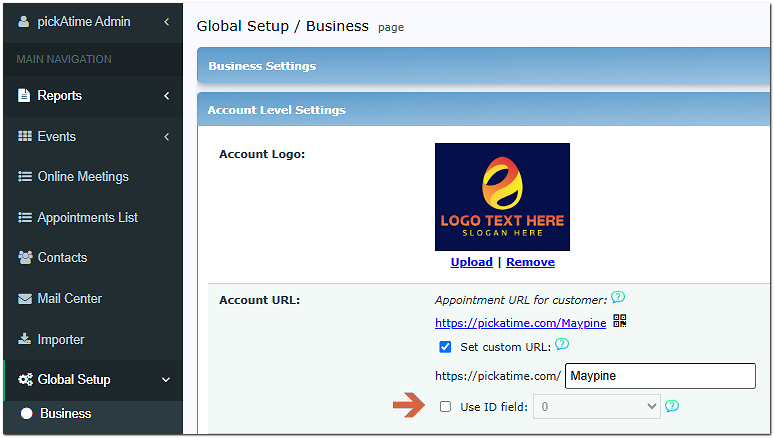
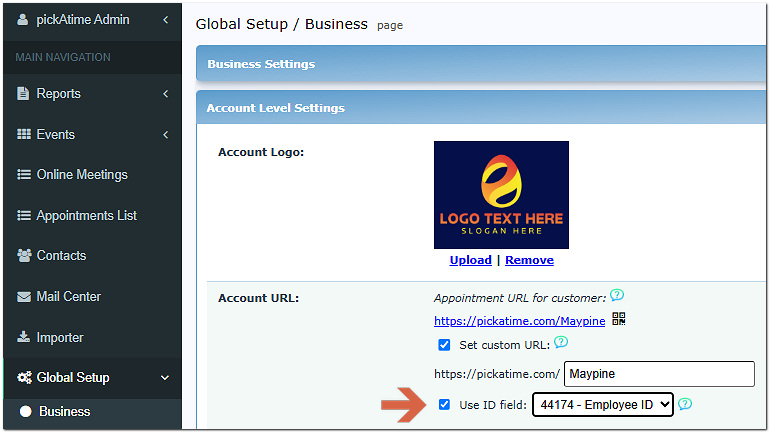
When this option is in use, participants will have to enter a unique ID (for example, an employee ID) after they enter their password or use Google to log in.
Step 2: Prepare Your People File
Create a spreadsheet containing one row for each eligible participant.
Required Columns
- ID - A unique identifier for each contact. Each ID must be unique across all imported contacts (Students, Teachers, Parents, People). - This is your Employee ID.
- First - The first name of the person.
- Last - The last name of the person.
- Email - A valid email address for the contact. Only one email address per row is allowed.
Format Requirements
- The file must be a tab-delimited text file (*.txt or *.tsv).
- Each row must represent one person.
- Field names (column headers) must exactly match the required field names (case-sensitive).
- Avoid using formulas, merged cells, or formatting.
Sample Table
| Employee ID | First | Last | |
|---|---|---|---|
| 00123 | Alice | Martin | amartin@example.com |
| 00456 | John | Stevens | jstevens@example.org |
| 00789 | Rosa | Delgado | rdelgado@example.net |
Additional fields such as department or location may also be included if desired.
Important: Each Employee ID must be unique. Duplicate Employee IDs may prevent participants from logging in correctly.
Step 3: Import the People File
- Go to the Importer Page.
-
Choose People Import.
-
Browse to and select your People file.
- Click Import.
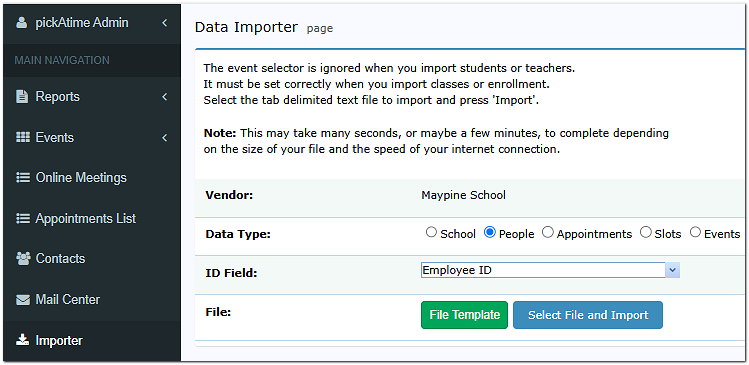
pickAtime will create a participant record for each person in the file.
Step 4: Verify the Import
After the import is complete:
-
Open the Contacts or People list (depending on your event configuration).
-
Confirm that:
-
All participants were imported.
-
Employee IDs appear correctly.
-
Names are spelled correctly.
-
No duplicate records exist.
-
Step 5: Test the Login
Before making the scheduler available:
-
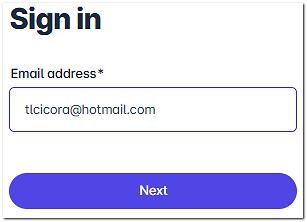
Open the Online Scheduler.
-
Enter the email and password for one of your imported participants.
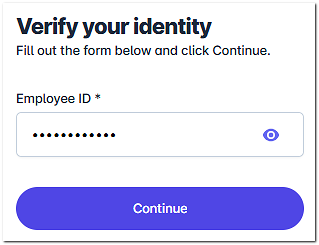
-
Enter the Employee ID.
-
Verify that the participant can successfully access the scheduler.
Managing Eligibility
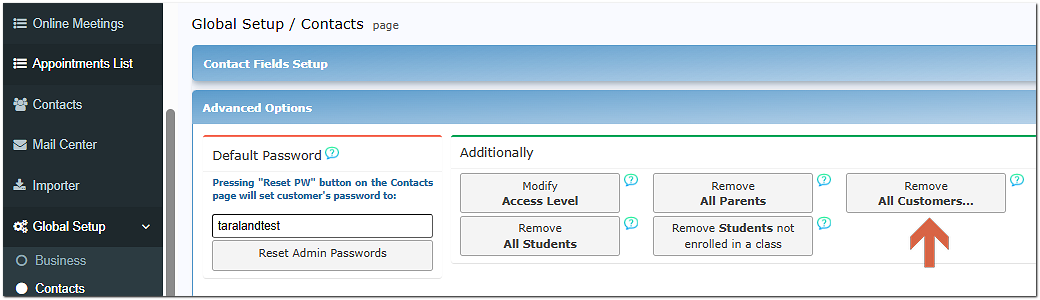
The imported People file acts as your eligibility list. However, anyone who is already on your account will still have access without needing their Employee ID. If this is not acceptable, then go to Global Setup/Contacts/Advanced Options/ Remove all Customers to remove all contacts before doing your import.
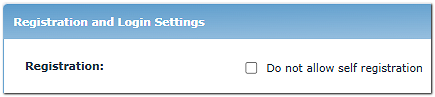
To keep your contacts from attempting to create new accounts, go to Registration and Login Settings (Located in Global Setup/Business/Registration and Login Settings) and select Registration.
Registration: Do not allow self-registration - Prevents new users from creating their own accounts. Access is available to customers who have been manually added or imported to the vendor account. Please note that this option is now automatically disabled when “Show the scheduler to users before they log in” is enabled.
Best Practices
-
Use Employee IDs that are already assigned by your organization.
-
Verify Employee IDs before importing.
-
Test with a few sample users before opening scheduling.
-
Keep your People file up to date as employees join or leave the organization.
-
Save a copy of your original spreadsheet for future updates.
Frequently Asked Questions
Can I import additional participant information?
Yes. You can include optional information such as email address, department, phone number, or location if those fields are supported by your event.
What happens if someone is not in the People file?
They will not be able to access the scheduler using Employee ID Login.
Can I update the eligibility list later?
Yes. You can import an updated People file at any time to add or update participant records.
Why isn't a participant able to log in?
Common causes include:
-
The Employee ID was entered incorrectly.
-
The participant was not included in the imported People file.
-
The Employee ID in the import file does not exactly match the ID being entered.
-
The People import did not complete successfully.
Events Preview Page
The Events Preview page is where you create, delete, and edit core event details.
At the top of the page is the Search Events bar.
Buttons
| Button | What it does |
|---|---|
| Add | Opens a form to create a new event |
| Delete | Deletes the selected event |
| Duplicate PTA | (Enabled only on request.) Creates a copy of an existing event, including its class and enrollment data — but not time slots. Best for events with unchanging rosters (e.g., full-year classes). |
| Edit Details | Opens a page to edit participant-facing event summary details |
| Go to Event | Opens Event Management for the selected event |
| Event Settings | Opens advanced event-level settings |
Adding a New Event
- Enter an Event Name.
- Select an Event Type:
PTA,Simple PTA,Normal, orRoster. - Select an Event Template — use one of pickAtime's built-in templates, or base it on an existing event.
- Select a Time Zone.
If you use an existing event as your template, the new event will inherit that event's time zone automatically.
All remaining fields are optional.
Edit Details
This page lets you add written details, links, or images for participants to see for this event.
Event Settings
The Event Settings page contains advanced configuration options for your events.
General Settings
| Setting | What it controls |
|---|---|
| Propagator Mode | Controls how broadly your changes apply — to only the current event, all events of the same type, or all events of the same category and type. See also here: Propagator Mode. |
| Events Sorting | Controls display order of events (see "Sort events by the following order" below) |
| Events Page Title | Customizes the title of your Events page (default: "Events") — e.g., rename to "Schools" or "Clinics" if your account spans multiple locations |
| Default List | Choose between showing all events at once, or showing "featured" events first (the event matching a parent's enrolled child) with a search bar for the rest |
| Sort Events By the Following Order | Drag fields to set the display order/hierarchy for events |
| Events Table Columns | Add, remove, or reorder columns shown on the Events Preview page |
| Allowed Timezones | Toggle between national and international time zone options |
Manage Categories for Events
Use Category Sort to group events into categories — useful for accounts with a high volume of events, to help participants navigate more easily.
| Setting | What it controls |
|---|---|
| Categories Page Title | Custom name for the Categories landing page |
| Allow customer to select category first | Requires participants to choose a category before seeing specific events |
| Category selector not displayed | Lets you build a direct URL to a specific category (based on the Category column on your event) |
| Events Categories | A management table to update, delete, or reorder categories across all events at once — affects how categories appear in the CUI |
Event Display Options
How to Access
In the Admin UI tool, open the event, go to the Settings / Online Scheduler Settings / Scheduler Settings, Scheduler Display section.
Formatting Options
You have five formatting options to choose from:
- Table * This is the only option for PTA events.
- Text
- List
- Vertical
- Date
Table - The Table Format features brighter colors for stronger visual contrast when comparing resources. This is the standard template used for Parent-Teacher Conferences.
Text - The Text Format is similar in structure to the Date Template but displays only one resource at a time. It offers a simplified viewing experience while maintaining a familiar layout.
List - The List Format presents available appointment times in a simple list format. This option works well for events where resources are hidden or when a minimal display is preferred.
Vertical - The Vertical Format displays one resource at a time in a clean, streamlined layout. Available appointment slots are presented in an attractive and easy-to-read format. This template works especially well for counselors, room checkout scheduling, and wellness appointments.
Date- The Date Format is a versatile and visually appealing scheduling option. All the information needed to select an appointment is displayed on a single page, allowing users to easily and quickly compare multiple resources without needing to filter through available slots. Common uses include office hour events, after-school scheduling, wellness appointments, special events, and more.
Paginator vs Calendar
In addition to the display options, you can also choose between the Calendar and Paginator.
The Calendar will display a day at a time, with the option to toggle between bates or to use a drop-down calendar.
The Paginator can cover multiple days at a time, allows you to toggle between dates, and has a drop-down.
Additional Features
Display the end time of each appointment slot displays the end time of the appointment.
Display # of slots per appointment time shows the number of available slots for the appointment time.
Global Setup
Global Setup / Business page
Business Settings |
|
|
Primary Contact |
Select the contact record of the person who will manage the vendor account. Usually, it is the Admin who created this vendor account. |
|
Billing Contact |
Select the contact record for the person designated to receive invoices and billing correspondence from pickAtime. |
|
Business Address |
Enter the physical or legal mailing address for the business. |
Account Level Settings |
|
|
Account Logo |
Upload your organization's logo to be displayed on the vendor account scheduling pages. |
|
Account URL |
|
|
Appointment URL for customer |
This is the primary scheduling link you will provide to customers (e.g., parents) to book appointments. |
|
Set custom URL |
Check the ‘Set custom URL’ box to personalize the link. You can define a custom slug in the designated field to make the URL more recognizable. |
|
Use ID field |
Enable this to restrict access to the scheduling URL. Customers will be required to enter a valid ID that matches a contact record previously imported into your account. |
Display Options |
|
|
Display Contact Name As |
Choose the format for contact names in Reports, the Appointment List, and the Event Management section (e.g., ‘Last, First’ or ‘First Last’). |
|
Date Display Format |
Select your preferred date format: ‘mm/dd/yy’ or ‘dd/mm/yy’. |
|
Time Display Format |
Select your preferred time format: ‘12-hour’ (AM/PM) or ‘24-hour’. |
|
Email notifications from |
Specify the sender name or email address that will appear on outgoing system notifications instead of pmail@pickatime.com. |
Miscellaneous |
|
|
Allow parents to attach and detach students |
Enable this to allow parents to manage and update their associated student list within their profile. |
|
Use First + Last Name as StudentID |
Enable this if you prefer parents to identify students by name rather than the school ID. This is recommended if parents are unlikely to know specific Student ID values. |
Integration Options |
|
|
Notification Contact(s) |
Select the individual(s) who will receive status updates and notifications regarding active integrations. |
|
Zoom Integration |
View the dedicated instructions page for details on connecting your Zoom account. |
|
Google Workspace Integration |
View the dedicated instructions page for details on connecting your Google Calendar and Workspace. |
|
Single Sign On (SSO) |
Select your SSO Provider from the dropdown menu. Additional setup steps will be required based on the provider selected. |
|
Admin UI is accessible only via SSO |
Warning: Enable this only after confirming your SSO configuration is fully functional; otherwise, you may be locked out of the Admin UI. |
|
Require customers to fill email |
Forces customers to provide an email address during booking if their imported contact record is missing one. |
|
Payments |
Select ‘Use Shopping Cart’ to allow participants to book multiple appointments and pay for them in a single transaction. Note: This setting applies to all events on the account that require payment. |
Registration and Login Settings |
|
|
Do not allow self-registration |
Prevents new users from creating their own accounts. Access is available to customers who have been manually added or imported to the vendor account. Please note that this option is now automatically disabled when “Show the scheduler to users before they log in” is enabled. |
Login |
|
|
Show the scheduler to users |
Determines if customers can view available events and time slots before or after logging in. Note: For a vendor account with the PTA event type, users must log in to view the scheduler. |
|
Allow login with external provider |
Enables the Sign In with Google option on the scheduling login page. This feature can be used when “Show scheduler before or after login” is enabled. |
|
Show the following message to Locked contacts |
Define the message displayed to users whose access level has been set to ‘Not Allowed’ on the Contacts page. |
Password Requirements |
|
|
Use strong password |
PickAtime passwords require a minimum of 8 characters and can only contain numbers, letters, and !@#$%&\/=_.,;: Activating this option also adds the following requirements: digits, Upper and Lower Case, and special characters. It also gives you access to the lower two options. |
|
Password must be changed every 90 days |
Requires participants to update their passwords every 90 days for enhanced security. |
|
Password must not be used for 10 rotations |
Prevents users from reusing any of their last 10 passwords. |
Advanced Settings |
|
|
Required Fields |
If ‘Force to fill required fields on the VUI’ is enabled, Administrators booking on behalf of customers must complete all mandatory contact/appointment fields. |
|
Vendor State |
Use this setting to deactivate your vendor account if you intend to stop using pickAtime services. |
Global Setup / Contacts
Use this section to configure custom prompts and registration forms. This allows you to collect essential information from participants (such as parents) when they first register or log in to your scheduling site.
See also the Collect Information from Customers page.
Advanced Options
Feature |
Functionality |
Instructions |
Notes |
|
Default Password |
Reset passwords for any contact except those with Administrator access. |
Navigate to the Contacts tab, search for the user, and click Reset PW. |
Change the global default password (e.g., 123456) under Global Setup / Contacts / Advanced Options. |
|
Reset Admin Passwords |
Resets passwords for all Admin levels (except the main Administrator) to the Default Password. |
Click the Reset Admin Passwords button. |
This will NOT reset passwords for Admins who have signed in within the last month. |
|
Modify Access Level |
Enables mass updates to Admin access levels. |
Select the new access level from the options provided. |
Often used to upgrade "Appointment Viewers" to "Appointment Makers" to enable the Block Schedule feature. |
|
Remove All Parents |
Deletes contact records with a ParentID value. |
Click the Remove All Parents button. |
Does not remove parents who have logged in during the last month. |
|
Remove All Customers |
Removes contacts from the database based on a selected access level. |
Select the access level in the pop-up; this removes that level and all lower levels. |
Will not remove contacts with future appointments or those who signed in during the previous month. |
|
Remove All Students |
Removes all students from the vendor account. |
Click the Remove All Students button. |
Excludes students enrolled in future classes or events active in the previous month. |
|
Remove Students not enrolled |
Deletes students who are not currently enrolled in any event. |
Click the Remove Students not enrolled button. |
Useful for removing mistaken imports or graduated students. |
Invoices
How Invoicing Works
Invoices are generated on the 3rd of each month, covering appointments booked during the previous month. You'll receive your invoice by email on that date, and it's also available in the Account Reports section at any time.
To view your invoices:
- Go to Reports / Account Reports.
- Select the Report labeled Account - Invoices and Payments
This displays a list of all your invoices and payments.
Can I Pay by Credit Card?
Yes:
- Go to pickatime.com and click Client Login.
- Log in with an administrative email address and password.
You'll land directly in the Reports section.
- Select the Account Reports radio button.
- Select the Report labeled Account - Invoices and Payments
- Click "Click Here" within the report.
- Select Pay by Credit Card.
Payment Details for Wire Transfers
Beneficiary Information
- Beneficiary: PickATime
- Beneficiary Address: 17307 NE 13th Place, Bellevue, WA 98008
Banking Information
- Bank: Bank of America
- Bank Address: 15600 NE 8th St STE A9, Bellevue, WA 98008
- Account Type: Checking
- Account #: 16436313
- Routing #: 125000024
- SWIFT code: BOFAUS3N
Insert Logo / Image / Document
Insert Logo / Image/document
PickAtime offers an option to upload your logo/image/document via our Insert Image feature in two different ways. You can add your logo via the Global Setup / Business page. You can also add images and documents to a number of sections within the CUI Messages or Notification Setup page.
File Types Accepted
File types for images: *.jpg; *.jpeg; *.png; *.gif;
File types for documents: *.doc; *.docx; *.pdf; *.txt; *.xls; *.xlsx
Option 1 - Upload a logo to your account:
- Go to Global Setup / Business, Account Level Settings, Account Logo
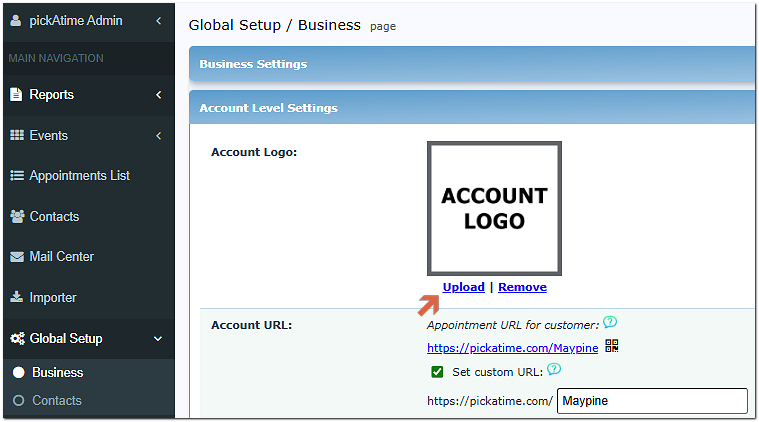
- Click on the upload button
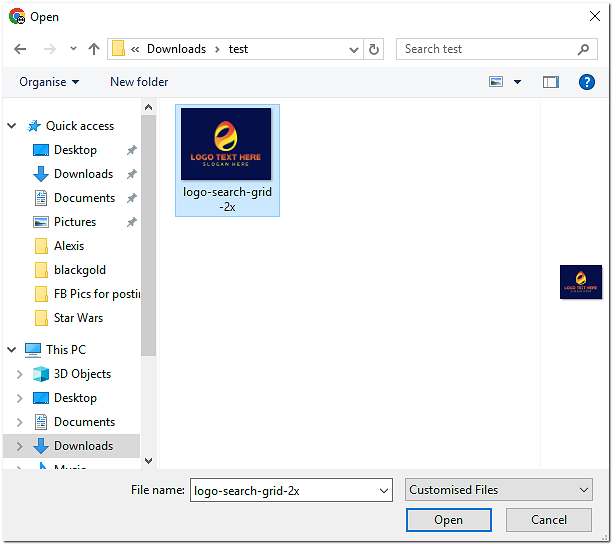
- You will then see a pop-up File Manager window, where you can choose a File on your PC and click the Upload button.
- Then you will see the Image window with the option to crop your image. Once you have finished cropping, click 'OK.'
- Your logo is now displayed on your account.
Option 2 - Upload a document to a hyperlinked item within an Email.
Let's say you would like to add the document to the Footer of the Confirmation Email.
If you want to attach the document to a hyperlinked text, do the following:
- Within the email, type the text that you want to hyperlink and then click the insert link option.
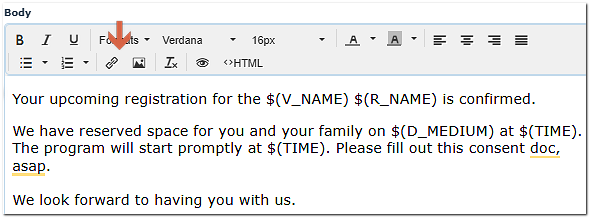
- Within the dialog box, click the file option.
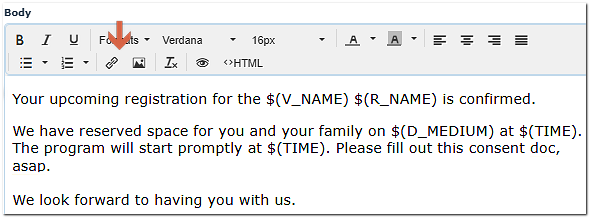
- Once you click on the Ok button, the File Manager will appear. Here, you can click on the Choose File button if your file is already uploaded and in our system.
- If you still need to select a file to upload, click Choose File, select your file, and then click the Upload button.
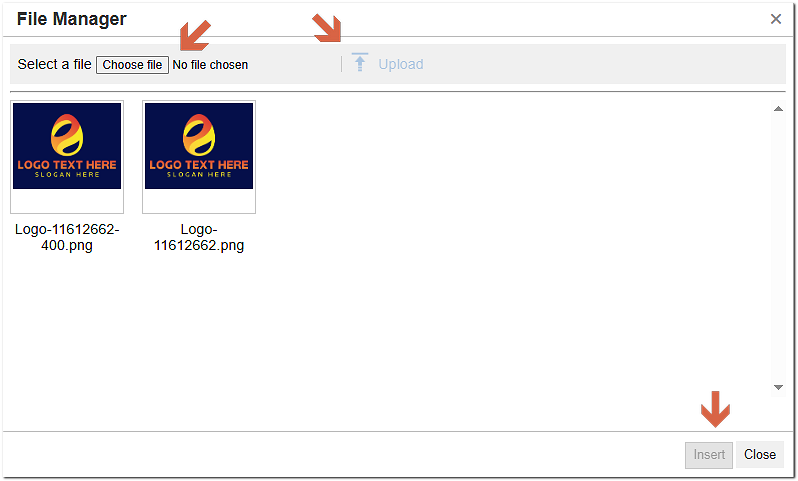
- Once your file is uploaded and in our system, click Insert.
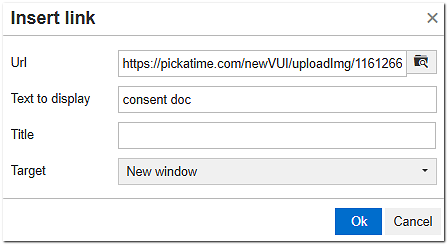
- Within the Insert link dialog box, make any changes to the Text to display and Title. If you want the document to open in a new window, click the ‘New Window’ option on the Target drop-down. Then click Ok.
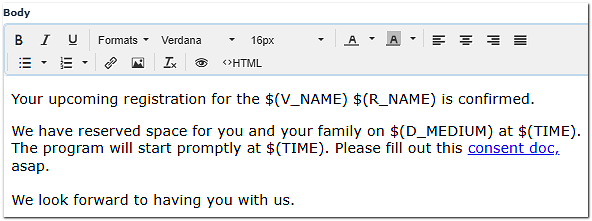
- Your text is now hyperlinked to the document.
Login Options
Standard Log in
This is the most frequently used login option. Your participants will create an account using their email and a password. You can also request additional information.
New Users
Your participants will create an account using the following steps.
- They will go to the scheduling link provided by your organization.

- Enter your email address and push the "Next" button.
- You will see the message "Your email address is not registered. Please click here to sign up."
- Enter your First and Last Name and your password, and then click the "Create your Free Account" button to create your account.
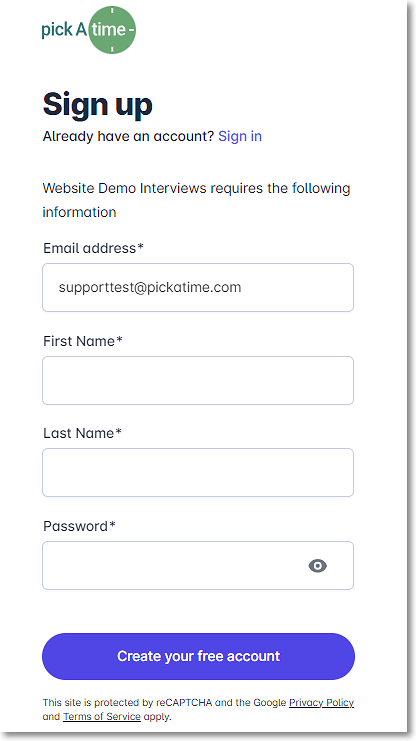
Current Users
- If you have previously registered, enter your email address and push the "Next" button, and you will be prompted to enter your password and then click "Sign In".
Forgotten Password
- If you have forgotten your password, you can click the Forgot Password button, and a new password will be emailed to you.
Single Sign-On Options
PickAtime offers Single Sign-On (SSO) options as well. You can use Blackbaud, FinalSite, Azure, or you can create your own portal. If you are interested in any of these options, please reach out to us at support@pickatime.com

Go to Global Setup/Business page, Integration Options section, and select your SSO Provider from the drop-down menu to see the SSO settings.
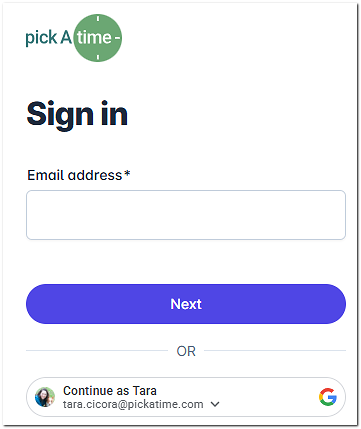
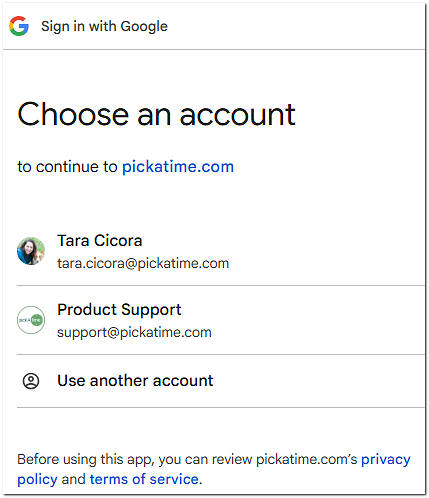
Allow login with external provider
This option can be accessed at Global Setup/Business page, Registration and Login Settings section.

When selected, this option will allow your participants to log in using their Google account.
Additional Settings and Options for logging in.
In addition to the above login options, there are additional options that can be used to enhance the current login options.
Use Id Field (Located in Global Setup/Business/Account Level Settings/Account URL)
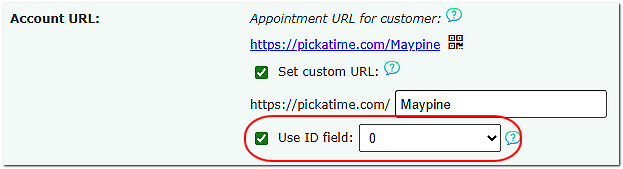
When this option is in use, participants also have to enter a unique ID (for example, an employee ID) after they enter their password or use Google to log in. ID fields are added on the Global Setup/Contacts page.
Registration and Login Settings (Located in Global Setup/Business/Registration and Login Settings)
Registration:
Do not allow self-registration - Prevents new users from creating their own accounts. Access is available to customers who have been manually added or imported to the vendor account. Please note that this option is now automatically disabled when “Show the scheduler to users before they log in” is enabled.
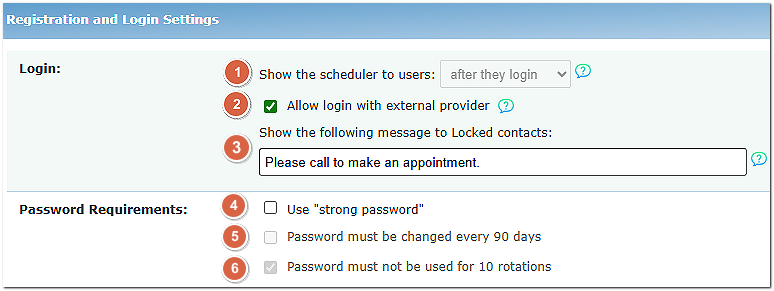
Login:
- Show the scheduler to users - This option allows you to decide if you want participants to see the appointment slots before or after they log in. For accounts that run PTA events, this option is not available to change.
- Allow login with external provider - When selected, this option will allow your participants to log in using their Google account. This feature can be used when “Show scheduler before or after login” is enabled.
- Show the following message to Locked contacts - In the Contacts section of the Admin UI, you can change the default access level of Allowed to Not Allowed for any contact. The Locked Out message will be displayed to any contact where you have set this access to ‘Not Allowed’.
Password Requirements:
- Use "strong password" - PickAtime passwords require a minimum of 8 characters and can only contain numbers, letters, and !@#$%&\/=_.,;: Activating this option also adds the following requirements: digits, Upper and Lower Case, and special characters. It also gives you access to the lower two options.
- Password must be changed every 90 days - Requires participants to change their passwords on a 90-day rotation.
- Password must not be used for 10 rotations - Participants must not reuse the same password within 10 rotations.
Macros
Macros
Macros let you pull specific customer and appointment data into your text messages and emails, so a single template can feel personally written for every recipient.
The Anatomy of a Macro
Every macro follows the same syntax:
| Part | Symbol |
|---|---|
| Trigger | $( |
| Field name | e.g., D_LONG |
| Closer | ) |
Complete syntax example: $(D_LONG)
How They Work
When a message is sent, the system scans the text for this syntax and replaces it with the actual data from that appointment or contact record.
| Use Case | Macro | Example Output |
|---|---|---|
| Formal date | $(D_LONG) |
October 17th, 2025 |
| Appointment time | $(TIME) |
2:15 PM |
| Customer name | $(C_NAME) |
Alex Rivera |
Example Usage
Dear $(C_NAME),

Your appointment is scheduled for $(TIME) on $(D_LONG).
Best Practices
Watch your punctuation. Macros insert text exactly where placed — Hello $(C_NAME), will render as Hello Alex Rivera, with the comma immediately following the name. Double-check spacing and punctuation around every macro.
Use the "Insert Macro" button. Rather than typing macros manually (which risks typos), use the Insert Macro button in your message editor — it provides a categorized list of every available field.
Always test before sending. Send a test message to yourself first. Some macro values (like a long address) can affect text wrapping in SMS or email.
Notification Setup Page
This page handles all of the notifications for your event. There are slight differences in the page setup depending on the type of event you use. Located in Events Management/Settings/ Notifications Setup.
The Email Fields for the Confirmation, Cancelation, and Reminder Emails |
|
|
Reply To Email Address |
This feature allows you to add an email address, should your participants reply to one of your emails. |
|
Subject |
The Email Subject for an individual confirmation email allows for customization |
|
Subject for Combine Email |
This feature is used when a participant books more than one appointment; pickAtime will combine the emails into one email, instead of sending multiple emails. In these situations, we use the "subject for combined email" for these combination emails. |
|
Insert Macro |
Insert Macro allows you to insert the correct macro for customization. Each email template is already preset with the general macro required for most events. Learn More About Macros. |
|
The email Header and Footer |
Your Header and Footer can be customized with the text, links, and graphics needed. |
|
The Email Body/ Printable Schedule |
By default, your Email’s body will be replaced with the Printable Schedule (note that the Printable Schedule is not an option for the Follow-up or Custom emails). Use of the Printable Schedule is often preferred, as the layout is cleaner to use. Changes to the Printable Schedule can be made in the Events Management / Settings / CUI Messages under the Printable Schedule section. |
|
Send the Confirmation and Cancellation Emails |
At the top of the Confirmation and Cancellation Email sections is the option to Send the Confirmation and Cancellation Emails must be checked for those emails to go out. |
|
Send the Reminder Email |
The option to Send the Reminder Email must be checked for those emails to go out. However, Admins can send reminder emails from the Appointments List even if reminders are disabled for the event. These will be labeled: “Sent Reminder Forced” within the Contact’s log. |
|
The Feature send the Reminder Emails at certain times |
Under this option is the option to add as many Reminder Emails as needed (there is no limit), at the time intervals that you need. |
The Email Fields for the Custom Emails |
|
|
Subject |
The Email Subject for an individual confirmation email allows for customization |
|
The email Header and Footer |
Your Header and Footer can be customized with the text, links, and graphics needed. |
|
The Email Body |
The Email Body can be customized with the text, links, and graphics needed. |
The Email Fields for Follow-Up Email |
|
|
Reply To Email Address |
This feature allows you to add an email address, should your participants reply to one of your emails. |
|
Send Follow-Up Emails |
The option to Send Follow-Up Emails must be checked for those emails to go out. You will then determine when you want the email to go out, either by the number of days post the appointment or on a specific date. |
|
Subject |
The Email Subject for an individual confirmation email allows for customization |
|
Subject for Combine Email |
This feature is used when a participant books more than one appointment; pickAtime will combine the emails into one email, instead of sending multiple emails. In these situations, we use the "subject for combined email" for these combination emails. |
|
The email Header and Footer |
Your Header and Footer can be customized with the text, links, and graphics needed. |
|
The Email Body |
The Email Body can be customized with the text, links, and graphics needed. |
SMS (Short Message Service) - Normal Events only |
|
|
Send SMS Reminder |
The option to Send SMS Reminder must be checked for those emails to go out. Under this option is the option to add the time interval that you need. You can only send one SMS message automatically per appointment. Additional SMS messages can be sent from the Appointment List Page. |
|
Insert Macro |
Insert Macro allows you to insert the correct macro for customization. Learn More About Macros. |
|
Reminder and SMS Custom sections |
Your Reminder and SMS Custom sections can be customized with the text; however, the limit for characters is 160. |
The Notifications Section
This section of the page handles the two notification options that pickAtime offers.
The Resource Notification Email will notify the Resource (the entity within the event that holds the appointment slots, this might be a teacher or a counselor) of when a participant books, changes, or cancels an appointment.
The Calendar Event Notification is the notification that goes out to participants for the purpose of being added to their calendar.
Resource Notification Email Section |
|
|
The For resources assigned to a contact, send appointment notification via email option. |
The option to check the For resources assigned to a contact, send appointment notification via email option. This option must be checked for emails to go out. |
|
Send copy of emails to (separate by ;) |
Send copy of emails to (separate by ;): option allows you to add the needed additional (non-resource) emails. |
|
Subject |
The Email Subject allows for customization |
|
Insert Macro |
Insert Macro allows you to insert the correct macro for customization. Each email template is already preset with the general macro required for most events. Learn More About Macros. |
|
The Confirmation Email Body and Cancellation Email Body sections |
Your Confirmation Email Body and Cancellation Email Body sections can be customized with the text, links, and graphics needed. |
Calendar Event Notification Section |
|
|
Title* |
Your Title* line allows for customization. |
|
Description |
The Description section of the notification is where you include the detailed information about the appointment. This section can be customized and may include:
|
|
Insert Macro |
Insert Macro allows you to insert the correct macro for customization. Learn More About Macros. |
|
Location* |
The Location* section is where you enter the event or appointment location details that participants will see when booking and in their confirmation materials. This field can include:
|
|
Calendar appointment file name |
The Calendar Appointment File Name is the name that will appear in your participants’ personal calendars (such as Google or Outlook) when they add their appointment. |
Propagate Settings
The Propagate Settings feature acts as a "global sync" for event configurations — letting you update settings across multiple events at once, instead of editing each one individually.
Where to find it: Go to Events Preview / Event Settings to see your current propagation scope.
How Propagation Works
Propagation is trigger-based, not a constant sync — changes only push to other events the moment you modify a setting.
Affected pages: Propagation only applies to changes made on:
- Settings / Online Scheduler Settings
- Settings / Vendor View Setup
- Settings / Notifications Setup
- Settings / CUI Messages
Scope options: You can choose how broadly a change applies:
- All events of the same type
- All events of the same category and type
- Only the current event (the "safety toggle" — use this to customize a single event without affecting others)
Best Practices
| If you want to... | Set propagation to... |
|---|---|
| Update an email template across all your events | "Propagate changes to all events" |
| Change the open/close dates for just this event | "Propagate to only current event" |
| Test a new setting before rolling it out everywhere | "Propagate to only current event" |
⚠️ Important: Always double-check this toggle before leaving the page. If global propagation is left on by mistake, a small change meant for one event could unintentionally overwrite settings across dozens of others.
SMS Messaging
1. Enabling the Service
SMS messaging is enabled upon request.
- Cost: 3¢ per text message sent
- Activation: Once enabled by our team, a new SMS section will appear under Notification Setup
2. Configuring the Automated Reminder
In Notification Setup → SMS, you can configure:
- Enable Reminders: Check the box to activate automated SMS reminders
- Custom Message: Enter your preferred reminder text
- Timing: Set how far in advance the message should send (e.g., 24 hours or 2 hours before the appointment)
⚠️ Character limit: Messages are limited to 160 characters — this includes macros (e.g.,
$(TIME)on$(D_MEDIUM)) after they've been expanded into full text, not their shorthand length.
3. The Participant Experience
Participants are not automatically enrolled in SMS reminders. During booking, they'll see an opt-in checkbox to request a text reminder.
If they check the box and provide a mobile number, their reminder is automatically queued for the time you've configured.
4. Sending Reminders "On Demand"
For manual blasts — e.g., a last-minute schedule change or weather delay — send directly from the Appointments List page:
- Filter your list by Event or Date.
- Select the participants you want to reach.
- Click Send SMS and broadcast your message.
Note: This only reaches participants who originally opted in to SMS notifications — it won't reach anyone who didn't check the box during booking.
SMS Best Practices
Keep it brief. With only 160 characters, focus on the essentials: Who, When, Where.
Example message:
Reminder: Your appointment is at $(TIME) on $(D_MEDIUM) at the $(LOCATION). Please arrive 5 mins early. Scheduler Settings Pages
Online Scheduler Settings (PTA Product)
Booking Settings |
|
Booking Window |
|
|
Booking Opens |
Select the date and time you would like the scheduler to open for participants. |
|
Booking Closes |
Select the date and time the scheduler should close and no longer accept bookings. |
|
Admins can access the scheduler at any time |
Check this to ensure Administrators can access the scheduler even when it is closed to the public. |
For schedulers with multiple booking dates, close booking: |
|
|
Close booking at a specific time of day, XX days before the appointment. |
|
|
Close booking XX hours/days/weeks/months before the appointment |
|
|
Close booking XX hours before the first appointment of the day. |
|
Booking Limits: |
|
|
Maximum per Event |
Sets a total limit on the number of appointments allowed for the entire event. Set to 0 for no limits. |
|
Maximum Per Child |
Sets a cap on the number of appointments allowed for each individual student. Set to 0 for no limits. |
|
One appointment per teacher per student |
Restricts parents to one booking per teacher, regardless of the number of classes or students involved. |
|
One appointment per class |
Restricts bookings to one per class, even if multiple students from the same family are enrolled in it. |
|
Allow back-to-back |
When disabled, the system prevents consecutive bookings with different teachers to allow for travel time. |
Cancellation Policy |
|
|
Customer may cancel their appointment up to XX hours/days/weeks. |
Use this setting to prevent participants from cancelling their appointments within a specific timeframe (hours, days, or weeks) before the scheduled start time. Set this value to 0 if you wish to allow cancellations up until the last minute. Conversely, a very high value effectively disables the cancellation option for participants. Note: Closing the scheduler only prevents new bookings; it does not stop participants from cancelling existing appointments unless this lock-out period is active. |
Share Your Scheduler |
|
Scheduling Link |
|
|
Account Scheduling Link |
Displays all available events on the scheduler. If you have only one open event on the vendor account, we recommend that you use the Scheduling link for the account. |
|
Event Scheduling Link |
Displays the scheduler of the selected event with the ability to select other available events on this account. |
|
Customize the event link |
Allows you to customise the scheduling link for the selected event parameter. |
|
Scheduling link for the category |
Displays the scheduler with the list of event(s) of the selected category. |
Display Settings |
|
Scheduler Display |
|
Initial Table Layout: |
|
|
Condensed |
Compact layout with variable time steps — good for smaller screens or quickly browsing availability |
|
Expanded |
Fixed time intervals in a traditional layout — easier for comparing exact appointment lengths/gaps |
Navigation Style: |
|
|
Display calendar to navigate over dates |
Displays a calendar interface to help users browse different dates easily. |
|
Display paginator to navigate over dates |
Allows the display of multiple dates with slots on one page. |
Scheduler Display Limits |
|
|
Display X weeks/days of slots |
Determines the volume of days or weeks visible to the customer at one time. |
Teacher Display |
|
|
Display description |
Add Teacher Description to the teacher’s legend on the CUI. |
|
Separate legend for each child (Regular PTA only) |
Generates an individual schedule legend for each student for better clarity. |
|
Display class names |
Enable this to show specific class names alongside teacher names on the scheduler. Note, if a student is enrolled in multiple classes with the same instructor, the teacher will be listed individually for each class. This allows parents to book a separate appointment for each specific teacher/class combination. |
|
Teacher groups |
Group teachers by categories (e.g., Lower School vs. Upper School) to simplify the selection process. |
ADVANCED SETTINGS |
|
|
Online Meeting Provider |
Select the integrated video conferencing tool (Zoom, Google, MS Teams) to be used for virtual appointments. |
|
Allow a parent to make conflicting appointments for themselves |
Enables parents to book multiple appointments that occur at the same time. |
|
Allow customers to see and cancel past appointments |
Lets parents view/cancel appointments that have already passed |
|
Don't allow customers to change appointment time |
Prevents parents from rescheduling once booked |
Online Scheduler Settings (Event Scheduling)
Booking Settings |
|
Booking Window |
|
|
Booking Opens |
Select the date and time you would like the scheduler to open for participants. |
|
Booking Closes |
Select the date and time the scheduler should close and no longer accept bookings. |
|
Admins can access the scheduler at any time |
Check this to ensure Administrators can access the scheduler even when it is closed to the public. |
For schedulers with multiple booking dates, close booking: |
|
|
Close booking at a specific time of day, XX days before the appointment. |
|
|
Close booking XX hours/days/weeks/months before the appointment |
|
|
Close booking XX hours before the first appointment of the day. |
|
Booking Limits: |
|
|
Maximum per Event |
Sets a total limit on the number of appointments allowed for the entire event. Set to 0 for no limits. |
|
Maximum Per Child |
Sets a cap on the number of appointments allowed for each individual student. Set to 0 for no limits. |
|
Duration between appointments |
Enter a duration to prevent customers from booking too frequently. If a customer attempts to book within this window, they will see your custom "Cannot Book" message. |
|
per resource |
Restricts the frequency of bookings with a specific staff member or room. Select this to allow customers to book again quickly as long as they choose a different resource. |
Cancellation Policy |
|
|
Customer may cancel their appointment up to XX hours/days/weeks. |
Use this setting to prevent participants from cancelling their appointments within a specific timeframe (hours, days, or weeks) before the scheduled start time. Set this value to 0 if you wish to allow cancellations up until the last minute. Conversely, a very high value effectively disables the cancellation option for participants. Note: Closing the scheduler only prevents new bookings; it does not stop participants from cancelling existing appointments unless this lock-out period is active. |
Share Your Scheduler |
|
Scheduling Link |
|
|
Account Scheduling Link |
Displays all available events on the scheduler. If you have only one open event on the vendor account, we recommend that you use the Scheduling link for the account. |
|
Event Scheduling Link |
Displays the scheduler of the selected event with the ability to select other available events on this account. |
|
Customize the event link |
Allows you to customise the scheduling link for the selected event parameter. |
|
Scheduling link for the category |
Displays the scheduler with the list of event(s) of the selected category. |
Display Settings |
|
Scheduler Display |
|
|
Display Scheduler in a: date, text, list, vertical, table format |
There are five ways you can display your slots.
|
|
Display calendar to navigate over dates |
Displays a calendar interface to help users browse different dates easily. |
|
Display paginator to navigate over dates |
Allows to display of multiple dates with slots on one page. |
|
Shows end times |
Displays the end time of the slot. |
|
Show Number of Available Openings |
Show the number of appointment slots for the appointment time. |
|
Display X weeks/days of slots on the scheduling page with a max capacity of XXX slots per day |
Determines the volume of days or weeks visible to the customer at one time. |
|
Display X days of time slots |
Enter a value here if you would like to display only a certain number of days/weeks/months to your customer. |
|
Limit visible openings to x per slot and reveal the next available slot when xx% of slots are booked |
This will allow you to initially display only part of the available appointments per slot on the online scheduler. You can set the number of slots you would like initially to show up on the scheduler. The default is set to 100%, but can be adjusted. Once your selected % of slots is booked, the rest will open up. |
Resource DisplayNote: different options will appear depending on the selected scheduler display format |
|
|
Hide resources on the Scheduling Page |
When using the Text, Vertical, or List displays, these options appear to allow you to show or hide the resources for your participants. |
|
Resource selection format (only active if the resources are NOT hidden): |
When using the Text, Vertical, or List displays, you can opt to show the resources in a drop-down, vertically or as buttons. |
|
Custom label for Resource |
Create a custom label for Resource |
|
Display resource description |
When using the Table or Date display, you can add the description to the resource’s legend on the CUI. |
|
Display room |
When using the Table or Date display, the scheduler will show the Room value on the scheduler in the list of resources, next to the resource’s name. |
ADVANCED SETTINGS |
|
|
Online Meeting Provider |
Select the integrated video conferencing tool (Zoom, Google, MS Teams) to be used for virtual appointments. |
Multiple Appointment Booking |
|
|
Allow customers to take multiple slots |
This allows your customer to book more than one slot per appointment time. |
|
Allow overlapping appointments |
Enables customers to book multiple appointments that occur at the same time. |
Appointment Changes |
|
|
Allow customers to see and cancel past appointments |
Permits users to view their history and manage appointments that have already passed. |
|
Don't allow customers to change appointment time |
Removes the ability for participants to reschedule their existing appointment times. |
Appointment Limit for Resources: A resource is whoever or whatever holds the slots - staff, a room, or any entity you choose. |
|
|
Maximum appointments per resource per day |
Limits how many appointments a single resource (e.g., a teacher) can accept daily, regardless of total available slots. Set to 0 for no limits. |
|
Student Selection |
Require parents to select their student's name from a dropdown menu. (Note: This requires student data to be imported first.) |
|
Allow customers to select a timezone from the list of allowed timezones |
Check if you want to display a drop-down of time zones to your customers so that they can change the time zone they can view and book their slots in. |
Admin View Settings page
Appointment Tab Settings |
|
|
Resources Display: |
Will show resources on the right-hand side |
|
Slot Generator: |
Check this box if you would like Admins to see the "Appointment type" dropdown in the Slot Generator and Slot Updater pop-ups. By default, the “appointment type” is set to ‘in-person’, so you do not have to activate this option unless you need ‘virtual’ appointments. |
Appointments Display: |
|
|
Show custom appointment fields in the left-hand sidebar |
If this box is checked, then your service will appear in the appointments box. |
|
Show appointment fields on the left-hand side |
This will display your appointment fields on the left-hand side of the appointments page. |
|
When multiple appointments are in slot, sort by |
This allows you to sort by names or the creation date. |
Appointments Creation: |
|
|
Create a new contact if the person is not found in the system |
If this box is checked when you use the appointments page and book an appointment for a new contact, that contact will be added as a new contact on the vendor account. |
Appointments Grid: |
|
|
Start Display at: |
Determines at what time your scroll bar begins (on a 24-hour clock) |
|
End Display at: |
Determines at what time your scroll bar ends (on a 24-hour clock) |
|
Draw Time Label Every: |
Determines the time interval drawn on the view bar of the appointments page on the VUI and CUI (when the table option is selected). |
|
Draw Gray Indicator Line Every: |
Determines the time interval during which the gray line is drawn on the view bar. |
|
Minimal slots height: |
Determines the slot height. |
|
Adjust automatically |
When checked, the system will automatically adjust depending on the duration of the created slots. |